He's Not Dead!

He's resting.
Pining for the fjords.
But he's still cooking. So maybe I'll just leave all these recipes here. Until I get motivated to record the hilarious anecdotes which go with them.
Thai Potato Curry
oriental thai curry veg vegan
I'm not sure how authentically Thai Caroline Phelp's recipe is.
But the combination of soy sauce and coconut definitely has the right ethnic savour.
I made this without the final onions, replaced the coconut milk with grated coconut cream and a splash of actual cream, and used a smaller volume of pork stock instead of the vegetable broth (take that vegetarians!). Although I did use a little generic curry powder (I was cooking for Philistines) I also added extra half teaspoons of coriander, turmeric, fenugreek and cumin powder.
And it was very good.
Best let it simmer over a low heat for 30 minutes to soften the potatoes completely.
Serves 2-4
Ingredients
- 2 tablespoons vegetable oil (or other neutral oil) or add a little butter
- 2 garlic cloves (minced)
- 1 tablespoon ginger (peeled and finely chopped)
- ½ teaspoon coriander powder or 1 teaspoon
- ½ teaspoon of cumin powder optional
- ½ teaspoon of fenugreek powder optional
- ½ teaspoon of turmeric optional
- 1 cup organic coconut milk or grated coconut cream
- 8 ounces potatoes (peeled and cut into 1-inch cubes) or a bit chunkier
- 2 tablespoons soy sauce
- 1 teaspoon sugar
- ½ teaspoon kosher salt
- 1 tablespoon curry powder or less
- ½ cup vegetable broth or just enough to moisten
- 8 ounces onions (thinly sliced)
In a medium sized pot over medium-high heat, add oil, garlic, ginger and coriander powder.
Cook for 1 minute while stirring, until garlic becomes fragrant.
Add vegetable broth and bring back to a boil.
Cook for 1 minute while stirring, until garlic becomes fragrant.
Nah. First add the ginger and fry a little, then the garlic, then the potatoes, then the powders and shake and fry until the spices no longer smell so raw.
Add coconut milk and stir – then add potatoes, soy sauce, sugar, salt and curry powder. Stir and bring to a gentle boil.Add vegetable broth and bring back to a boil.
Add the soy sauce, throw over the sugar and grated coconut cream then moisten with a little double cream and pork stock.
A blob of butter makes a nice addition too.
Add onions, stir, cover and simmer for 15-20 thirty! minutes, until potatoes are tender. Serve with rice.
Not sure about the onions, but sure - if you must.
Otherwise, rather tasty.
You want a really thick rich sauce coating the well-softened potatoes with here and there a nicely caramelized crust on the bottom. So don't add too much liquid, leave it tightly covered over a very low heat and don't let it burn. Too much.
Otherwise, rather tasty.
You want a really thick rich sauce coating the well-softened potatoes with here and there a nicely caramelized crust on the bottom. So don't add too much liquid, leave it tightly covered over a very low heat and don't let it burn. Too much.
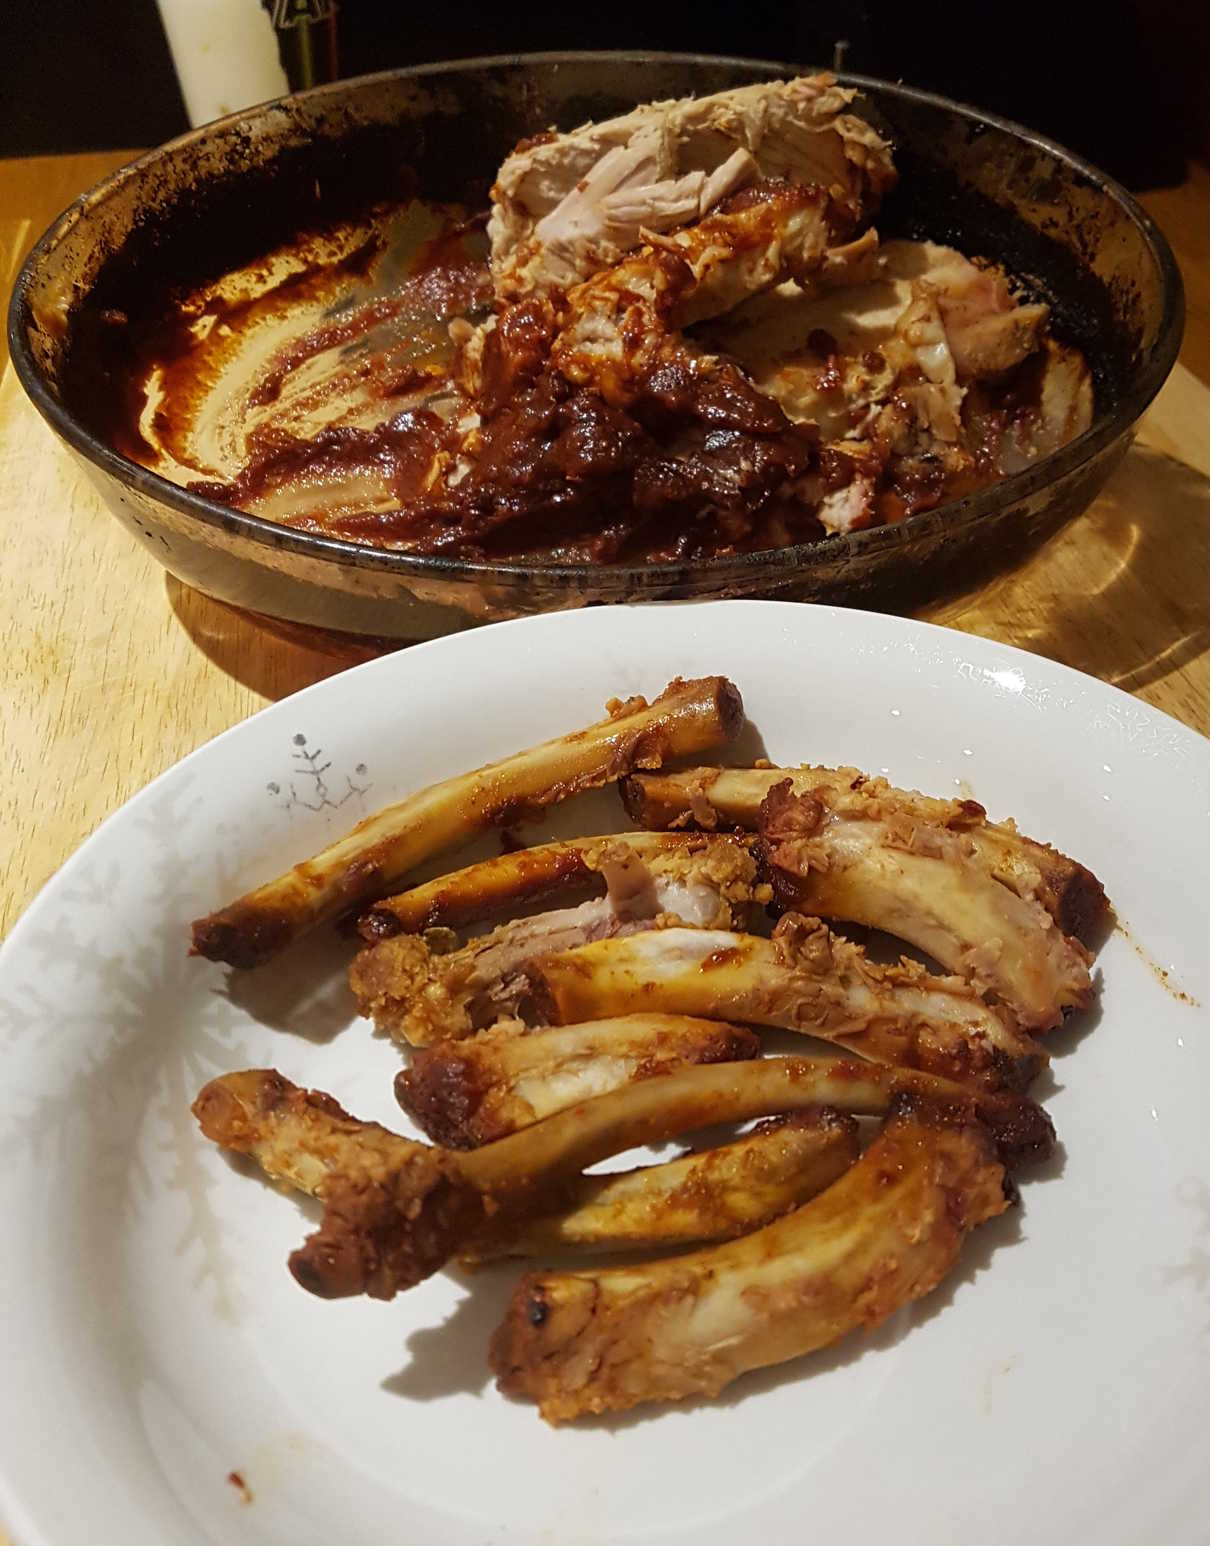
Really Sticky Ribs
main meat
Comments on the original recipe do recommend using less passata.
These were so good they were all eaten before I had a chance to photograph them. Well that's my story. So enjoy this picture of the bones.
These were so good they were all eaten before I had a chance to photograph them. Well that's my story. So enjoy this picture of the bones.
Serves 6
Ingredients
- 500g carton passata or 2 tins of tomatoes, blended
- 2 garlic cloves , crushed
- 2 tbsp reduced-salt soy sauce What the fuck is reduced salt?
- 1 tbsp Worcestershire sauce
- a tablespoon or so of smoked paprika
- a tablespoons or two of oil
- 1kg small, lean pork ribs
- 3 tbsp honey
Heat oven to 200°C/fan 180°C/gas 6. In a large bowl, mix together the passata, garlic, soy sauce, honey and Worcestershire sauce.
Remove foil from tray and bake the ribs for a further 45-60 mins, turning them a couple of times, until sticky and almost all of the sauce has disappeared. To make ahead, cook or half-cook the ribs the night before and keep in the fridge until needed.
I heated the sauce to barely simmering in a pan to roll the ribs around in before transferring it all to the roasting tin.
I might have added paprika and a splash of oil.
Add the pork ribs to the bowl and mix well to coat evenly. Lay the ribs and all the sauce into a large, shallow roasting tin. Cover with foil and bake for 35 mins.I might have added paprika and a splash of oil.
Remove foil from tray and bake the ribs for a further 45-60 mins, turning them a couple of times, until sticky and almost all of the sauce has disappeared. To make ahead, cook or half-cook the ribs the night before and keep in the fridge until needed.
Rather good.
I worked mine around roasting a pork joint, so they cooked at a lower temperature for longer before finishing at the higher temperature.
I worked mine around roasting a pork joint, so they cooked at a lower temperature for longer before finishing at the higher temperature.
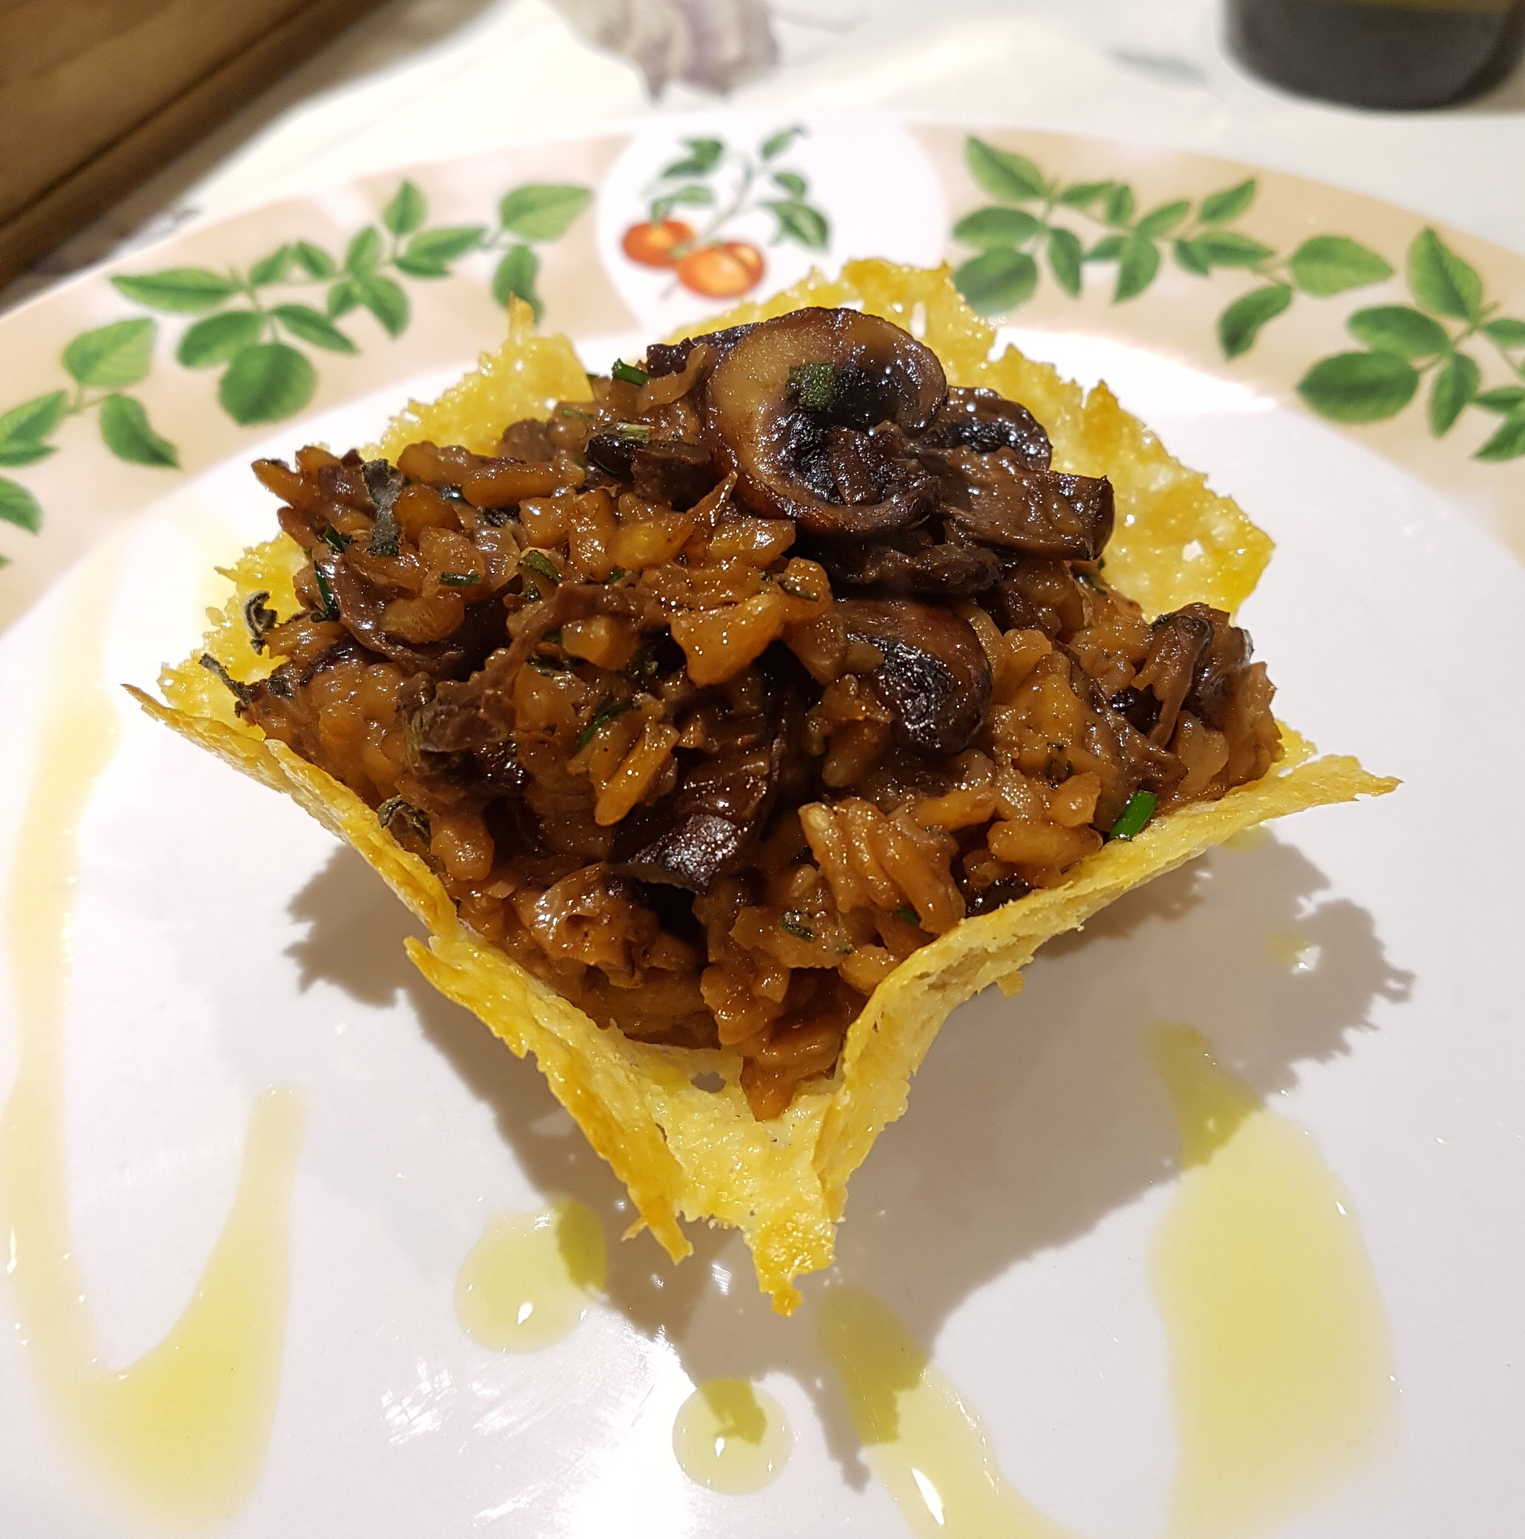
Mushroom Risotto with Truffled Pecorino
main veg
I had truffled pecorino left over from Christmas so this is what I thought to do with it.
For extra style points, serve them in bowls made of crispy parmesan.
I later found a recipe which added sage to the risotto, which might have been nice. I should try that!
I later found a recipe which added sage to the risotto, which might have been nice. I should try that!
Tried it. It was rubbish. Well, no real improvement.
Serves 4
Ingredients
- 1-1½oz/30-50g dried wild mushrooms (such as morels or porcini)
- butter & olive oil for frying
- 1 cup finely chopped shallots about 3-4 banana shallots
- 3-4 garlic cloves, minced
- half a dozen (200g/6 oz) fresh baby bella or cremini mushrooms, sliced
- 4 cups chicken broth
- 1½ cups arborio or carnaroli rice
- 1 cup white wine
- ½ teaspoon salt
- 1 cup (150g/5 oz) finely grated pecorino with truffles
- Freshly ground black pepper
- Fresh chopped parsley or chives (optional)
- 1 tablespoon chopped sage?
For the Parmesan serving bowl(s):- couple cups grated Parmesan
Steep the dried mushrooms in hot water for an hour.
You can make the Parmesan bowls now, if you want to use them:
For each bowl take about half a cup of grated Parmesan and make a thin, circular layer of cheese on a sheet of baking parchment or better, silicon baking paper. Put into a Gas Mark 6 oven for about 5 minutes until the disks melt, bubble, then stop bubbling and start to darken to a wheat colour. Remove them and lay them over an inverted bowl to set in shape. If you got the cooking time right they should set to a crisp. If you took them out too soon they'll still be chewy.
Now strain the rehydrated mushrooms, rinsing them to clean them in a little more hot water and keeping all the liquid. Slice up the mushrooms. Finally strain the liquid through muslin, a paper towel or a coffee filter to remove the grit.
Heat the stock and mushroom liquid together and have them just simmering in a covered pot at the side while you make the risotto.
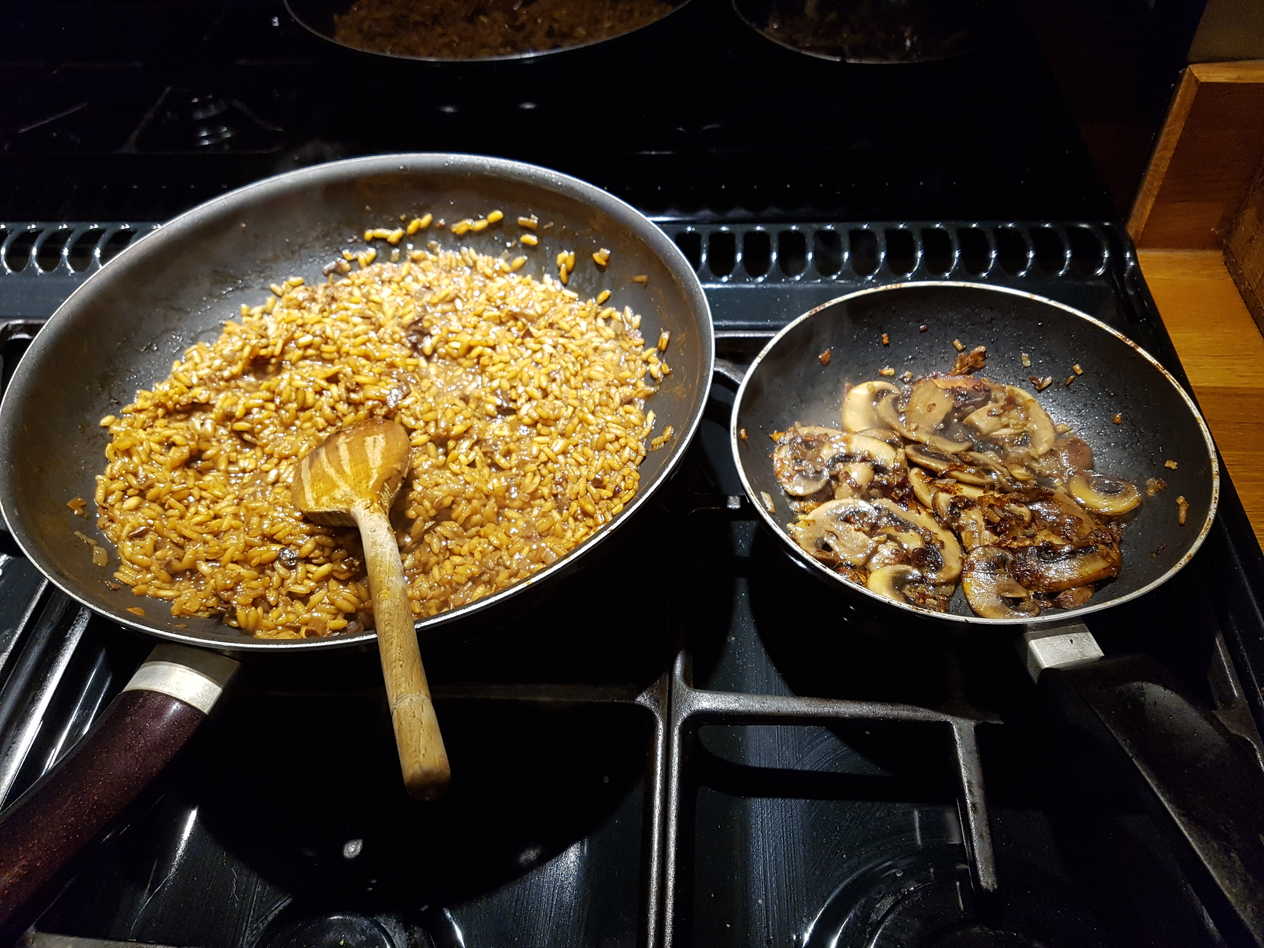
Melt a couple of tablespoons of butter with a couple of olive oil in a wide, deep skillet. Add ¾ of the shallots and sauté them over a medium/low heat for a few minutes until they soften and turn translucent without colouring. Add the garlic and stir, then the rice and stir to coat all the grains. Add the salt. After a couple of minutes add the chopped dried mushrooms and the wine, and bubble off the liquid, then begin adding the hot stock a ladle at time to the rice, slowly cooking the mixture dry each time. This should take 20-30 minutes until the rice is done. Stop at this point even if you have stock left over.
Stir in chopped sage now if you like.
Meanwhile in a smaller frying pan heat butter and olive oil and fry the remaining shallots over quite a high heat until they begin to brown. Add the sliced mushrooms and continue cooking until they too take on colour. Add more butter if the pan gets too dry.
Remove the risotto from the heat, stir in a couple of chunks of butter and the grated pecorino.
Ladle into Parmesan bowls, or regular ceramic ones, and top each serving with a portion of the reserved fried mushrooms, fresh black pepper, and, if desired, chopped fresh parsley or chives.
Serve promptly.
You can make the Parmesan bowls now, if you want to use them:
For each bowl take about half a cup of grated Parmesan and make a thin, circular layer of cheese on a sheet of baking parchment or better, silicon baking paper. Put into a Gas Mark 6 oven for about 5 minutes until the disks melt, bubble, then stop bubbling and start to darken to a wheat colour. Remove them and lay them over an inverted bowl to set in shape. If you got the cooking time right they should set to a crisp. If you took them out too soon they'll still be chewy.
One online recipe
cooks them for 30 seconds in a microwave, which might work in a professional kitchen,
but in my domestic microwave only a small circle in the middle of the disk melted and bubbled. The rest of the cheese did nothing.
Now strain the rehydrated mushrooms, rinsing them to clean them in a little more hot water and keeping all the liquid. Slice up the mushrooms. Finally strain the liquid through muslin, a paper towel or a coffee filter to remove the grit.
Heat the stock and mushroom liquid together and have them just simmering in a covered pot at the side while you make the risotto.
Melt a couple of tablespoons of butter with a couple of olive oil in a wide, deep skillet. Add ¾ of the shallots and sauté them over a medium/low heat for a few minutes until they soften and turn translucent without colouring. Add the garlic and stir, then the rice and stir to coat all the grains. Add the salt. After a couple of minutes add the chopped dried mushrooms and the wine, and bubble off the liquid, then begin adding the hot stock a ladle at time to the rice, slowly cooking the mixture dry each time. This should take 20-30 minutes until the rice is done. Stop at this point even if you have stock left over.
Stir in chopped sage now if you like.
Meanwhile in a smaller frying pan heat butter and olive oil and fry the remaining shallots over quite a high heat until they begin to brown. Add the sliced mushrooms and continue cooking until they too take on colour. Add more butter if the pan gets too dry.
Remove the risotto from the heat, stir in a couple of chunks of butter and the grated pecorino.
Ladle into Parmesan bowls, or regular ceramic ones, and top each serving with a portion of the reserved fried mushrooms, fresh black pepper, and, if desired, chopped fresh parsley or chives.
Serve promptly.
The flavour is good, but a little flat, slightly dead. It needs something to lighten it and lift it.
A grating of lemon peel? Lemon oil? How would I make lemon oil?
Maybe the suggested sage would be sufficient?
A grating of lemon peel? Lemon oil? How would I make lemon oil?
Maybe the suggested sage would be sufficient?
Yeah, that doesn't quite do it. It doesn't significantly change the flavour profile.
Back to the lemon...
Back to the lemon...
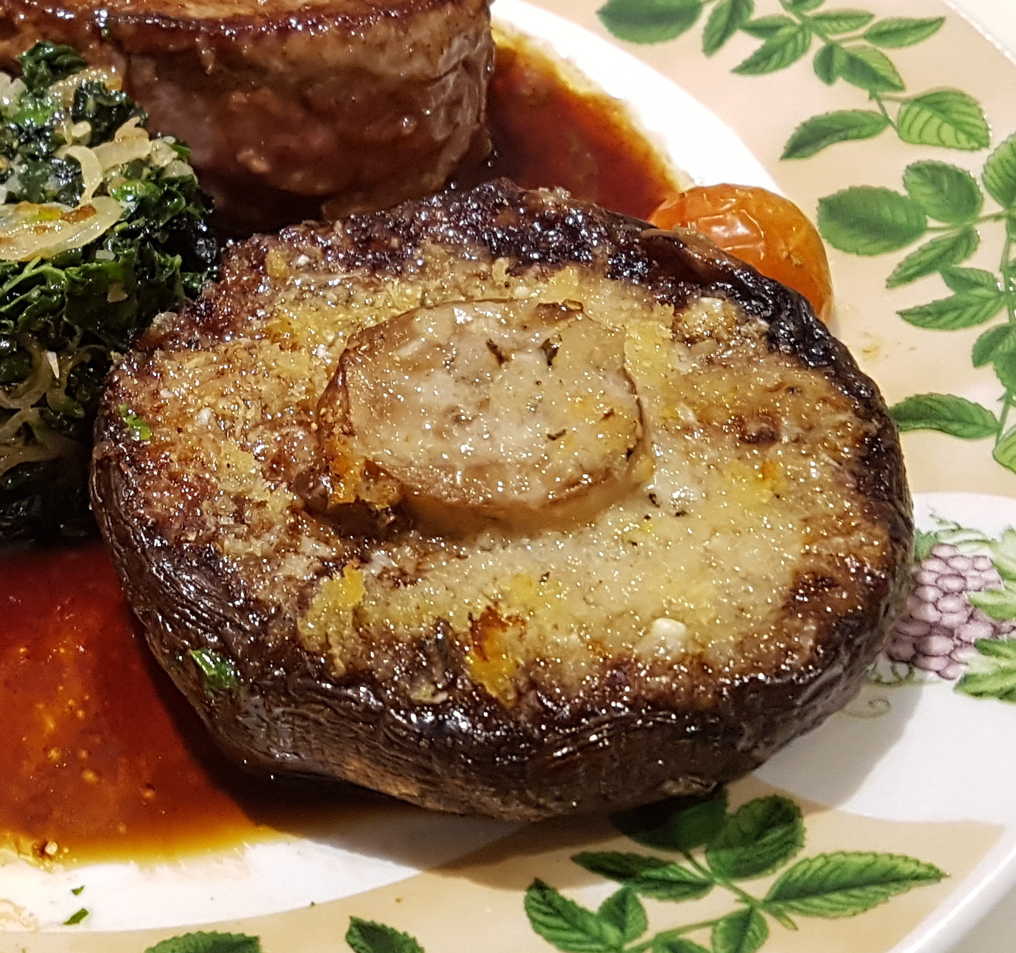
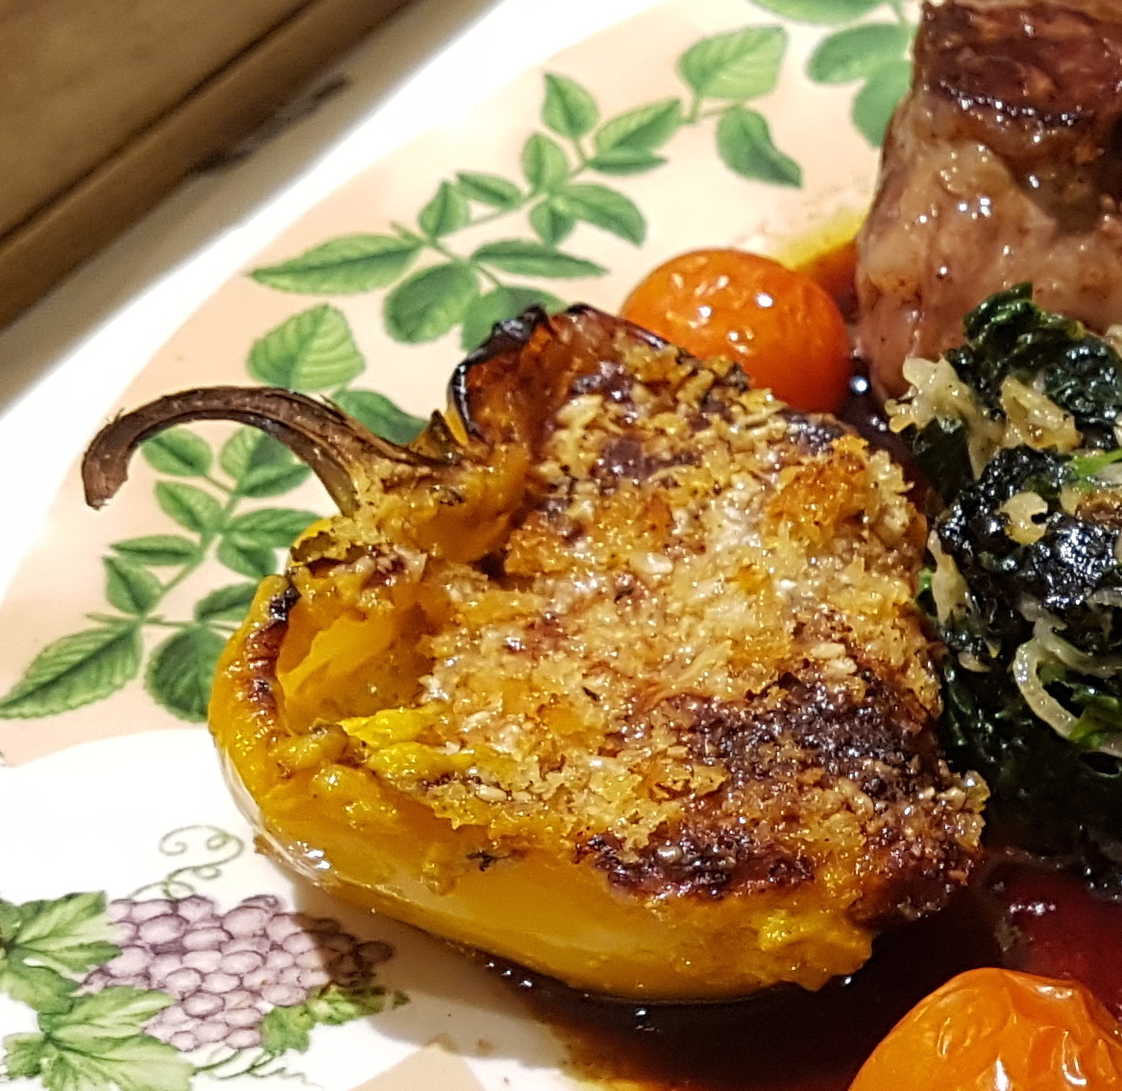
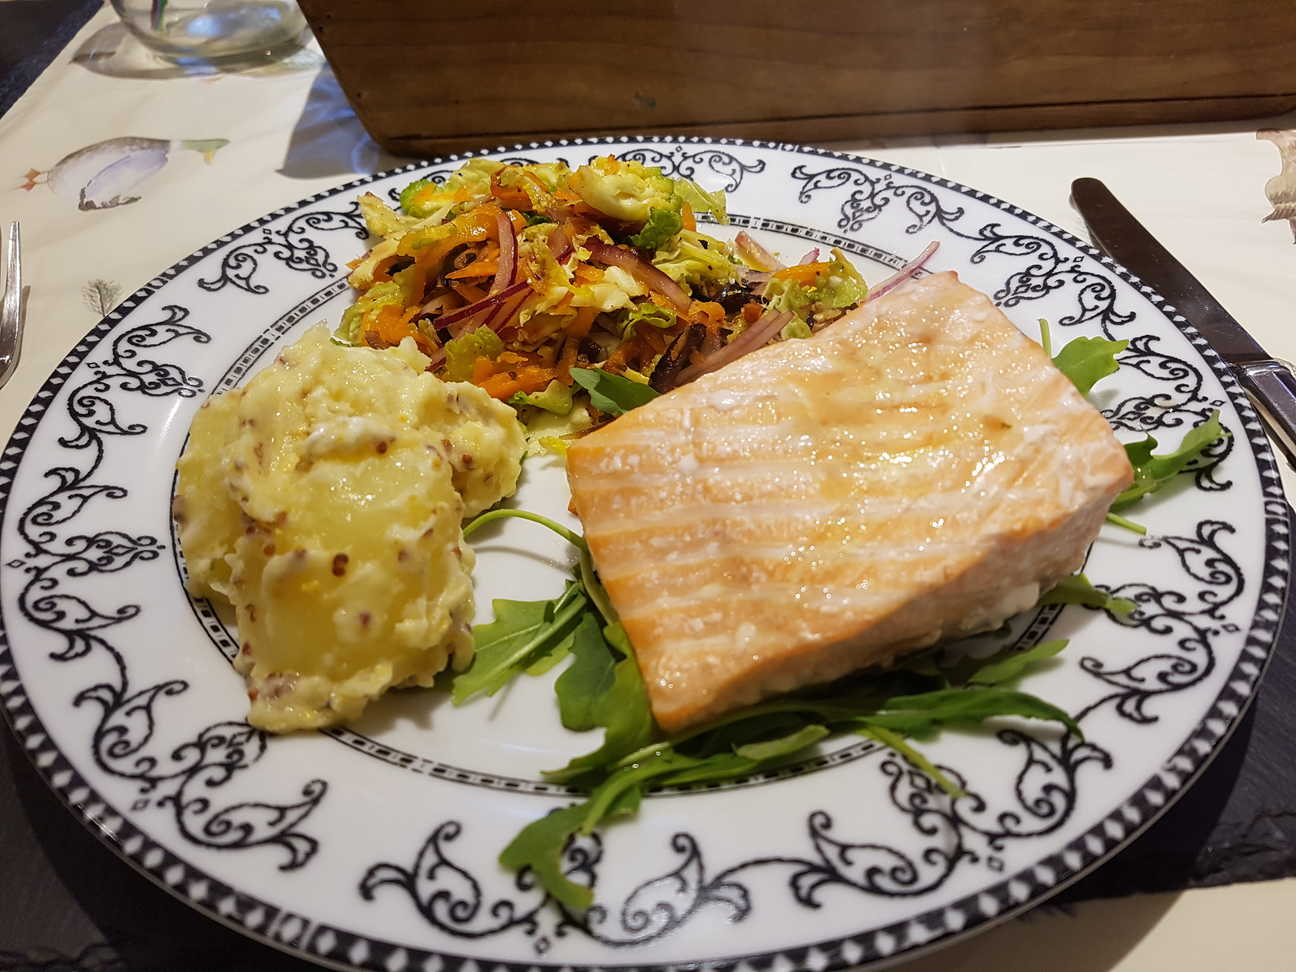
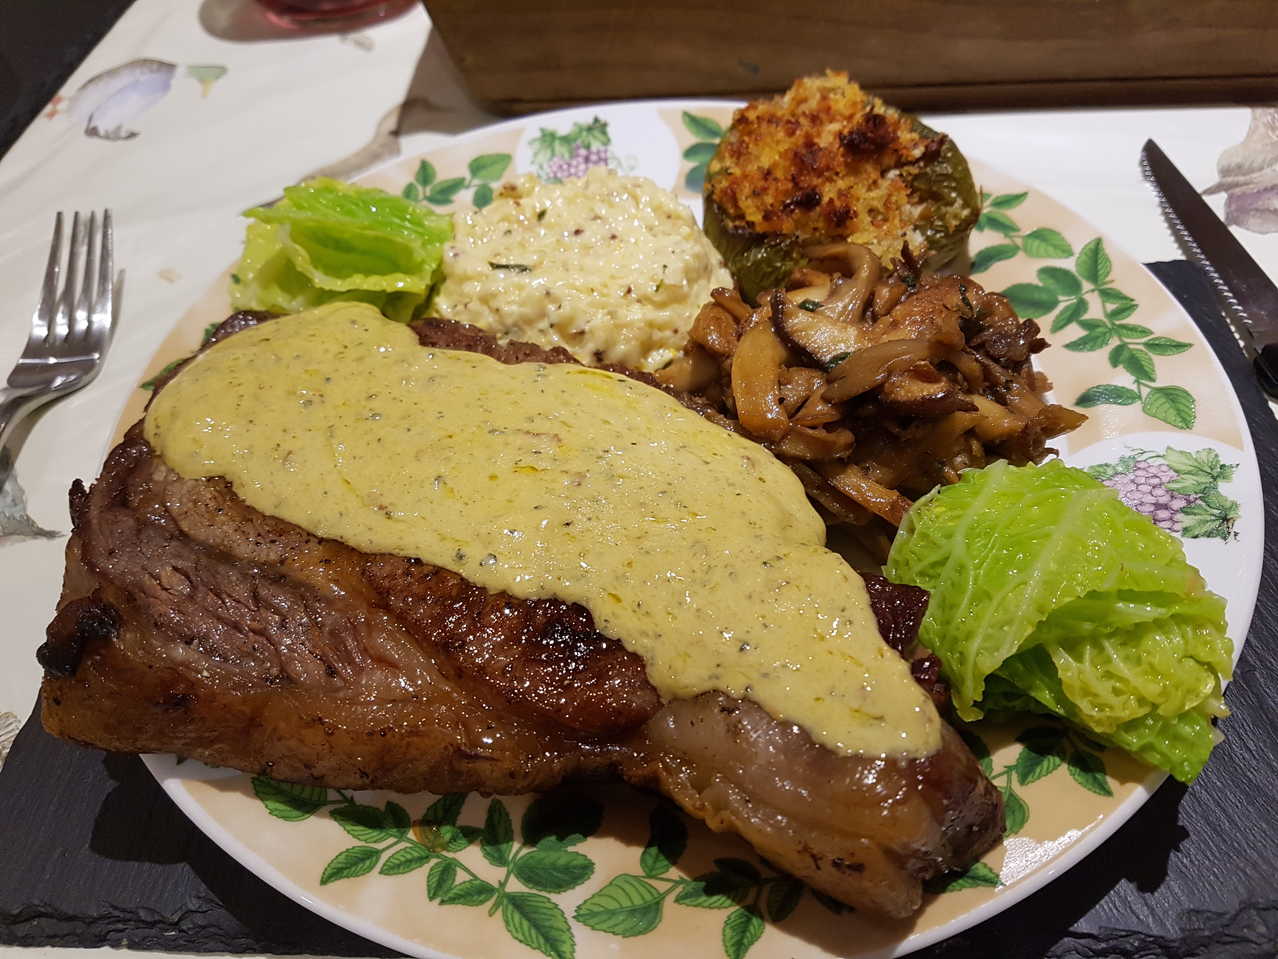
Filet Mignon McPhail with Cavolo Nero, Oyster Mushrooms and Jerusalem Artichoke Gratin.
meat main
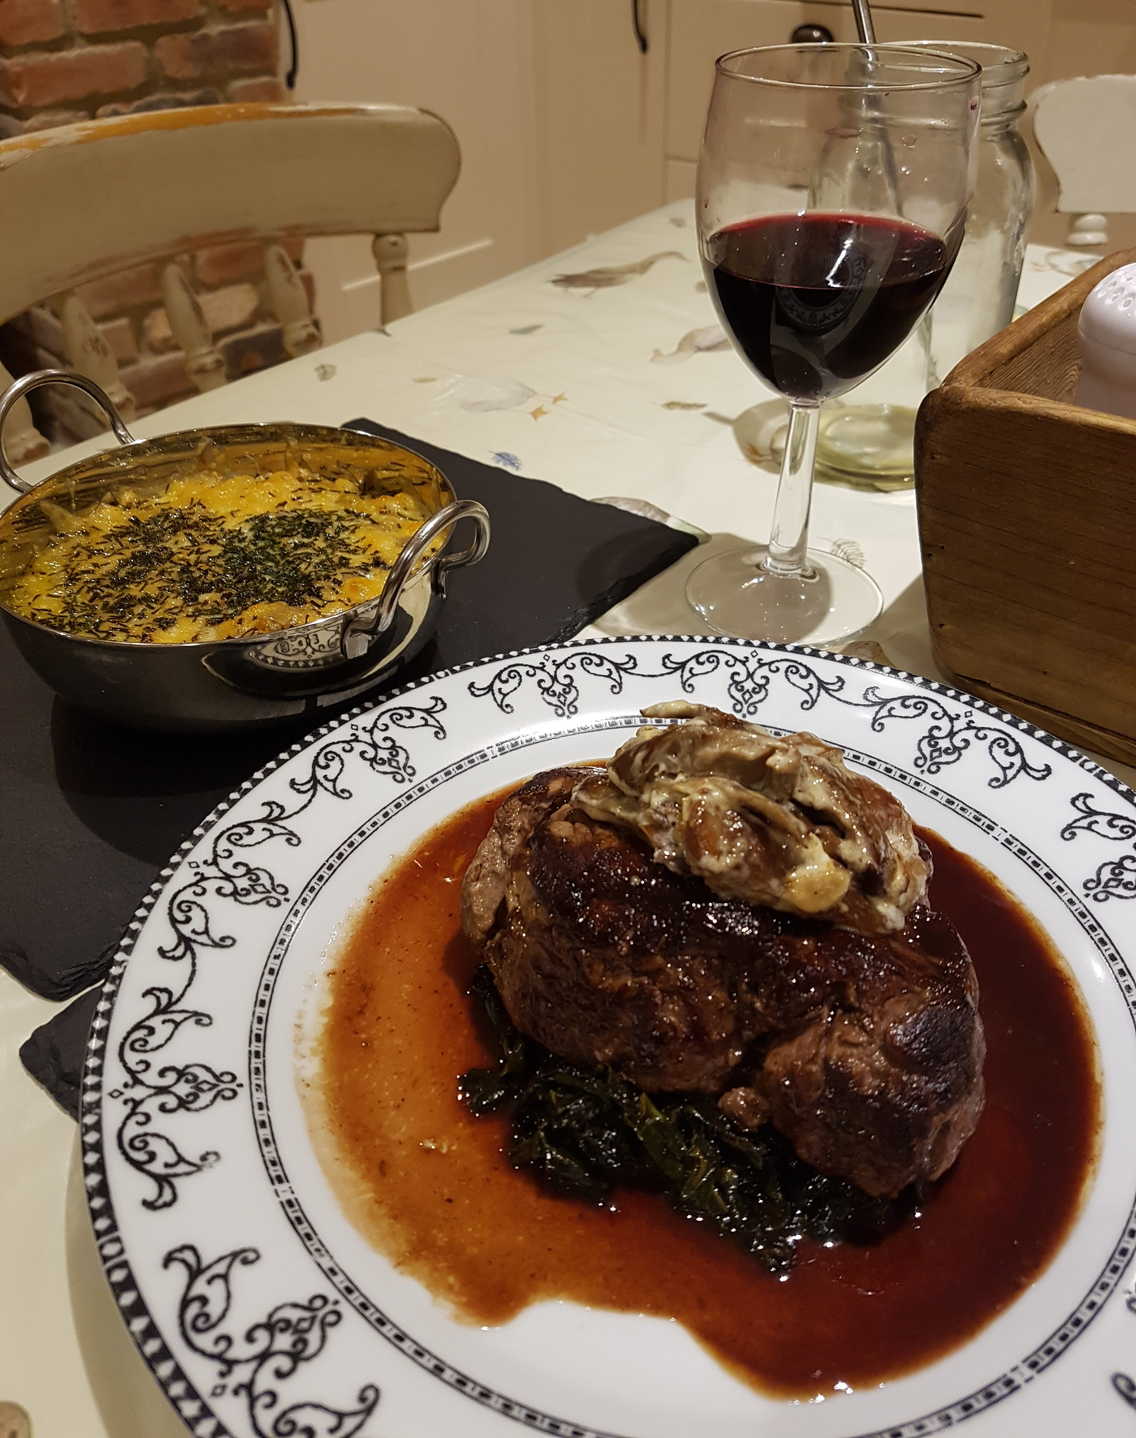
A nice meal I put together around Flora's Dad's beef fillet steaks.
Refer to the individual recipes for more details.
Refer to the individual recipes for more details.
menu
Fillet Steaks McPhail
Buttered Cavolo Nero with Dijon
Oyster Mushrooms with light Gorgonzola Cream
Jerusalem Artichoke and Cauliflower Gratin with Truffled Pecorino
Buttered Cavolo Nero with Dijon
Oyster Mushrooms with light Gorgonzola Cream
Jerusalem Artichoke and Cauliflower Gratin with Truffled Pecorino
Method
Prepare the gratins and set in the bottom of a low oven to keep warm. Have the grated cheese and chopped chives ready for the toppings.
Start the Cavolo Nero sweating in a covered saucepan, and begin frying the mushrooms. You can use the same frying pan you'll use for the meat. Have a cold saucepan with the cream and gorgonzola ready to receive the mushrooms, and once they're browned, flame off the cognac and decant them into it. Set it aside cold until you need it.
Wipe the frying pan, re-grease with butter and start frying the steak.
Keep an eye on the greens, adding moisture if they get too dry.
When the steaks are done on both sides, put them in a shallow dish in the oven to keep warm, lifting out the gratins. Scatter the cheese topping over the gratin dishes and put them under the grill.
Turn on a low heat under the mushrooms to warm through the cream and melt the cheese.
Swirl a little more butter with the garlic and rosemary in the frying pan, then add the rowan jelly until it bubbles through, then red wine and reduce until a little sticky.
Everything should come together perfectly at the end. Swirl the mustard through the greens. Add any collected steak juices to the sauce and strain it into a warmed jug. Pile a bed of greens on each serving plate, place a steak on top, drizzle with the red wine sauce and add some of the creamed mushrooms.
Serve with the bubbling gratins.
Absolutely gorgeous!
Buttered Cavolo Nero with Dijon
side veg
A simple way to add a little kick to a leafy green like Swiss chard or spinach,
you can also use use it for more robust kale or cavolo nero.
The cavolo will turn rather dry and stringy on its own though so you'll need to add a little stock or wine or cream, or what-have-you. Make sure to cook it long enough to completely break it down.
An alternative is to par-boil the greens first, then quench them in ice water until required.
Quickly coat them in foaming butter and mustard when ready to serve.
Serves 2
Ingredients
- butter
- half a dozen fat leaves of cavolo nero
- 2-3 teaspoons stock or wine
- 1 teaspoon Dijon mustard
Trim the stalks out of a half dozen Cavolo Nero leaves.
Slice them cross-ways about 1cm wide.
Melt a generous knob of butter in a saucepan, throw in the chopped greens and cover. Sweat gently until they collapse.
Moisten with a few teaspoons of stock or any liquid you prefer, and continue cooking until the leaves are completely softened.
Swirl through a teaspoon of Dijon, season if necessary, and serve.
Oyster Mushrooms with light Gorgonzola Cream
side veg
Any meaty mushrooms like shiitake, maybe chanterelles, would work too. And you can always just use plain old buttons - sliced, halved or quartered.
The cheese flavour is supposed to be subtle - just enough to use up that last piece left over from Christmas - so don't go mad!
The cheese flavour is supposed to be subtle - just enough to use up that last piece left over from Christmas - so don't go mad!
Serves 2
Ingredients
- a garlic clove
- half a dozen oyster mushrooms
- cognac
- a splash of double cream
- a small knob of Gorgonzola other blue cheeses are available
Slice the mushrooms fatly, and the garlic thinly.
Melt a knob of butter in a small frying pan. Add the garlic, then the mushrooms one handful at a time.
Keep the heat high and lightly brown everything. Don't let the garlic burn though.
Throw in a glass of cognac and flame it off, then add enough cream to just cover the mushrooms and cook gently over a low heat until the cream begins to bubble and thicken a little.
Add the Gorgonzola off the heat and stir until it melts through.
Throw in a glass of cognac and flame it off, then add enough cream to just cover the mushrooms and cook gently over a low heat until the cream begins to bubble and thicken a little.
Add the Gorgonzola off the heat and stir until it melts through.
Excellent. You don't need to be quite so skimpy with the cheese, to be honest; a Gorgonzola sauce with added mushrooms is also rather good.
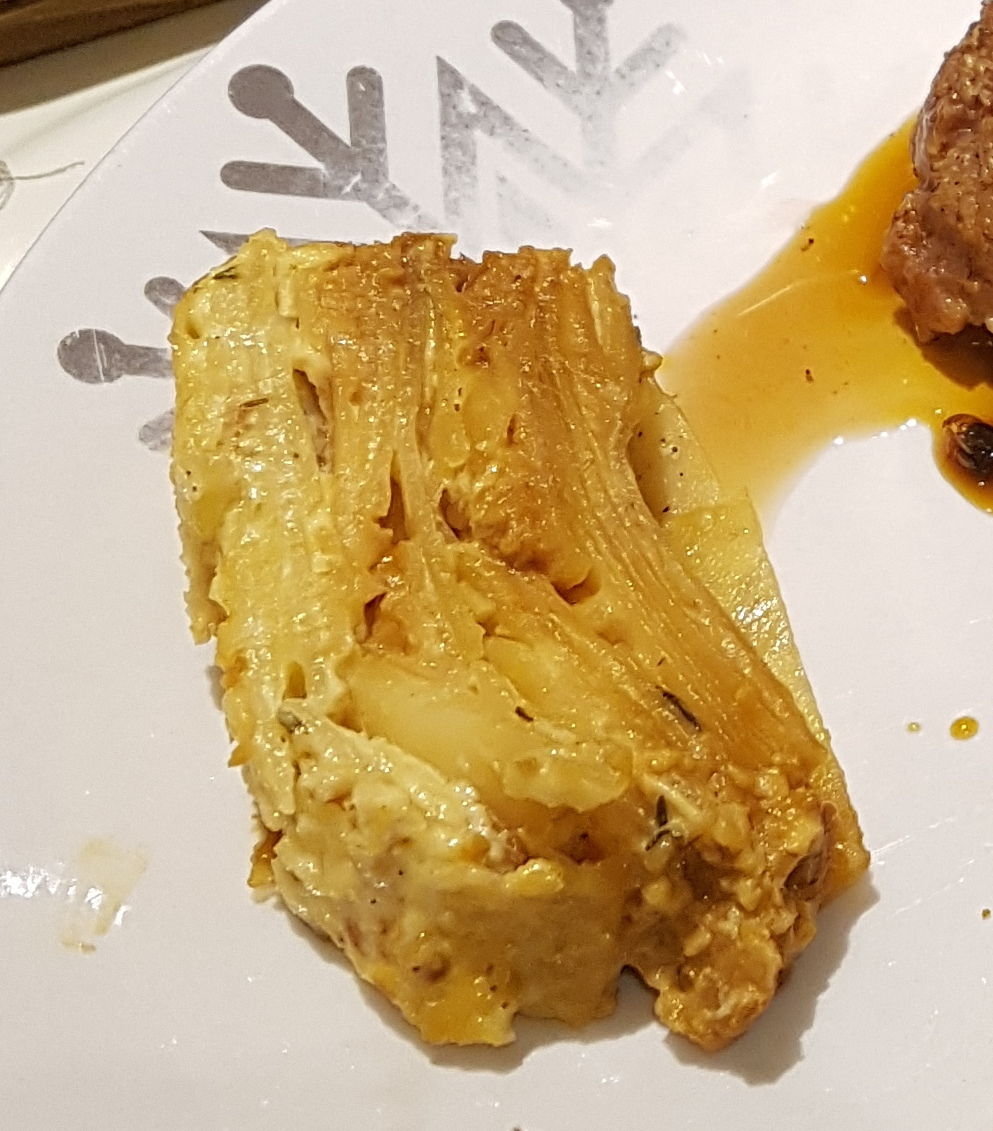
Jerusalem Artichoke and Cauliflower Gratin with Truffled Pecorino
side
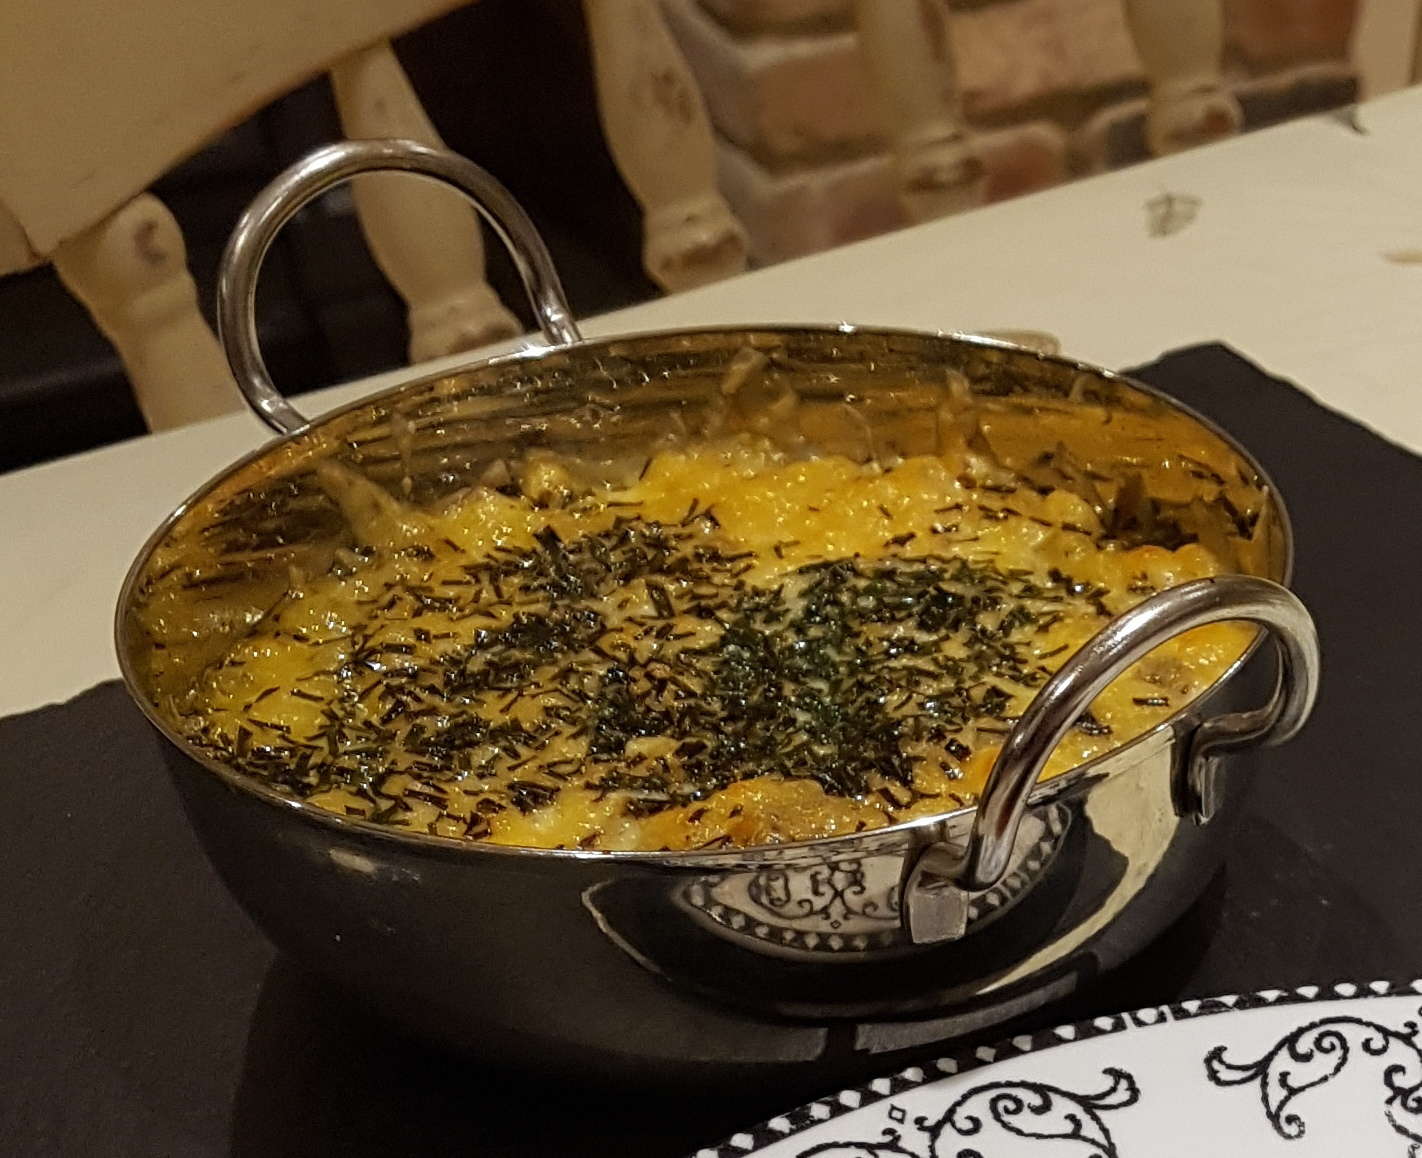
I added cauliflower and truffled pecorino to Matthew Tomkinson's gratin.
Hey it worked for me!
Serves 4
Ingredients
- half a dozen/200g Jerusalem artichokes, peeled and sliced
- 3 fat florets/100g cauliflower
- 50g of smoked bacon, boiled and diced
- 25g of butter
- 80ml of double cream
- 80ml of milk
- nutmeg
- salt & pepper
- 50-100g of truffled pecorino, grated
- chives, finely chopped
Simmer the bacon (use stock if you like) until cooked through, dice, then fry in a little butter until crispy.
Drain on kitchen paper for later.
Heat half cream and half milk in a saucepan. Add a grating of nutmeg.
Peel and quickly slice the artichokes on a mandolin into the saucepan and cover with the liquid so they don't have time to discolour.
Slice the cauliflower florets vertically on the mandolin and add to the mixture.
There should be just enough of the liquid to cover the vegetables so add more as required.
Simmer gently until the artichokes are soft but not quite falling apart. Strain the vegetables out and continue simmering the liquid until it's reduced by half and bubbles nicely.
Add back the vegetables and the crisped bacon.
Season if needed mine didn't. Layer into ovenproof serving dishes and keep them warm in the oven until required.
Grate the pecorino (or Parmesan) over each dish, scatter with chives, and grill until the cheese bubbles and begins to colour, but before it hardens, the oil separates out, or the chives darken.
Really good.
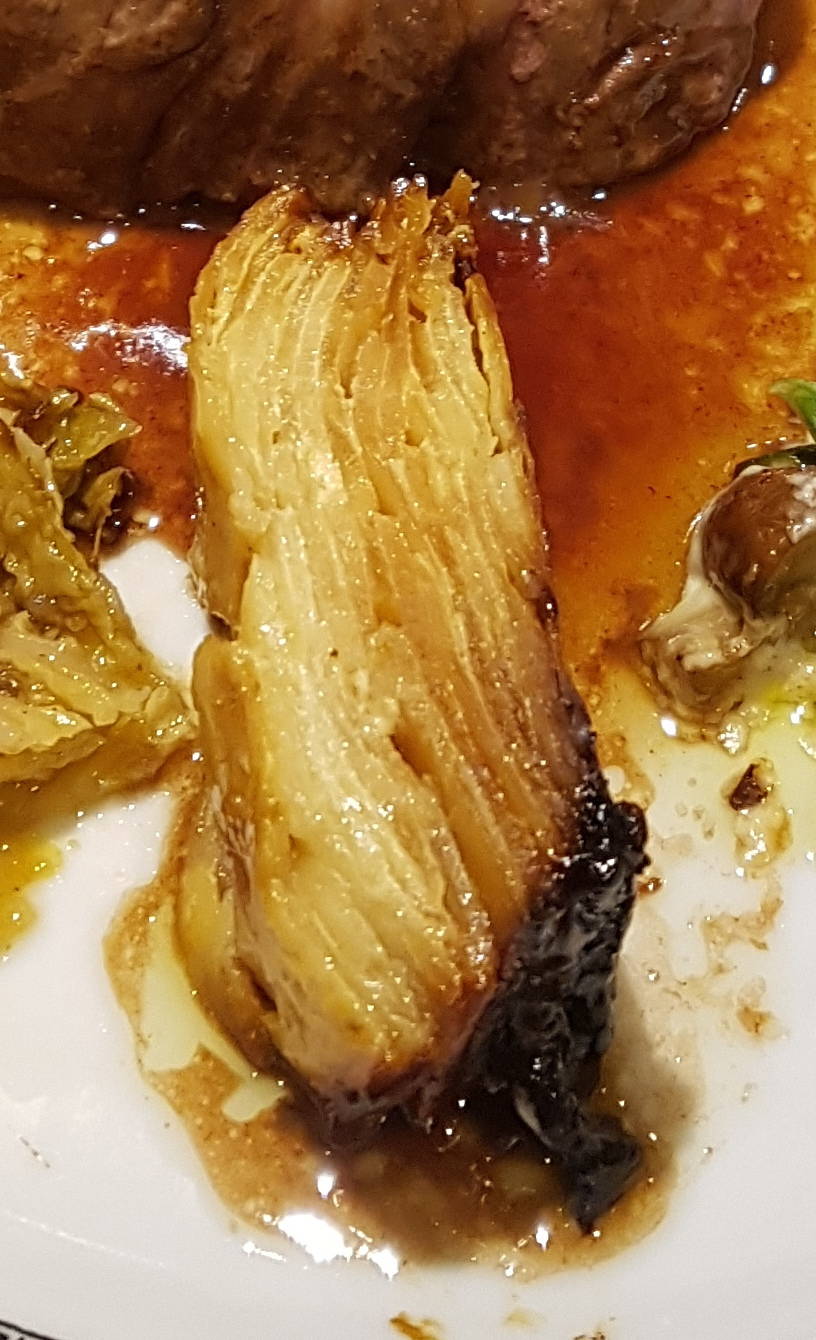
Roast Jerusalem Artichokes
veg vegan side
I made smaller batches than this recipe, so I just threw in a peeled garlic clove or two, and didn't bother with the mace.
They were pretty good.
By the way - it's amazing how long Jerusalem artichokes keep in the fridge!
They were pretty good.
By the way - it's amazing how long Jerusalem artichokes keep in the fridge!
Serves 4
Ingredients
- 800g Jerusalem artichokes
- 1 garlic bulb, cut down the middle
- 1 tbsp rosemary leaves, chopped
- 3 tbsp rapeseed oil
- pinch ground mace
- 20g butter
- 2 tsp lemon juice
Heat oven to 180°C/160°C fan/gas 4. Soak the artichokes in cold water for 20 mins or so to loosen any dirt, then scrub them with a scourer, being sure to remove any grit.
Halve the small ones and quarter the bigger ones, and put them in a roasting tin with the split garlic bulb and rosemary.
Coat everything with the oil and season.
Roast for 45-50 mins until tender inside and crispy outside.
To finish, squeeze the softened garlic cloves from their skins and toss with the roasted artichokes, along with the mace, butter and lemon juice.
To finish, squeeze the softened garlic cloves from their skins and toss with the roasted artichokes, along with the mace, butter and lemon juice.
Not bad.
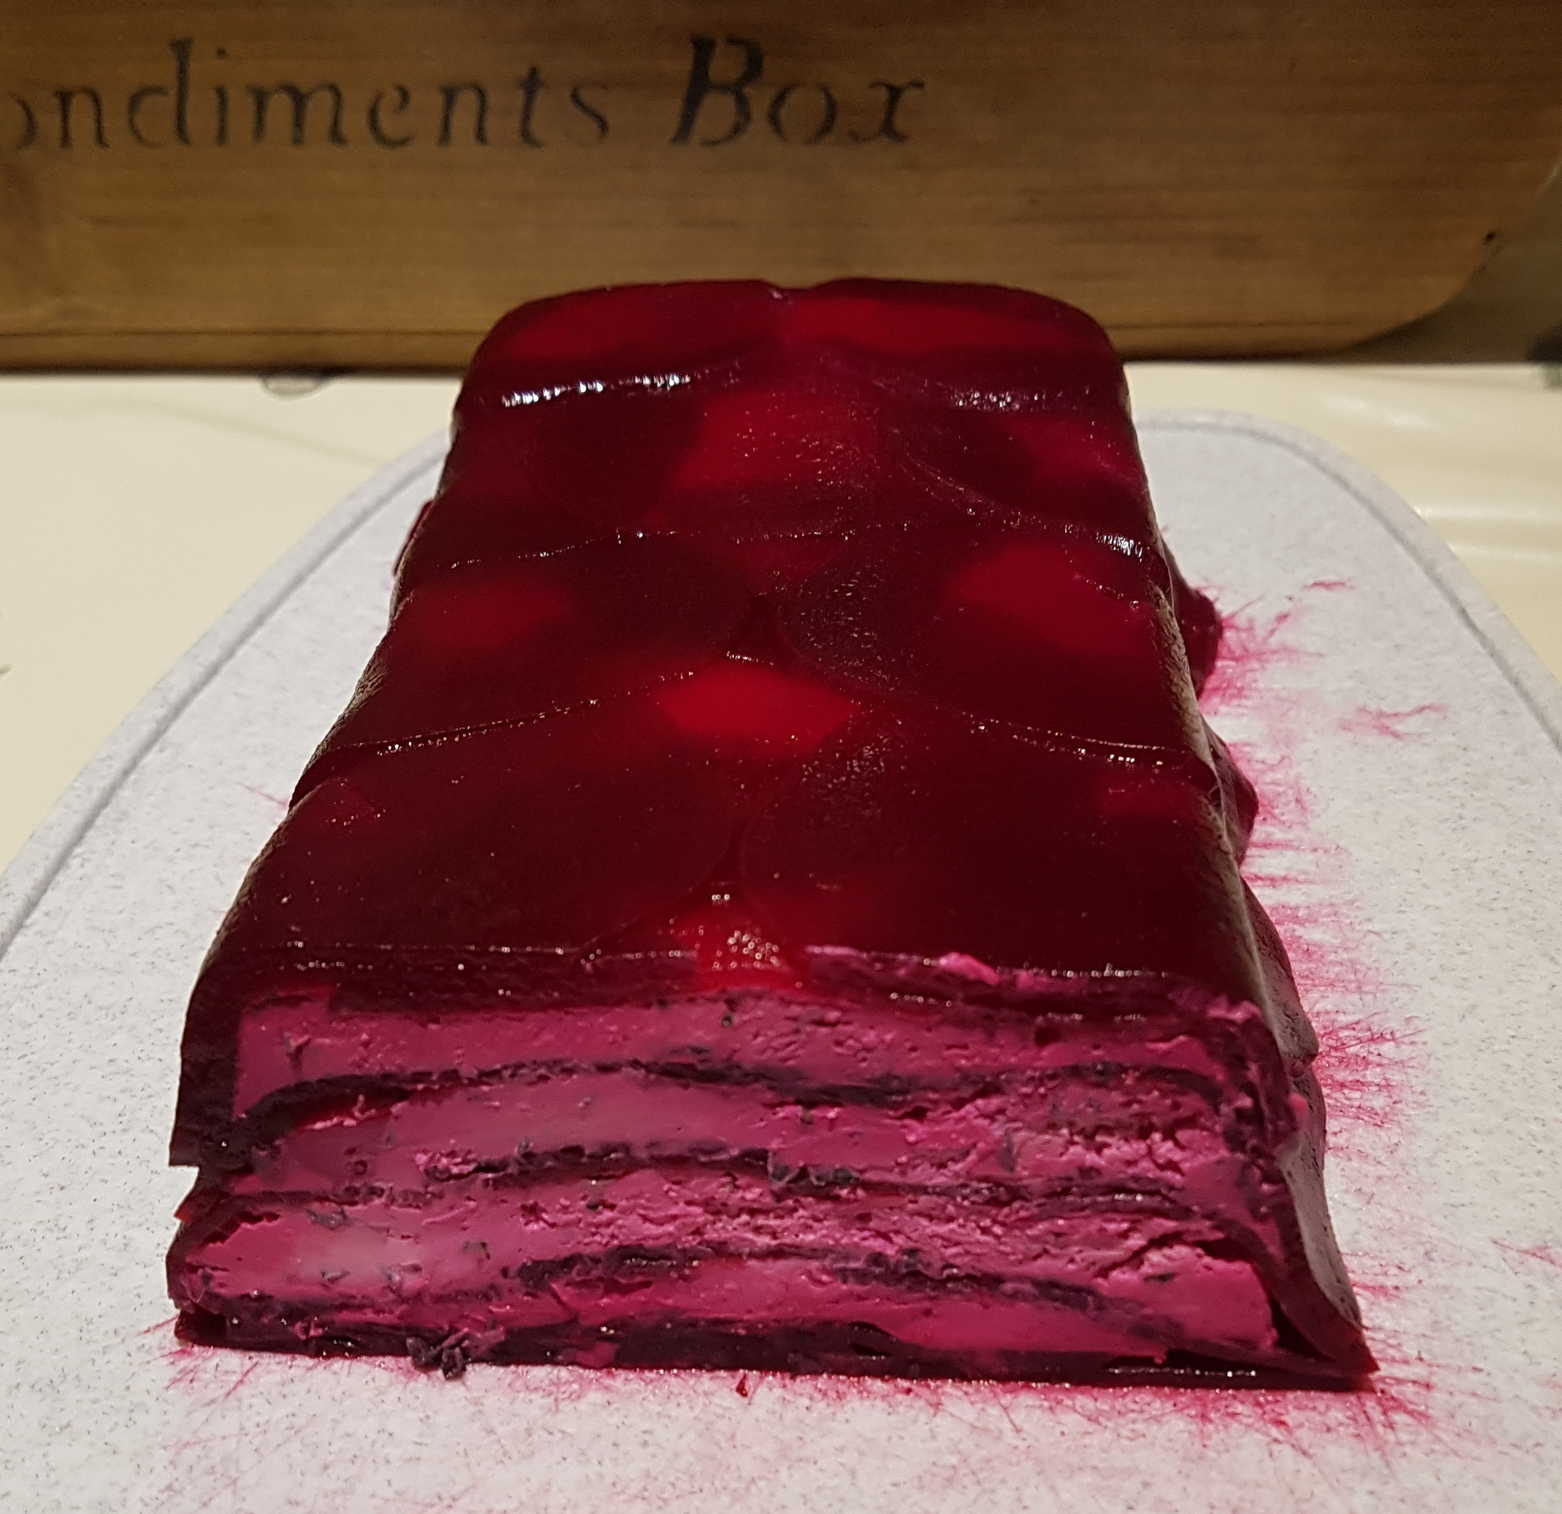
Beetroot and Goats Cheese Terrine
starter veg
I should think ideally this terrine would show clean red on white colours.
Mine was more pink on dark pink due to the amount the beetroot leached into the cheese.
You should try and dry off the beetroot slices as much as humanly possible to cut down on the leakage.
The toppings are definitely optional, though I'm sure they'd be very nice 😉
The toppings are definitely optional, though I'm sure they'd be very nice 😉
Serves 8
Ingredients
- olive oil
- raw beetroot 8 medium, (about 1kg)
- oregano a small bunch, leaves picked if you must
- soft goats cheese 300g
- full-fat soft cheese 100g
- thyme leaves chopped to make 1 tbsp
- chives snipped to make 2 tbsp
- walnut halves 75g
- golden caster sugar 1 tbsp
- olive oil
- sage ½ a small bunch, leaves picked
Brush a long and thin terrine mould or loaf tin (approx 20cm x 9cm) with a little olive oil, then line with a few pieces of clingfilm, leaving enough to overlap the top.
Put the beetroot in a pan and top up with cold water and a pinch of salt.
Cover, bring to the boil and simmer for 40-50 minutes until a knife pierces them easily, then leave to cool.
Finely chop half the oregano and beat into the goat’s cheese and soft cheese with the thyme, chives, ½ tsp finely ground black pepper and 1/2 tsp salt. Cover and chill.
Cover with more clingfilm, weigh down with a piece of card and a few tins, and chill overnight.
To make the garnish, toast the nuts in a small frying pan for a few minutes then sprinkle-over the sugar. Stir for a minute until the sugar melts and coats the nuts. Tip out onto a baking tray and leave to cool.
Heat 2 tbsp oil in a small pan and add the sage and remaining oregano leaves. Fry for a few minutes until crisp then scoop out and drain on kitchen paper. Season with a little salt. You can do this up to 2 hours before and leave at room temperature.
To serve, remove the top layer of clingfilm for the terrine and tip onto a platter or board. Using the remaining clingfilm, gently remove the terrine from the mould and lift off the clingfilm. Top with the walnuts and crisp herbs and cut into slices with a very sharp knife. Serve with toast and a few salad leaves if you like.
Finely chop half the oregano and beat into the goat’s cheese and soft cheese with the thyme, chives, ½ tsp finely ground black pepper and 1/2 tsp salt. Cover and chill.
Oregano is a pretty coarse herb, so if you decide to use it you do need to mince it finely.
Peel the beetroot by rubbing off the skin with your thumb (wear gloves to prevent staining) and carefully cut into 1.5mm slices on a mandoline, or with a very sharp knife.
You should dry the slices as thoroughly as possible on kitchen roll, maybe then leaving them uncovered in the fridge overnight.
Add a layer of slightly overlapping beetroot slices to the terrine. Trim them to fit flush to the sides of the tin, or keep them rustic if you like.
Add a thin layer of the goat’s cheese mix, then repeat until everything is used up, finishing with a layer of beetroot.Cover with more clingfilm, weigh down with a piece of card and a few tins, and chill overnight.
To make the garnish, toast the nuts in a small frying pan for a few minutes then sprinkle-over the sugar. Stir for a minute until the sugar melts and coats the nuts. Tip out onto a baking tray and leave to cool.
Heat 2 tbsp oil in a small pan and add the sage and remaining oregano leaves. Fry for a few minutes until crisp then scoop out and drain on kitchen paper. Season with a little salt. You can do this up to 2 hours before and leave at room temperature.
To serve, remove the top layer of clingfilm for the terrine and tip onto a platter or board. Using the remaining clingfilm, gently remove the terrine from the mould and lift off the clingfilm. Top with the walnuts and crisp herbs and cut into slices with a very sharp knife. Serve with toast and a few salad leaves if you like.
It tastes pretty good, even if it can end up looking a bit messy.
Baked Mushrooms
side veg
A variation on an old theme.
Serves 1 per Mushroom
Ingredients
- large portabello mushrooms
- soy sauce
- garlic, pressed or crushed
- butter
- fresh breadcrumbs and grated parmesan optional
Preheat the oven to Gas Mark 5-6.
Wipe the mushrooms clean, cut away their stems. Place in a baking tin with the gills uppermost.
Melt the butter and mix it with garlic and with some soy sauce. Drizzle more soy sauce into the mushrooms then pour in the garlic butter.
Bake for 30-45 minutes until the mushrooms are tender.
Wipe the mushrooms clean, cut away their stems. Place in a baking tin with the gills uppermost.
Melt the butter and mix it with garlic and with some soy sauce. Drizzle more soy sauce into the mushrooms then pour in the garlic butter.
Bake for 30-45 minutes until the mushrooms are tender.
Simple. Excellent.
If you like you can mix or cover the garlic butter with grated cheese and seasoned breadcrumbs for a crispier crust.
If you like you can mix or cover the garlic butter with grated cheese and seasoned breadcrumbs for a crispier crust.
Baked Pepper Stuffed with Red Pepper Cream
side veg
When life gives you peppers. Stuff them with other peppers!
Serves 4
Ingredients
- 2 red peppers
- garlic
- double cream
- cream cheese
- salt & pepper
- 2 yellow peppers
For the Topping:- fresh breadcrumbs
- herbs
- grated parmesan
Make the sauce by blending the red peppers with cream, cream cheese and a little garlic.
Halve or quarter the peppers, remove the core and seeds.
It will be nicer if you toast their skins under the grill or over a gas burner until they char,
leave them to cool in a plastic bag, then peel the skin off.
Season.
Cut the yellow peppers in half lengthways and remove the core and seeds. You can leave the stalks attached if you like.
Grate the parmesan and mix with the breadcrumbs, and any herbs you fancy. Put the peppers in a tight-fitting, lightly oiled baking dish. Fill the pepper halves with the red pepper cream and cover with the breadcrumb mix. Drizzle with a little oil and bake at Gas Mark 5 or 6 for half an hour or so until they are cooked through and the topping is crispy.
Not too bad.
Potato Dauphinoise with Miso Paste
side veg experimental
I once had some leftover teriyaki sauce and potato dauphinoise,
and noted that they were an excellent combination.
For some reason I thought miso paste might be the same. But it isn't.
Back to the drawing board. Unfortunately I don't think I could have layers of teriyaki sauce in the dauphinoise. Not unless I seriously thickened it with something?
Back to the drawing board. Unfortunately I don't think I could have layers of teriyaki sauce in the dauphinoise. Not unless I seriously thickened it with something?
Ingredients
- garlic
- double cream
- milk
- thyme
- miso paste if you must
Peel the potatoes.
Line a loaf tin or a baking dish with baking parchment, if you want to make it easier to lift out and neatly slice the finished cake.
Heat the same quantity of milk and double cream. Add crushed garlic and some thyme leaves. Season, if you're not using miso paste, and slice in the potatoes with a mandoline balanced precariously over the pan. Simmer gently for a scant 5 minutes until the slices are slightly softened but retain some crispness. Layer them neatly into the dish and smear miso paste thinly over a couple of the layers if you want to. Reduce any of the cream mixture remaining until it's thick and foamy and pour over the top.
Fold the parchment over the top of the dauphinoise, cover the dish with a lid or foil. Bake for about 1½ hours at Gas Mark 5, or until the mixture swells, browns a little at the edges and is easily pierced with a knife.
Allow to cool a little and serve immediately, or press overnight with a decent weight covering the whole surface (use a piece of card for example), then slice and fry in butter until golden to serve.
Yeuch!
Miso paste, it turns out, is really salty. I mean REALLY salty.
Nor does it contribute anything to the flavour. I'd just make the same recipe, but without the paste. Season the cream with regular salt & pepper instead.
Miso paste, it turns out, is really salty. I mean REALLY salty.
Nor does it contribute anything to the flavour. I'd just make the same recipe, but without the paste. Season the cream with regular salt & pepper instead.
Creamed Celeriac
side veg
Snaffled from a recipe for braised hare by Kevin Mangeolles over at Great British Chefs
Serves 4
Ingredients
- 1/2 celeriac
- 100g of butter, melted
- 300g of whipping cream
- 2 tbsp of grain mustard
- salt
Grate the celeriac and transfer to a pan with the melted butter.
Cook until softened, add the cream and reduce until you have a thick creamy consistency.
Add the mustard and season with salt
Cook until softened, add the cream and reduce until you have a thick creamy consistency.
Add the mustard and season with salt
Very good flavour. The texture is still quite grainy - the celeriac doesn't quite melt away.
Which I suppose is the idea. Otherwise you'd have puréed it.
Buttered Cabbage with Cumin
veg side
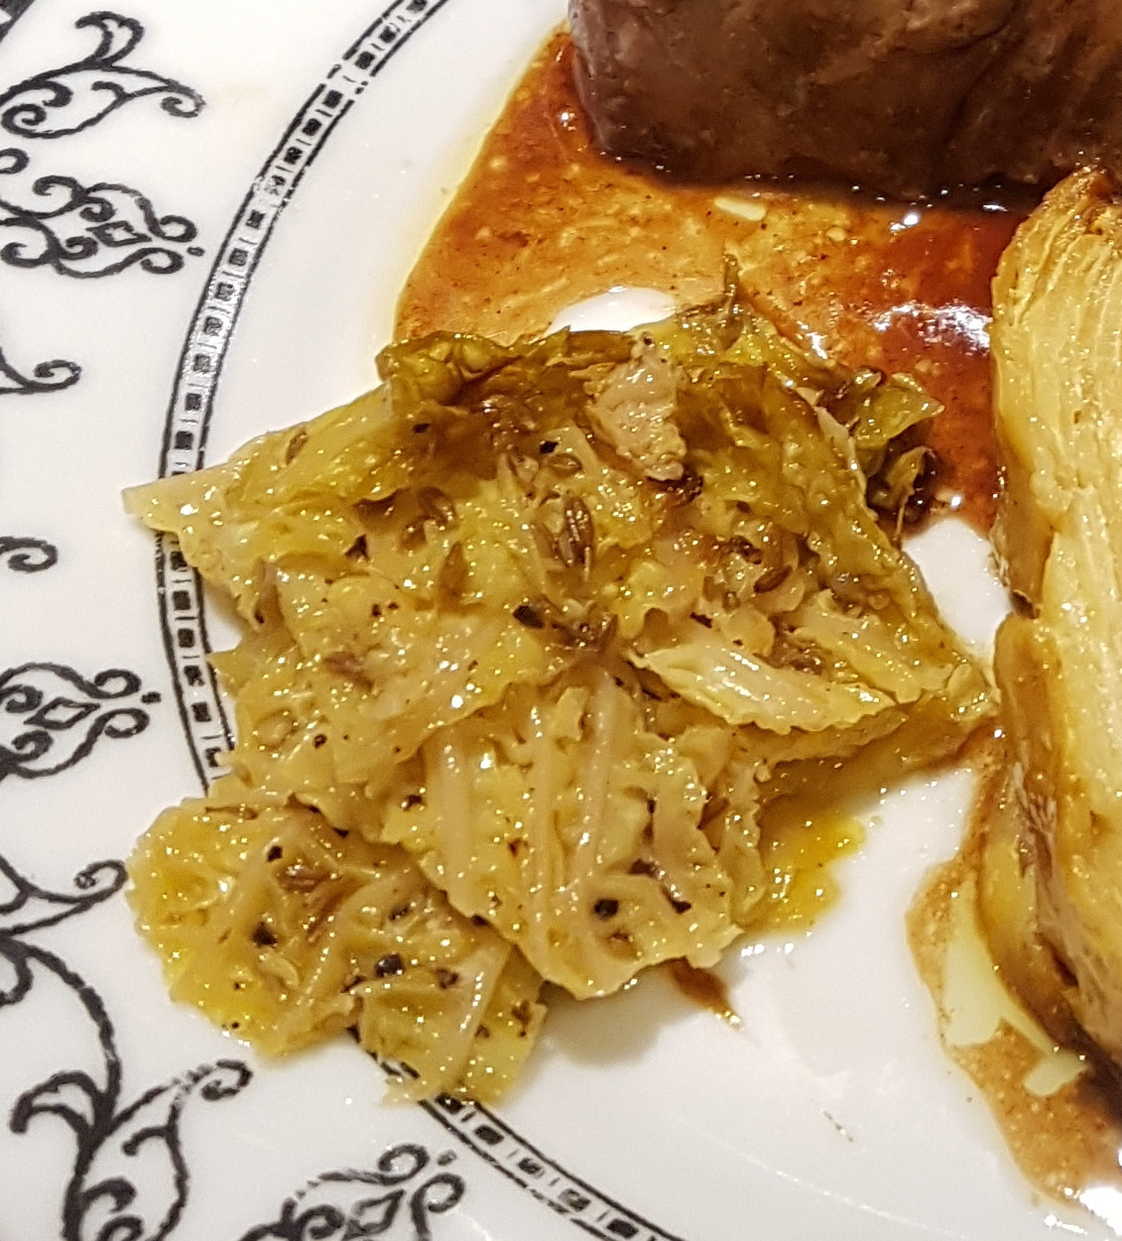
A very tasty cabbage.
Ingredients
- savoy cabbage
- cumin seeds
- butter
- saké
- Forvm Chardonnay vinegar
- salt & pepper
Cut the savoy cabbage into bite-sized pieces slices or 1½" squares and layer them into a baking dish.
Sprinkle each layer with a few cumin seeds, salt, pepper and a drizzle of melted butter.
Finally moisten the dish with saké and white wine vinegar, seal with foil and bake for around 1½ hours at the bottom of a Gas Mark 5 oven.
Goes beautifully with Fillet Steak McPhail.
Celeriac Gratin with Teriyaki Layers
side veg
I'm on a mission to improve a creamy gratin with the addition of teriyaki sauce.
No success so far. This one went wrong when I overcooked it and the teriyaki sauce squeezed itself out of the gratin and just burned around the edges.
Also the whole thing was a bit too salty.
I might try it again with potatoes though. Seems like it had potential.
I might try it again with potatoes though. Seems like it had potential.
Ingredients
- celeriac
- double cream
- milk
- butter
- thyme
For the Teriyaki Sauce:- 2 tbsps soy sauce
- 2 tbsps saké
- 2 tbsps mirin
- 1 tsp brown sugar
- 1 tbsp tapioca starch
- garlic
- ginger
Heat equal quantities of double cream and milk seasoned with thyme leaves if you like - they do clump up in your mouth though.
Slice the celeriac into the pot with a mandoline precariously balanced on top.
Simmer gently for about 5 minutes until the slices are softened but not collapsing.
Line a baking or loaf tin with baking parchment If you want to lift out the cooked gratin for ease of slicing into neat servings. and brush with melted butter. Lift out the celeriac slices, wipe them off a little, and layer them carefully into the tin. Drizzle a couple of the layers with the thickened teriyaki sauce. Finish off with more celeriac layers. Brush the top with melted butter, fold over the parchment if using, seal with foil, and bake at Gas Mark 5 for about 1½ hours.
Don't let it overcook or the teriyaki sauce will burn. Serve in pretty slices, or neat shapes if you can cut them out.
You might want to seal the pan with cling film to prevent the milk from simmering over.
Ordinarily I would season the cream, but with the use of the salty soy sauce it might be best not to in this case.
Peel and cut the garlic and ginger into fat slices.
Heat them in a small saucepan with the soy sauce, saké, mirin and sugar and bubble until reduced by about half.
Strain out the vegetables and return to the pan off the heat.
Mix the tapioca with a little saké to make a thick paste, then stir into the cooled, reduced sauce.
Reheat gently, stirring often, until it thickens. Which might happen dramatically quickly.Ordinarily I would season the cream, but with the use of the salty soy sauce it might be best not to in this case.
Line a baking or loaf tin with baking parchment If you want to lift out the cooked gratin for ease of slicing into neat servings. and brush with melted butter. Lift out the celeriac slices, wipe them off a little, and layer them carefully into the tin. Drizzle a couple of the layers with the thickened teriyaki sauce. Finish off with more celeriac layers. Brush the top with melted butter, fold over the parchment if using, seal with foil, and bake at Gas Mark 5 for about 1½ hours.
Don't let it overcook or the teriyaki sauce will burn. Serve in pretty slices, or neat shapes if you can cut them out.
Has potential if you don't burn it or over-salt it.
And use potatoes instead of celeriac.
Mushrooms with Asparagus
side veg
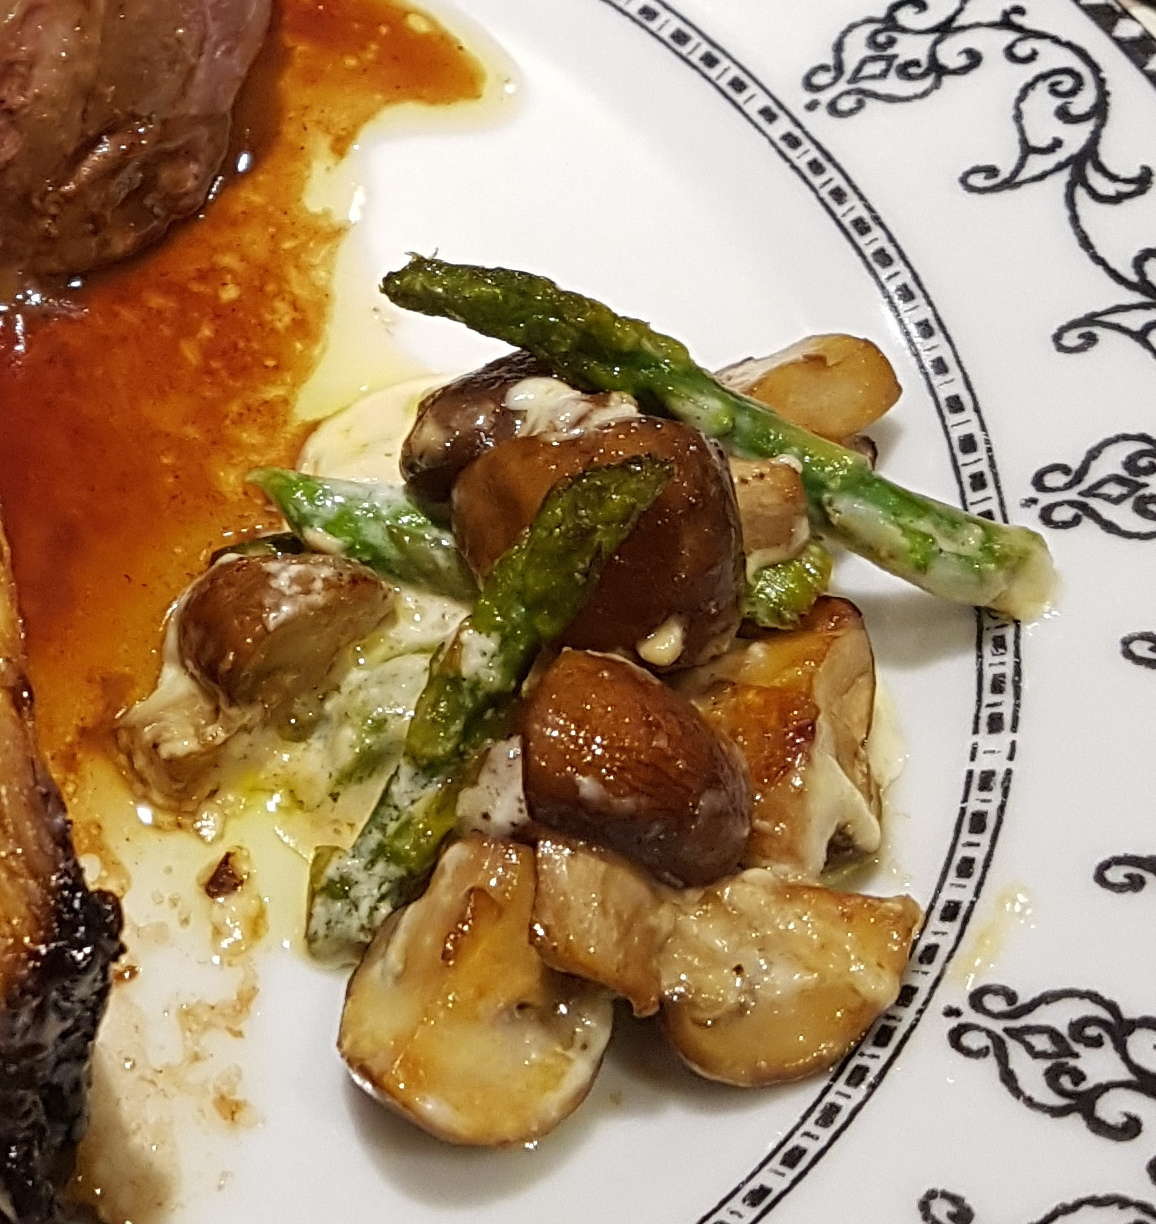
An oddly pleasant combination. I made my sauce with cream cheese, but on reflection Parmesan, or blue cheese would have been a better choice.
Ingredients
- button mushrooms, preferably chestnut
- asparagus spears
- garlic, sliced
- butter
- olive oil
- double cream
- cheese, grated or crumbled
Clean and quarter the button mushrooms.
Slice the garlic.
Slice the asparagus on a bias into decent lengths. Discard any woody ends of the stalks.
Heat a generous amount of butter and olive oil in a saucepan, add the mushrooms, garlic and then the asparagus, and fry over high heat until the mushrooms colour and everything is tender.
Remove the vegetables with a slotted spoon, pour in the cream and bubble it down a little to thicken, then add the grated or crumbled cheese and blend in off the heat.
Season you can use miso paste or soy sauce instead of salt here and pour over the vegetables to serve.
Surprisingly good match.
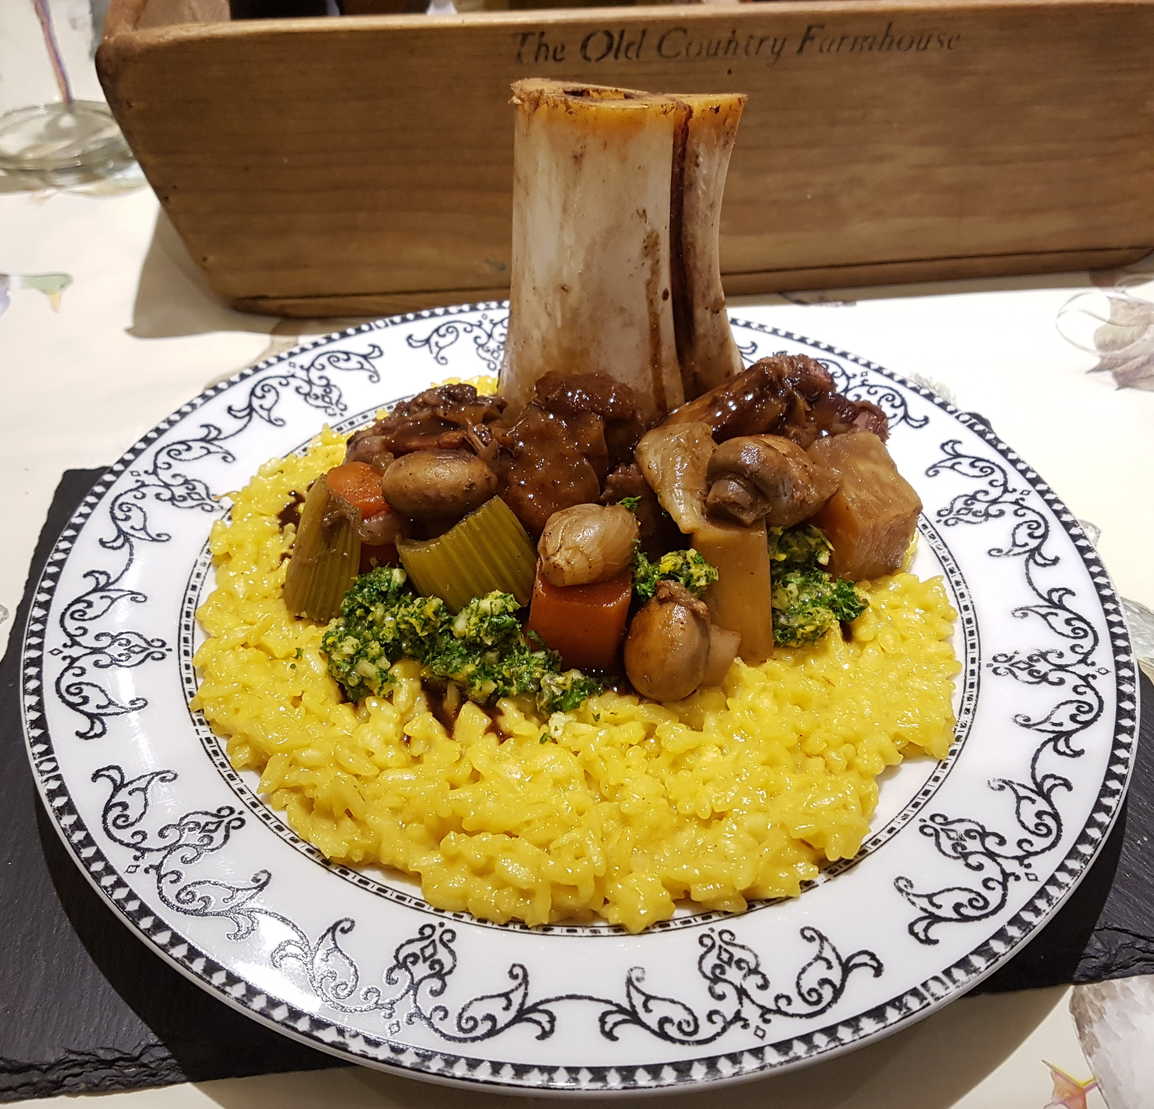
Slow Cooked Beef Shank in Chocolate Stout Sauce
main meat stew
I saw a recipe for hare in chocolate stout that sounded like it would adapt well to beef shank.
Have your butcher cut up a cow's shin, preferably a rear one, into manageable sections that will fit into your casserole.
Ask him to leave the bone in and the skin on which will help to preserve their shape during cooking.
You can add more-or-less any vegetables to the casserole, except for celeriac. As I discovered - it really doesn't stew well, remaining bland and slightly bitter. Throw in any other herbs you feel like.
Baby onions will disintegrate in short order, particularly after browning, so only add them at the very end with the mushrooms.
Serves 4
Ingredients
- 1 beef shin, bone in, cut in sections
- seasoned flour
- 800ml chocolate stout
- 250ml-500ml stock, chicken or beef
- 2 onions, diced
- 3 celery sticks, diced
- 2 carrots, diced
- 6 garlic cloves, sliced
- few sprigs of thyme
- 1 bay leaf
- 2 tbsp of tomato purée or a tin of tomatoes optional
- 10g of dried porcini mushrooms
- fennel, parsnip, etc
- 50g-100g bitter chocolate, finely grated
Extras:- a dozen baby onions
- 150g button mushrooms
Finely chop your vegetables.
If you want to have a nicer presentation reserve some of the vegetables to chop into larger chunks for adding later. Things like the celery, carrots, fennel or parsnips if using. Don't chop the button mushrooms or baby onions.
Dredge the shank sections in seasoned flour, heat oil in a large casserole, and brown the shin meat all over. Set aside.
Add the minced vegetables and brown them in the casserole, adding more oil as necessary.
Sweat tomato puré if using.
Transfer to your slow cooker. Add the dried mushrooms, tinned tomatoes if you fancy, herbs, chocolate stout, and stock to just cover the shins. Cook on low for 6 hours.
Due to the long cooking time the original vegetables will have largely disintegrated, so if you want to serve recognisable chunks you need to add them when there's only an hour or so of cooking left to go. At this point strain out the finely diced vegetable mush, return the liquid to the casserole and add the new perky vegetables.
Shortly before the end of cooking (about 10 minutes) brown the peeled whole baby onions and whole button mushrooms in foaming butter, then add them to the casserole.
To serve, remove the shanks and keep them warm. You can separate and slice the meat if you like.
Get rid of the herbs.
Strain out the vegetables if you've added fat ones and keep them warm, reduce the sauce until it thickens, then beat in finely grated bitter chocolate to taste.
Season.
Serve the shanks, with a pleasing arrangement of meat and more-or-less recognisable vegetables drizzled with the thick chocolatey sauce, on a bed of unctuous risotto Milanese and a side of zesty passion fruit gremolata.
If you want to have a nicer presentation reserve some of the vegetables to chop into larger chunks for adding later. Things like the celery, carrots, fennel or parsnips if using. Don't chop the button mushrooms or baby onions.
Dredge the shank sections in seasoned flour, heat oil in a large casserole, and brown the shin meat all over. Set aside.
Add the minced vegetables and brown them in the casserole, adding more oil as necessary.
Sweat tomato puré if using.
Transfer to your slow cooker. Add the dried mushrooms, tinned tomatoes if you fancy, herbs, chocolate stout, and stock to just cover the shins. Cook on low for 6 hours.
You could cook in a very low oven for 6 hours, or on the stove top for 3-4 hours I suppose.
After about 5 hours you have a choice to make as to how you want to present the vegetables.Due to the long cooking time the original vegetables will have largely disintegrated, so if you want to serve recognisable chunks you need to add them when there's only an hour or so of cooking left to go. At this point strain out the finely diced vegetable mush, return the liquid to the casserole and add the new perky vegetables.
Shortly before the end of cooking (about 10 minutes) brown the peeled whole baby onions and whole button mushrooms in foaming butter, then add them to the casserole.
To serve, remove the shanks and keep them warm. You can separate and slice the meat if you like.
Get rid of the herbs.
Strain out the vegetables if you've added fat ones and keep them warm, reduce the sauce until it thickens, then beat in finely grated bitter chocolate to taste.
Season.
Serve the shanks, with a pleasing arrangement of meat and more-or-less recognisable vegetables drizzled with the thick chocolatey sauce, on a bed of unctuous risotto Milanese and a side of zesty passion fruit gremolata.
Most excellent, and so pretty!
Risotto Milanese
staple veg
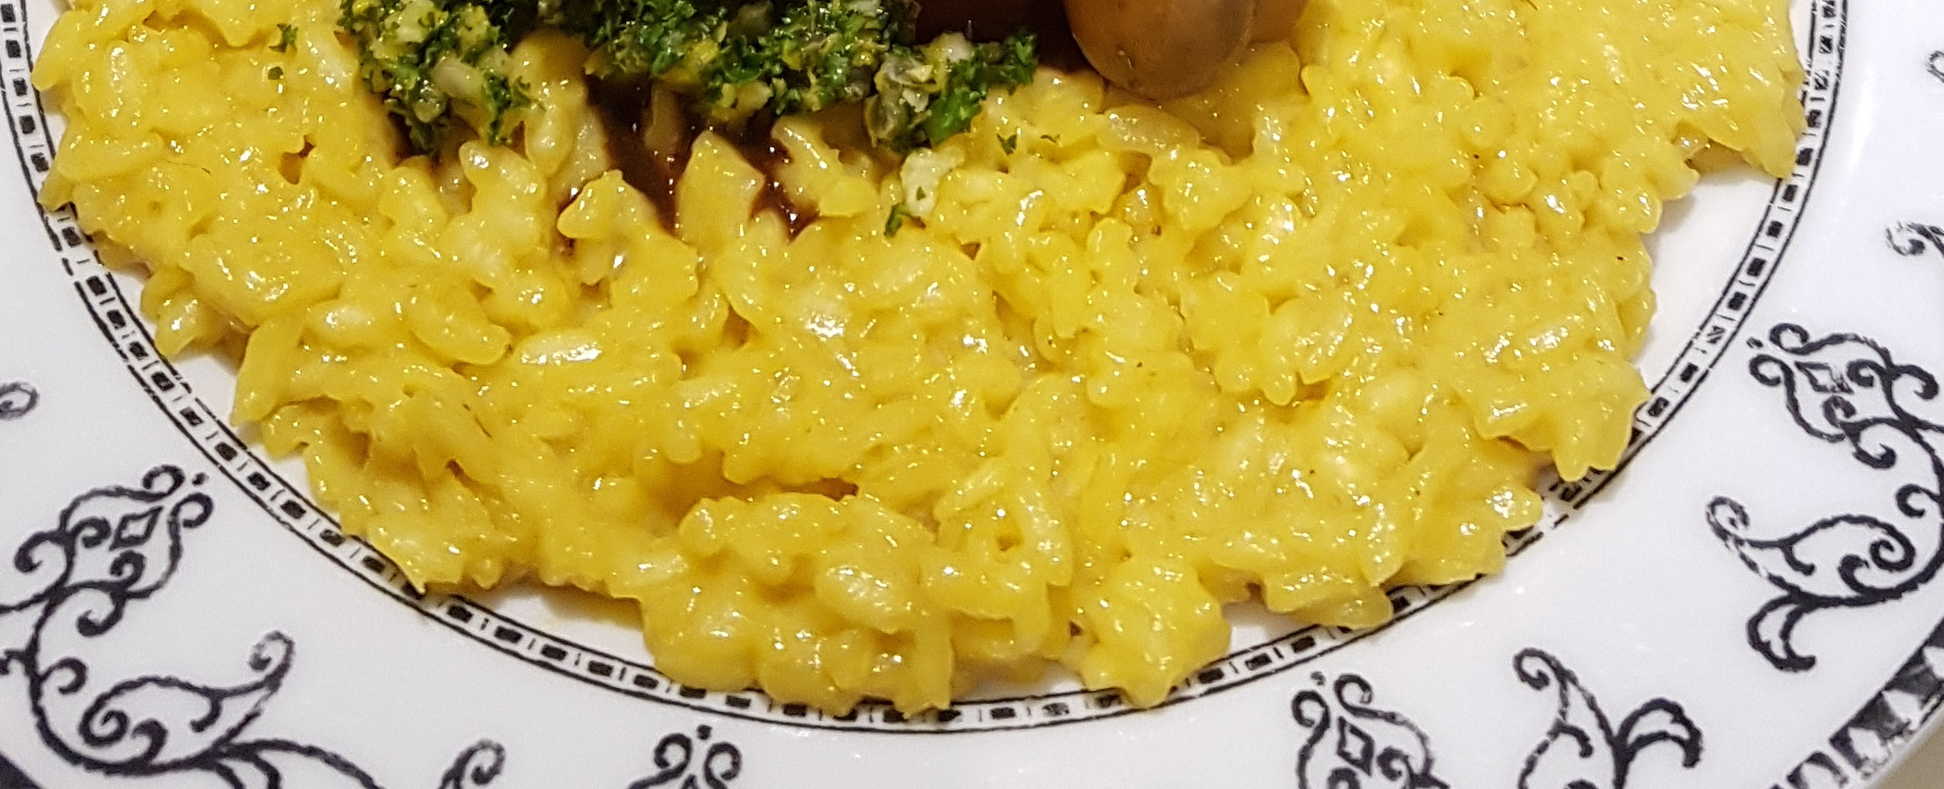
Saffron is the key ingredient in a risotto Milanese - and it's best to activate it by soaking it in water, broth or milk for a good few hours before using it.
Most recipes suggest only a couple of pinches or a couple of grams of saffron. I find that if you want to get that distinctive bright yellow colour you're going to need a lot more than that. Expect to use all you have.
Originally bone marrow would also have been used both to fry the rice and onion together with butter or olive oil, and also seared in pieces as a topping; place marrow bones on a tray and roast in the oven for 5 minutes, until the marrow just starts to melt away from the bones. Remove from the oven and carefully scoop out the marrow. Slice into portions. Sear in a frying pan over medium heat until warmed through, then season with a little salt, pepper and lemon juice
Thanks to Serious Eats for suggesting washing the rice in the stock.
I decided to freshen my risotto with some horseradish vodka I had in the fridge for making my bloody marys. I thought it would go well with my braised beef shanks. You could also brighten the rice by dressing it with more saffron mashed into a tablespoon of white wine vinegar if you'd prefer.
Serves 4
Ingredients
- 2 cups (400g) risotto rice, preferably carnaroli or vialone nano
- 1½l stock
- 3 tablespoons (45ml) extra-virgin olive oil
- 1 small yellow onion, minced
- 1 cup dry white wine
- 2 generous pinches saffron or all you have
- salt
- 2 tablespoons (30g) unsalted butter
- 50g freshly grated Parmigiano-Reggiano cheese
Optional Toppings:- whipped cream
- horseradish vodka
- lemon or orange juice or zest
- 1g saffron in 1 tablespoon white wine vinegar
- seared bone marrow
Crush the saffron into a little cold water or stock and leave to steep.
Combine rice and stock in a large bowl. Agitate rice with fingers or a whisk to release starch. Strain through a fine-mesh strainer set over a 2-quart liquid cup measure or large bowl. Allow to drain well, shaking rice of excess liquid. Set the stock to heat up.
Heat oil in a heavy 12-inch sauté pan over medium-high heat until shimmering. Add rice and cook, stirring and tossing frequently, until all liquid has evaporated and rice sizzles and takes on a nutty aroma, about 5 minutes. Add onion and continue to cook, stirring frequently, until aromatic, about 1 minute. Add wine and cook, stirring occasionally, until the pan is nearly dry, about 3 minutes.
Give reserved stock a good stir and pour all but 1 cup over rice. Add a large pinch of salt, increase heat to high, and bring to a simmer. Stir rice once, making sure no stray grains are clinging to side of pan above the liquid. Cover and reduce heat to lowest possible setting.
Cook rice for 10 minutes undisturbed. Stir once, shake pan gently to redistribute rice, cover, and continue cooking until liquid is mostly absorbed and rice is tender with just a faint bite, about 5 minutes longer.
Remove lid. Stir remaining stock to distribute starch, then add to the rice with the steeped saffron and water. Stir the risotto continuously until it reaches a suitable consistency, where the rice has absorbed some of the stock but there is still a decent amount of liquid in the pan. Remove the pan from the heat
Add the Parmesan and the butter to the risotto and return the pan to the heat. Use the spoon to rigorously whip the new ingredients into the risotto until fully combined. Continue to heat gently until it reaches the desired consistency - the finished risotto should flow without being too runny when tipped onto a plate. Add more stock or water as necessary if risotto becomes too dry.
Season and fold in heavy cream. Stir in your horseradish vodka, orange or lemon juice. Drizzle with saffron vinegar or top with zest or bone marrow. If you're using any of those things.
Serve with additional grated cheese on the side.
A delightfully colourful dish. Now go and buy more saffron.
Passion Fruit Gremolata
sauce veg vegan
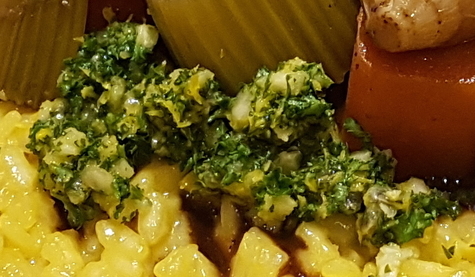
Like regular gremolata, but with some extra passion fruit.
Serves 2
Ingredients
- ½ cup minced fresh parsley
- 2 cloves garlic, minced
- grated zest of 1 lemon
- seeds from 1-2 passion fruit
Mix the ingredients. Done!
The passion fruit is, I'll admit, something of an affectation that makes it a bit crunchy.
You could always grate in a little horseradish or other citrus zest if you want to make it a bit different.
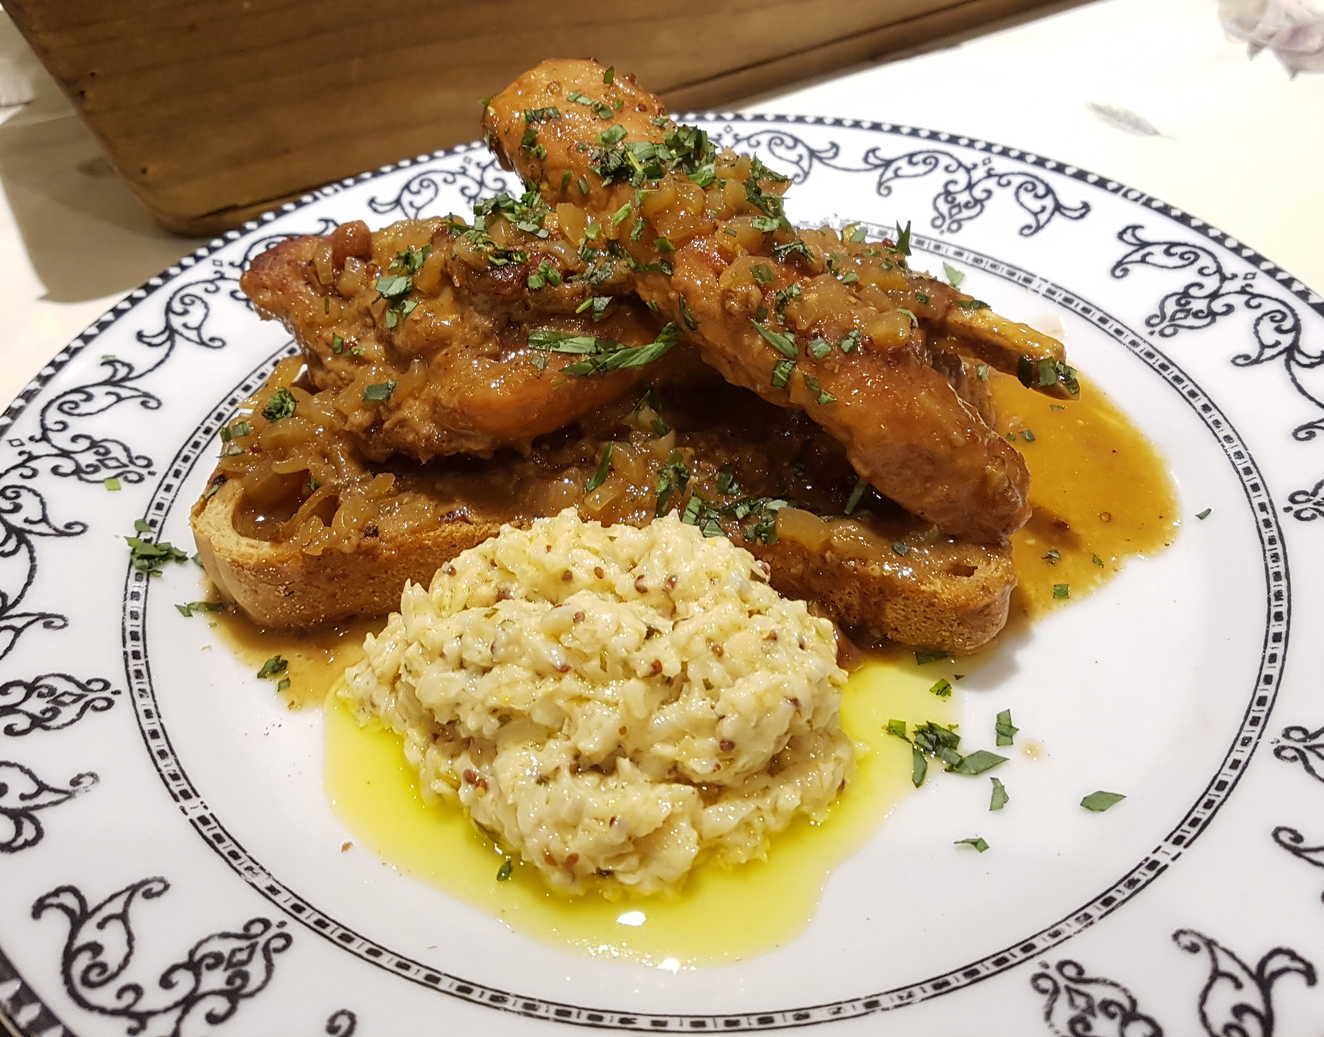
Rabbit in Chocolate Stout
main meat

I had an extra bottle of Sam Smith's chocolate stout so I decided to use it in Keith Floyd's Rabbit in Ale and Mustard.
Basically the same recipe but skipping the bread-crumbed topping and serving it on a nice fat piece of toast instead.
Serves 4
Ingredients
- 1 large or 2 small rabbits, jointed
- 1 tablespoon flour
- 1 tablespoon dry English mustard
- 4 tablespoons oil
- 1 oz (25g) butter
- 1 onion, diced
- ½ pint (300ml) chicken stock
- ¼ pint (150ml) chocolate stout
- salt
- freshly ground black pepper
- 1 tablespoon balsamic, red wine, or sherry vinegar
- 2 tablespoons brown sugar
- 2 teaspoons whole grain mustard
Toppings:- tarragon, chopped
- chives, chopped
- bitter chocolate, finely grated
Dip the rabbit joints in the flour and dry mustard.
Reserve any flour and mustard that is left over.
Heat the oil in a heavy frying pan and fry the joints until golden brown on all sides.
Lift out the joints and place them in a casserole.
Add the butter to the pan and sweat the onion until soft. Stir in any remaining flour and mustard and cook for 1 minute. Add the stock and stout and bring to the boil. Season to taste with salt and pepper and add the vinegar, sugar and the grain mustard. Pour over the rabbit and cook in a preheated oven, 325°F/160°C (gas mark 3), for 1 to 1½ hour.
To serve, arrange the rabbit on pieces of toasted ciabatta or cheap white bread and sprinkle with the herbs, or finely grated bitter chocolate, as you like.
Good - the bitterness of the stout manages to cook off nicely in the allotted time.
Salmon en Papillote with Horseradish Vodka, Kumquat and Roast Lemon
main fish
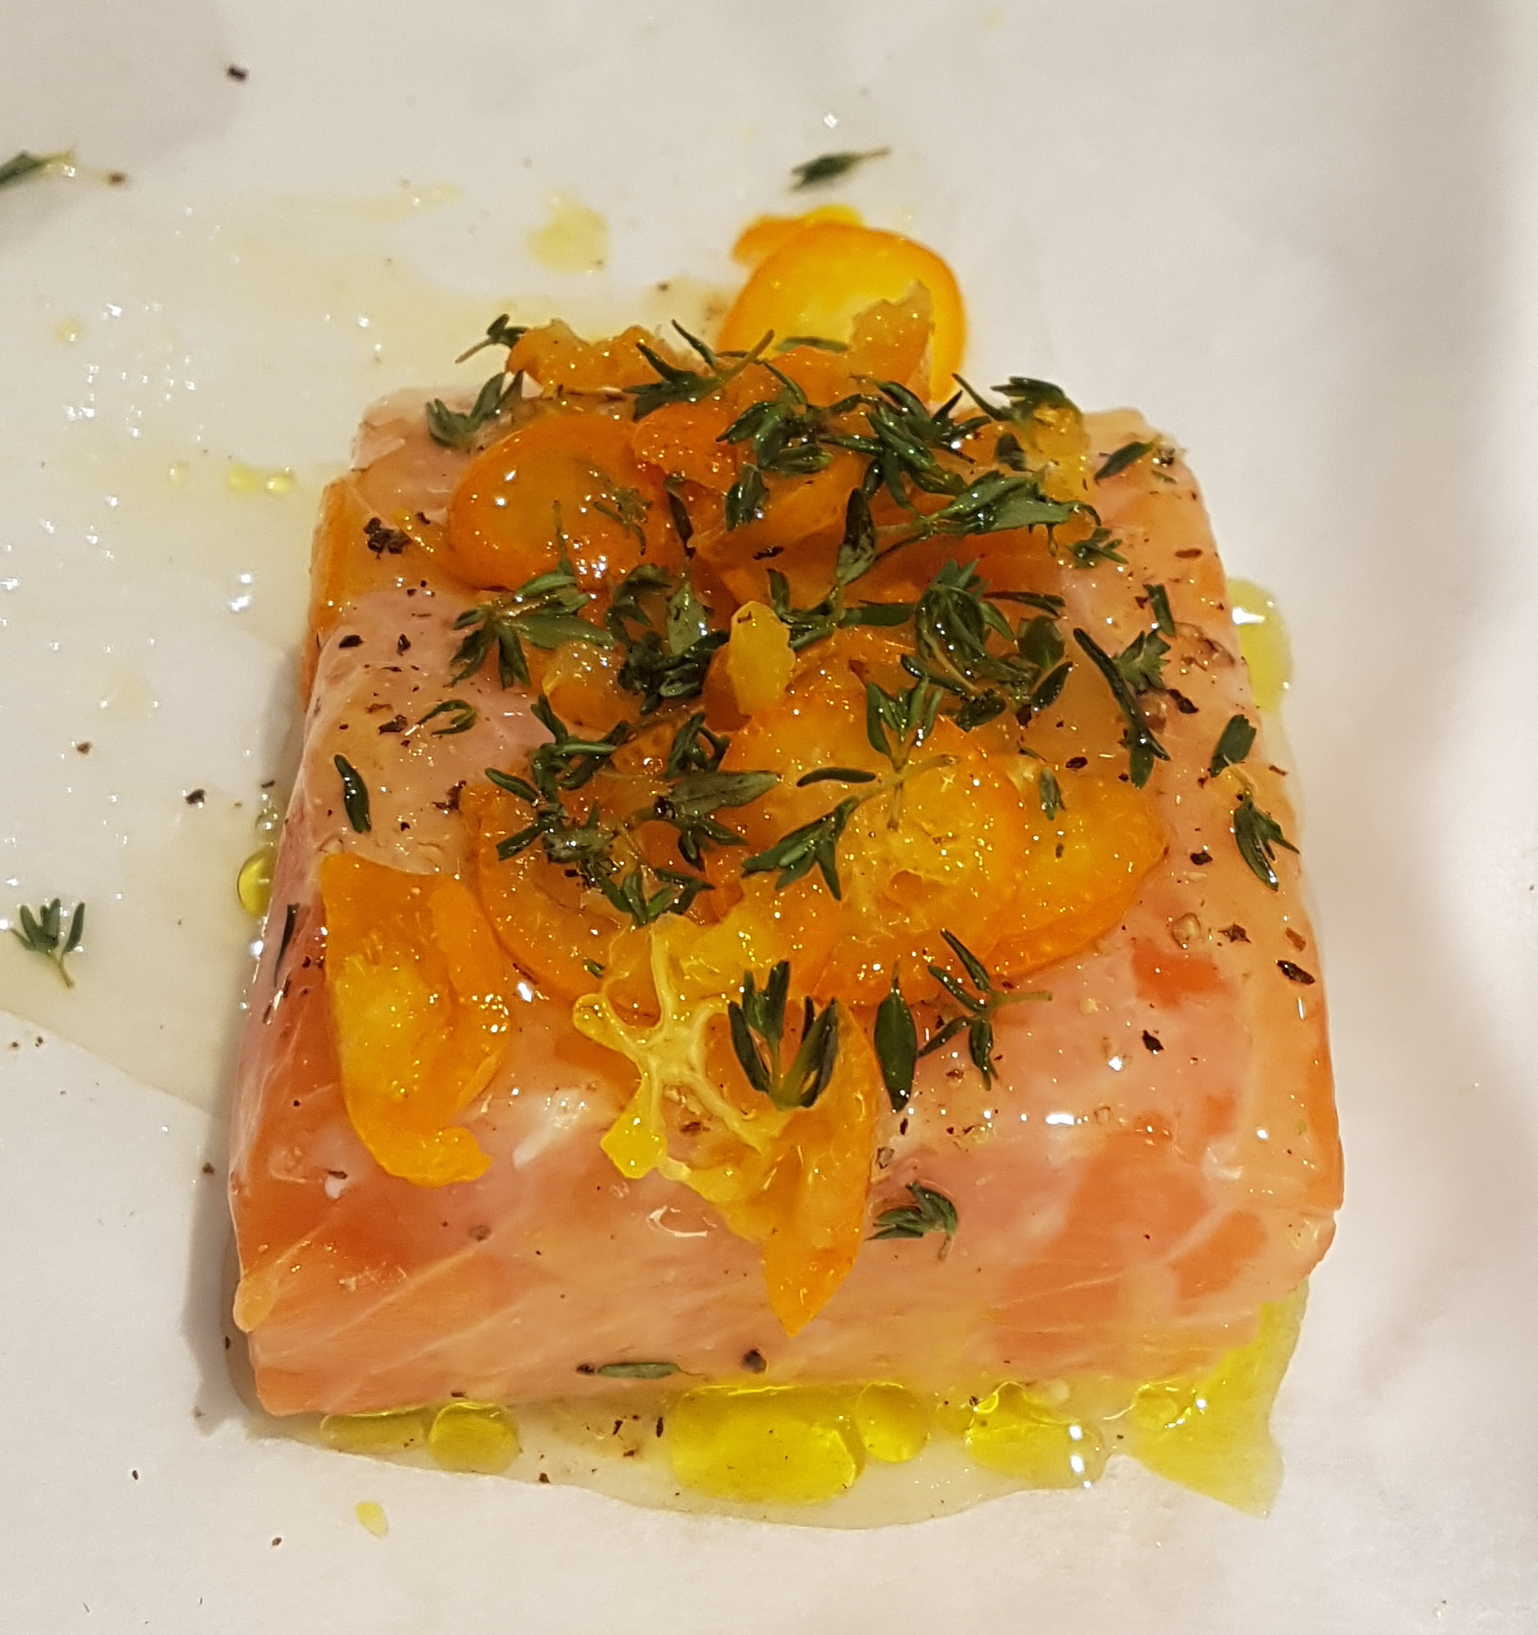
If you seal the fish first in baking parchment, then in foil for security, you can unwrap the golden parchment parcel and serve it still sealed to your guests for maximum style points.
Make sure the foil is well-crimped to prevent any leakage, pressing the edges flat with a rolling pin if necessary.
That way the more unreliable seal on the parchment is less important.
I had two lemon halves that had been used to stuff a roast chicken, so I used their juices too. It seemed to work. The result was pretty delicious.
I had two lemon halves that had been used to stuff a roast chicken, so I used their juices too. It seemed to work. The result was pretty delicious.
Serves 1 Lucky Dog
Ingredients
- a nice fat salmon fillet
- 1-2 teaspoons horseradish vodka
- 1 kumquat, seeded, thinly sliced
- 1 roast lemon
- olive oil
Preheat your oven as hot as it will go.
Cut half-circle or v-shaped pieces of foil and baking parchment the same size. Season the salmon and place it in the middle of the parchment. Remove the lemon's seeds and squeeze its pulp out over the fish. Pour over the vodka, top with the sliced kumquat, and drizzle over a little olive oil.
Crimp all around the two edges of the parchment leaving a loosely wrapped package. Then fold over the foil and crimp the edges of that too to seal everything in. Put in the top of the oven for 15-20 minutes until the parcel puffs up. Or would if it wasn't too stiff to move. Peel away the outer foil and serve the parchment package to your admiring guests.
Yum!
Salmon en Papillote with Lemongrass, Galangal and Creamed Coconut
main fish
A variation on the theme. In case you're bored.
Serves One per Parcel
Ingredients
- a nice salmon fillet
- a chunk of creamed coconut
- couple of lemongrass stalks, bruised, cut or folded to size
- a piece of galangal, or ginger, peeled, sliced
Preheat your oven as hot as it will go.
Cut half-circle or v-shaped pieces of foil and baking parchment the same size. Grate or shave the creamed coconut into the middle of the parchment and put the salmon fillet on top skin-side down. Season. Scatter with the bruised lemon grass and slices of galangal (or ginger).
Crimp all around the two edges of the parchment leaving a loosely wrapped package. Then fold over the foil and crimp the edges of that too to seal everything in. Put in the top of the oven for 15-20 minutes until the parcel puffs up. Or would if it wasn't too stiff to move. Peel away the outer foil and serve the parchment package to your admiring guests.
Oooh, deja-licious!
Scallops with a Goat's Cheese and Blood Orange Cream
main fish experimental
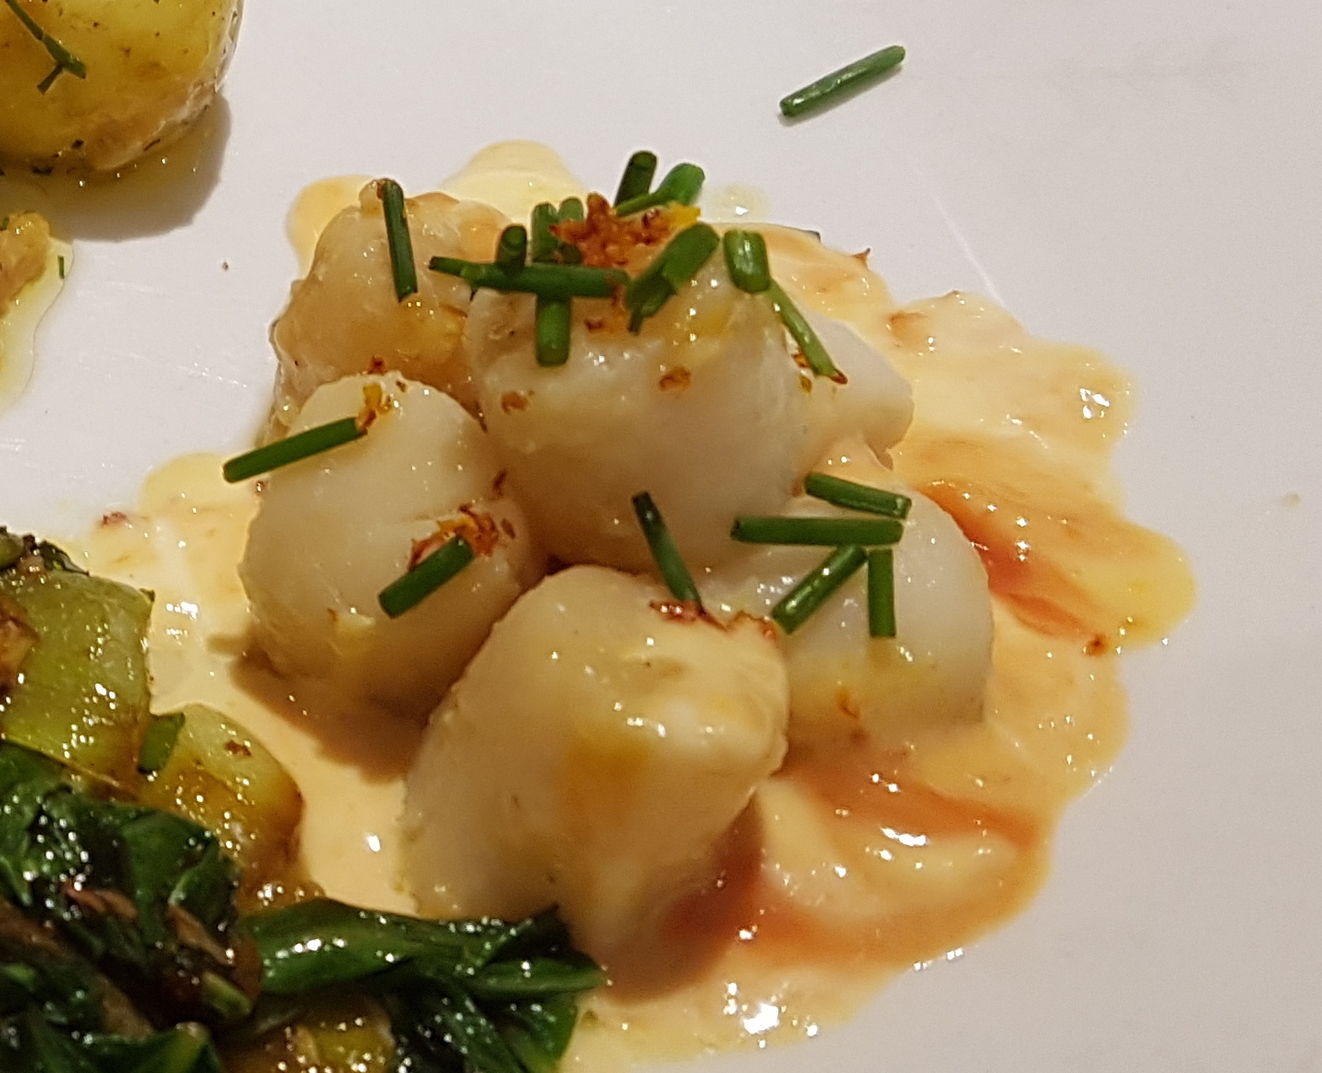
First, don't buy the scallops from the Fishmonger's market stall in Brighouse, or they'll be rubbery and taste revoltingly oily,
as if they had been frozen and defrosted a hundred thousand times.
Secondly don't make the sauce - it's disgusting. Maybe just dress the non-vulcanised scallops with reduced blood orange juice and call that good? Perhaps even try mixing the orange and plain cream. But don't do this!
Secondly don't make the sauce - it's disgusting. Maybe just dress the non-vulcanised scallops with reduced blood orange juice and call that good? Perhaps even try mixing the orange and plain cream. But don't do this!
Serves No-one. If they're lucky.
Ingredients
- half a dozen scallops
- butter
- garlic
- cherry-sized piece of goat cheese
- juice from 2 blood oranges
- double cream
- chives, chopped, to serve
Fry the scallops quickly in clarified butter.
Scoop them from the pan and add minced garlic to fry for a few seconds, then squeeze in the blood orange and boil to reduce. Mash in the goat's cheese and mix with a dash of cream.
Serve the scallops with the thick sauce, and a scattering of snipped chives.
Scoop them from the pan and add minced garlic to fry for a few seconds, then squeeze in the blood orange and boil to reduce. Mash in the goat's cheese and mix with a dash of cream.
Serve the scallops with the thick sauce, and a scattering of snipped chives.
Revolting!
Perhaps its the combination of the salty, garlicky, seafood and the creamy cheese, or the hint of sour goat with the sweet orange highlights. But it's deeply horrid. Avoid.
Perhaps its the combination of the salty, garlicky, seafood and the creamy cheese, or the hint of sour goat with the sweet orange highlights. But it's deeply horrid. Avoid.
Soft Fruit Compote
dessert vegan veg
Flora's instructions for this light fruit compote were highly unspecific so your mileage may vary.
I haven't made it, but I did eat it and it was excellent.
Apparently the syrup requires lots of sugar though.
Ingredients
- couple of tablespoons Kirsch
- 3-4 tablespoons water
- juice of 1 orange
- sugar lots, apparently
- fruit
Peel, pare, de-seed or chop the fruit into mouth-sized pieces.
Heat the sugar, water, orange juice and Kirsch and bring to the boil.
Pour immediately over the fruit, stir and allow to cool, then chill until ready to serve.
Heat the sugar, water, orange juice and Kirsch and bring to the boil.
Pour immediately over the fruit, stir and allow to cool, then chill until ready to serve.
Very good. The hot liquid lightly softens the fruit without overcooking it,
though depending on what fruit you have, you could actually cook it up in the syrup for a while.
You could consider switching up the liqueur with another fruity flavour like Cointreau or Grand Marnier, or even Tia Maria! You might add spices to the syrup too - perhaps star anise, cinnamon or vanilla pods.
You could consider switching up the liqueur with another fruity flavour like Cointreau or Grand Marnier, or even Tia Maria! You might add spices to the syrup too - perhaps star anise, cinnamon or vanilla pods.
Martin Wishart's Oxtail Stew with Olives
main meat stew
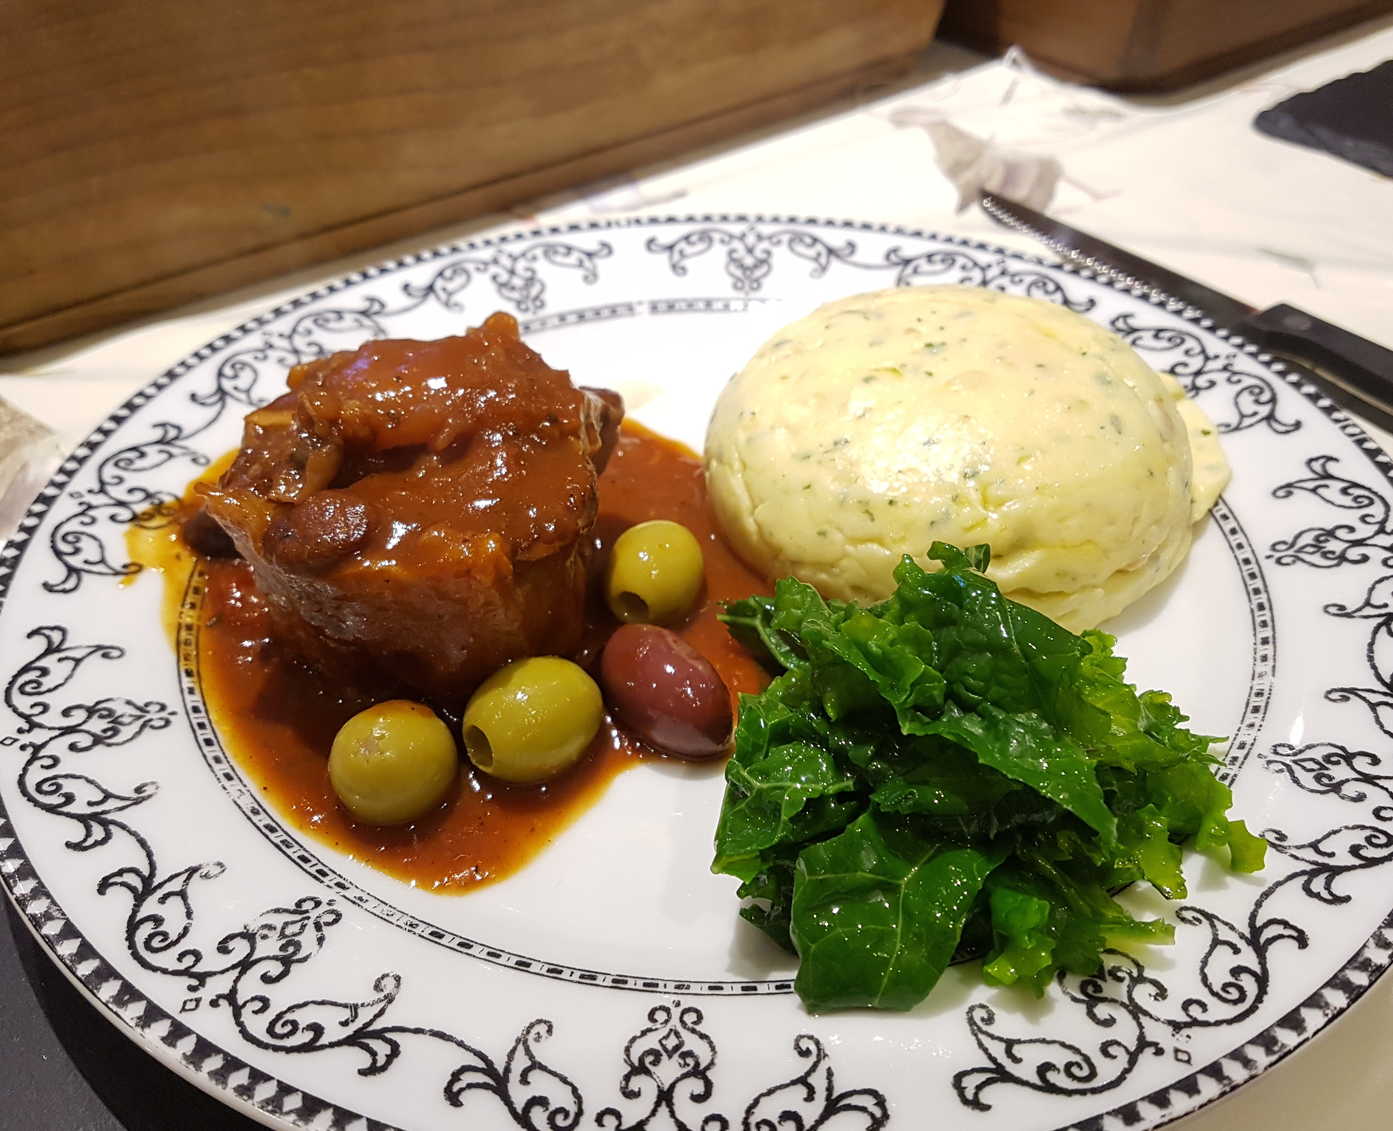
Though the original recipe cooks for only two hours, I reckon this is a recipe born for a long, slow stew.
You might use your slow cooker to good effect.
I am also responsible for the mango!
Serve with mashed potatoes, or perhaps a tangy polenta.
I am also responsible for the mango!
Serve with mashed potatoes, or perhaps a tangy polenta.
Serves 4
Ingredients
- 2 oxtail, cut into 5cm sections about 1 kg
- 120g of lardons I used thick-cut smoked bacon
- 1 large onion, sliced
- 2 garlic cloves, crushed
- 1.4l beef stock
- 800g of tinned chopped tomatoes or 500ml passata
- 300ml of dry white wine
- 4 bay leaves
- 1 bunch of thyme, small
- 1 tbsp of caster sugar
- 1 tbsp of olive tapenade
- 24 Kalamata olives
- 2 tbsp of red wine vinegar
- 3 tbsp of olive oil
- vegetable oil
optional extras:- baby onions
- button mushrooms
- mango!
Over a medium heat, sauté the lardons, onion and garlic in the olive oil in a large casserole pot until the onion is lightly browned.
In a frying pan, warm a little vegetable oil until very hot, then season the oxtail with salt and sauté until golden brown.
Add the sautéed oxtail, stock, tomatoes, wine, bay leaves, thyme, sugar and a good pinch of salt to the casserole pot.
Bring to the boil, partially cover the pot with a lid, then reduce the heat and leave to simmer for 2 hours, occasionally skimming off any fats that rise to the surface.
Add the Kalamata olives, season with salt and pepper, then finally add the red wine vinegar.
In a frying pan, warm a little vegetable oil until very hot, then season the oxtail with salt and sauté until golden brown.
Add the sautéed oxtail, stock, tomatoes, wine, bay leaves, thyme, sugar and a good pinch of salt to the casserole pot.
Bring to the boil, partially cover the pot with a lid, then reduce the heat and leave to simmer for 2 hours, occasionally skimming off any fats that rise to the surface.
I cooked mine in the oven - on its lowest setting with the lid slightly open.
The temperature of the stew held at about 80°C, and I cooked it for 6 hours
though I think it could have gone longer.
Stir in the olive tapenade and baby onions and continue to simmer for another hour until the meat easily comes away from the bone.Add the Kalamata olives, season with salt and pepper, then finally add the red wine vinegar.
Really delicious!
I served mine with mint and lime zest polenta, and blanched kale dressed with herb oil.
You can add baby onions, mushrooms, and even pieces of mango an hour from the end to good effect.
It also occurs to me that you might add star anise or soy sauce to aromatize or deepen the flavours.
I served mine with mint and lime zest polenta, and blanched kale dressed with herb oil.
You can add baby onions, mushrooms, and even pieces of mango an hour from the end to good effect.
It also occurs to me that you might add star anise or soy sauce to aromatize or deepen the flavours.
Roast Corn on the Cob
side veg vegan

Roast corn is, I think, actually nicer if you can get some butter onto the kernels before roasting.
But prising them open, slathering them with flavour, then carefully folding back all the leaves is such a faff.
This method couldn't be easier, and the results are almost as good once the cooked corn is dressed with butter and salt anyway.
You must use whole ears with the leaves still on though - otherwise you should butter the cobs and wrap them in tin foil instead.
Which still might just be best.
You must use whole ears with the leaves still on though - otherwise you should butter the cobs and wrap them in tin foil instead.
Which still might just be best.
You can though, if you like, melt butter, prise an opening in the top end of the cobs and dribble in the butter with a small funnel.
For the best of both worlds.
Serves a Barbecue
Ingredients
- whole ears of corn on the cob, leaves on
Preheat the oven to about Gas Mark 5 - though anything between Gas 4 and Gas 6 will be fine.
Wash the ears to clean and dampen them if you can be bothered.
Put them on a baking tray (or right on the rack) in the middle of the oven unopened.
Bake for about an hour, until the outer layers are dry and crispy and beginning to burn a little.
Take the cobs out and let them rest for 5-10 minutes so they're cool enough to handle.
Holding them by the stalky end, peel back the leaves and the silks and discard.
Rub with salty, peppery, garlicky or herby butter, crushed chilli flakes and a squeeze of lime, or whatever floats your boat. They're not too bad just on their own, though salt definitely brings out the best in them.
Easiest. Vegetable. Ever.
And pretty tasty too.
And pretty tasty too.
Celeriac Dauphinoise with Gruyère and Garlic
side veg
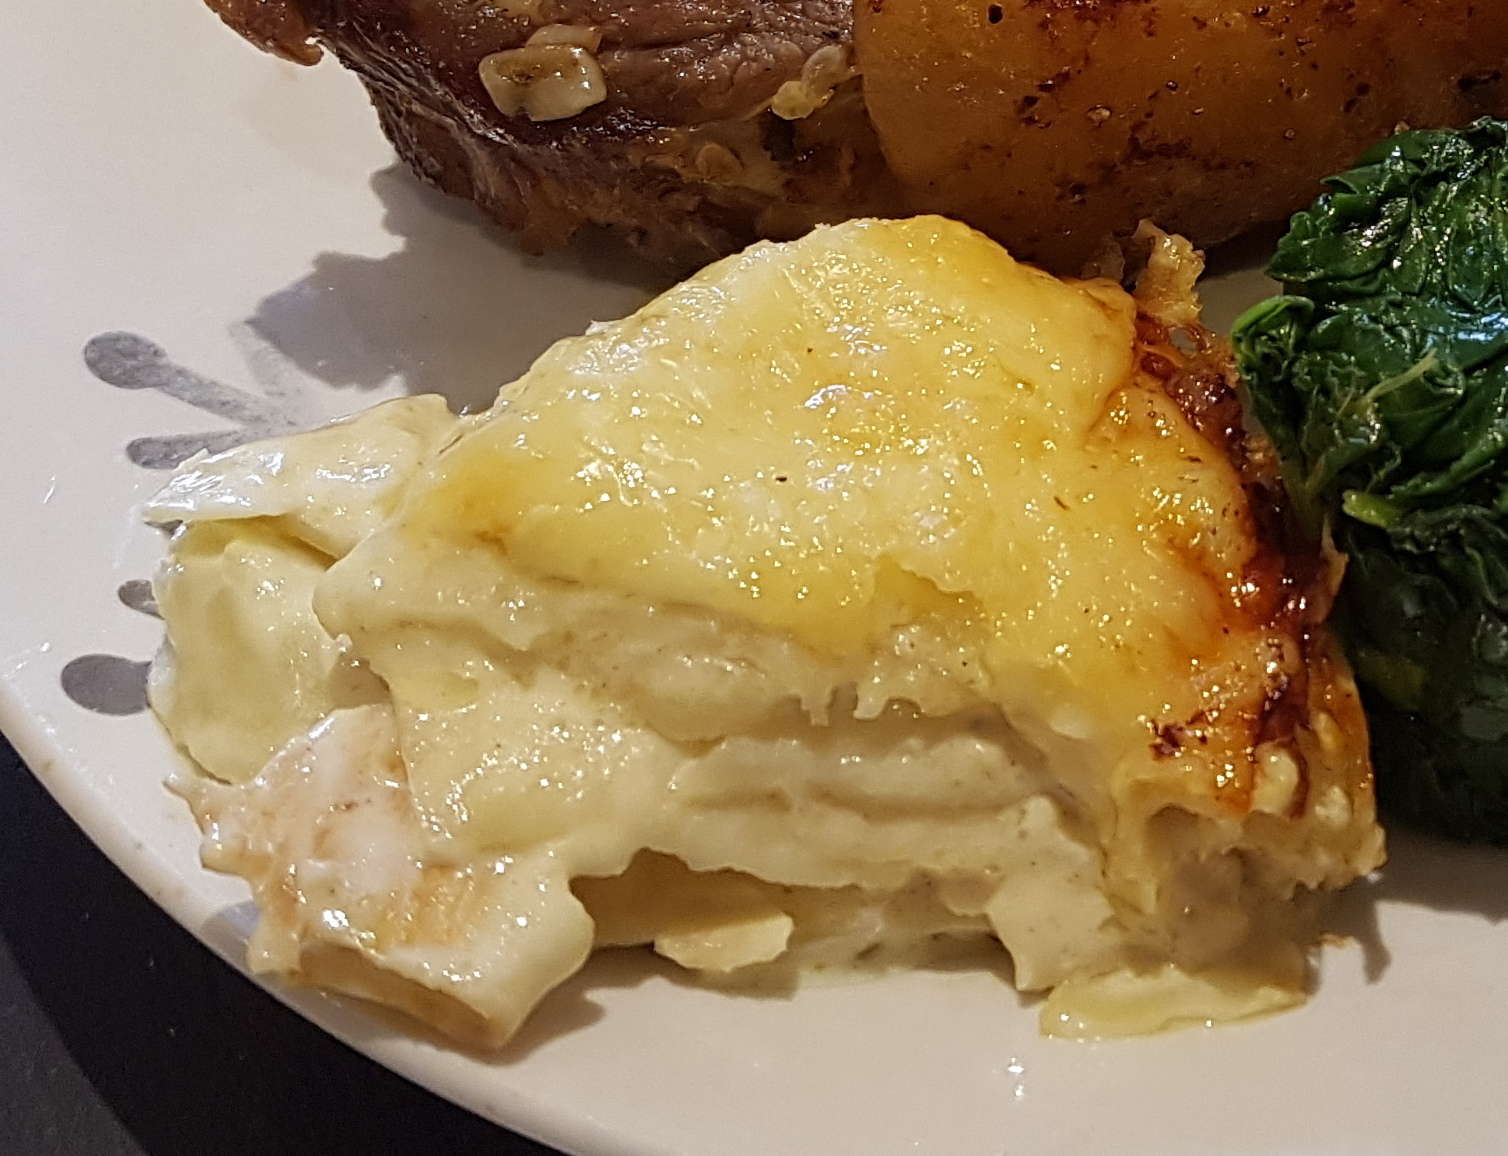
Apart from the fact that I infused the milky cream with garlic, nutmeg and thyme by simmering it up for a while
(in a pot with a cling-film lid) before straining out the bits,
I followed this recipe pretty closely.
Well, and cooking at Gas Mark 4. Which went up to Gas Mark 5 after 30 minutes.
The result was an oddly undercooked gratin, though it did taste pretty good after another hour in a low oven to finish off all the layers.
The problem, I think, was that my celeriac was pretty old, that the slices pre-cooked unevenly in the pan, and that I didn't properly separate them as I layered them in the casserole resulting in some layers clumping and not cooking well. I'd be tempted to cook for longer in the pan, but the truth is that the bottom layers were already collapsing and sticking. If not burning.
So perhaps the better approach would be to:
- don't use an old, tough, hollow-sounding, oddly light, slightly mouldy celeriac.
- season the liquid - use at least ½ teaspoon of salt.
- add more milk so that you have plenty of liquid for pre-cooking the celeriac slices.
- simmer for no more than 5 minutes to avoid disintegrating the bottom slices.
- carefully separate and layer the slices properly, moistening them a little with the liquor as you go.
- reduce the runnier liquid in the pot to thicken before pouring the remainder over the casserole.
- cook for much, much longer. And perhaps a bit hotter. Gas Mark 5 for an hour, say. You can always leave off the gruyère until closer to the end.
Serves 8
Ingredients
- 1kg celeriac, peeled
- 2 garlic cloves, crushed
- ½-1 tsp salt
- 200ml of double cream
- 200ml of milk perhaps double it
- ½ nutmeg, grated
- 150g of Gruyère
Preheat the oven to 170°C/gas mark 3
Next, place the slices of celeriac in a large saucepan and add the garlic, cream, milk and nutmeg. Place on the hob over a medium heat – you will find that the cream and milk won’t cover the celeriac completely but no matter Narrator: it will matter!, this is all just to get the process started and the flavours introduced
Once simmering away, cover preferably with cling film and leave to steam and cook for 5 minutes, then take off the heat and then leave to cool slightly
Using a slotted spoon, lift the celeriac out and arrange in a baking dish in layers laying flat on top of each other. Make sure to separate each slice so they don't clump together in uncooked lumps. Pour the remaining reduced creamy liquor over the top and shake the dish so that you have an even layer. Scatter over the Gruyère cheese or do that later and place in the oven for 30 minutes HA! or until the top begins to bubble and brown
Serve in wedges with some handsome roast meat or simply by itself for a light meal. I often find that it is better warmed up the next day. Possibly because you didn't cook it properly the first time?
Nope. You might as well just blow on it to warm it up.
First, slice your celeriac into thin slices. Use a mandoline.Next, place the slices of celeriac in a large saucepan and add the garlic, cream, milk and nutmeg. Place on the hob over a medium heat – you will find that the cream and milk won’t cover the celeriac completely but no matter Narrator: it will matter!, this is all just to get the process started and the flavours introduced
Once simmering away, cover preferably with cling film and leave to steam and cook for 5 minutes, then take off the heat and then leave to cool slightly
Using a slotted spoon, lift the celeriac out and arrange in a baking dish in layers laying flat on top of each other. Make sure to separate each slice so they don't clump together in uncooked lumps. Pour the remaining reduced creamy liquor over the top and shake the dish so that you have an even layer. Scatter over the Gruyère cheese or do that later and place in the oven for 30 minutes HA! or until the top begins to bubble and brown
Serve in wedges with some handsome roast meat or simply by itself for a light meal. I often find that it is better warmed up the next day. Possibly because you didn't cook it properly the first time?
It's pretty nice when you get it cooked through though.
Simple Buttered Cabbage
side veg
Two simple ways of buttering up cabbage leaves:
- The first touted by Kevin Mangeolles as part of his recipe for beer braised hare, which I keep plundering, leaves the leaves (😂) quite pristine by blanching them first, if presentation is what you're going for.
- The second, promoted by Molly Watson wilts the leaves in foaming butter while they absorb additional flavours, if taste is more your bag.
Best made with a cabbage with a bit of character, such as a pointy one or a savoy.
Ingredients
- cabbage a wrinkly one, like savoy, or pointy
- butter
- salt
Optional Extras:- ground pepper
- herbs, spices
- stock, wine, vinegar
- cheese
Separate the cabbage leaves and cut them into pieces.
Put them in a pot with a generous amount of butter on medium heat until the butter melts and nicely coats everything. Salt & serve.
Alternatively:
You can skip the blanching and cook the cabbage pieces all the way in foaming butter by salting and adding a few tablespoons of water or stock, wine, or good vinegar, covering and then gently sweating until tender. It will take a bit longer this way; 15-20 minutes.
Bit-sized squares, rectangles or lozenges work nicely.
Of course you could just shred them, but then you'd hardly need to bother with the blanching.
Blanch the pieces in boiling water for under a minute. Drain. Refresh in iced water unless serving immediately.
In which case you could just dress them with herb oil. Or...Put them in a pot with a generous amount of butter on medium heat until the butter melts and nicely coats everything. Salt & serve.
Alternatively:
You can skip the blanching and cook the cabbage pieces all the way in foaming butter by salting and adding a few tablespoons of water or stock, wine, or good vinegar, covering and then gently sweating until tender. It will take a bit longer this way; 15-20 minutes.
Simple. Tasty. Serve in little piles for a pretty plating, next to a massive sirloin steak smothered in blue cheese sauce. Say.
Of course you could add pepper oh, the luxury!, other spices (garam masala, ras el hanout), seeds (caraway or cumin are nice), herbs, cheese, etc.
Of course you could add pepper oh, the luxury!, other spices (garam masala, ras el hanout), seeds (caraway or cumin are nice), herbs, cheese, etc.
Braised Red Cabbage with Balsamic Vinegar
side veg
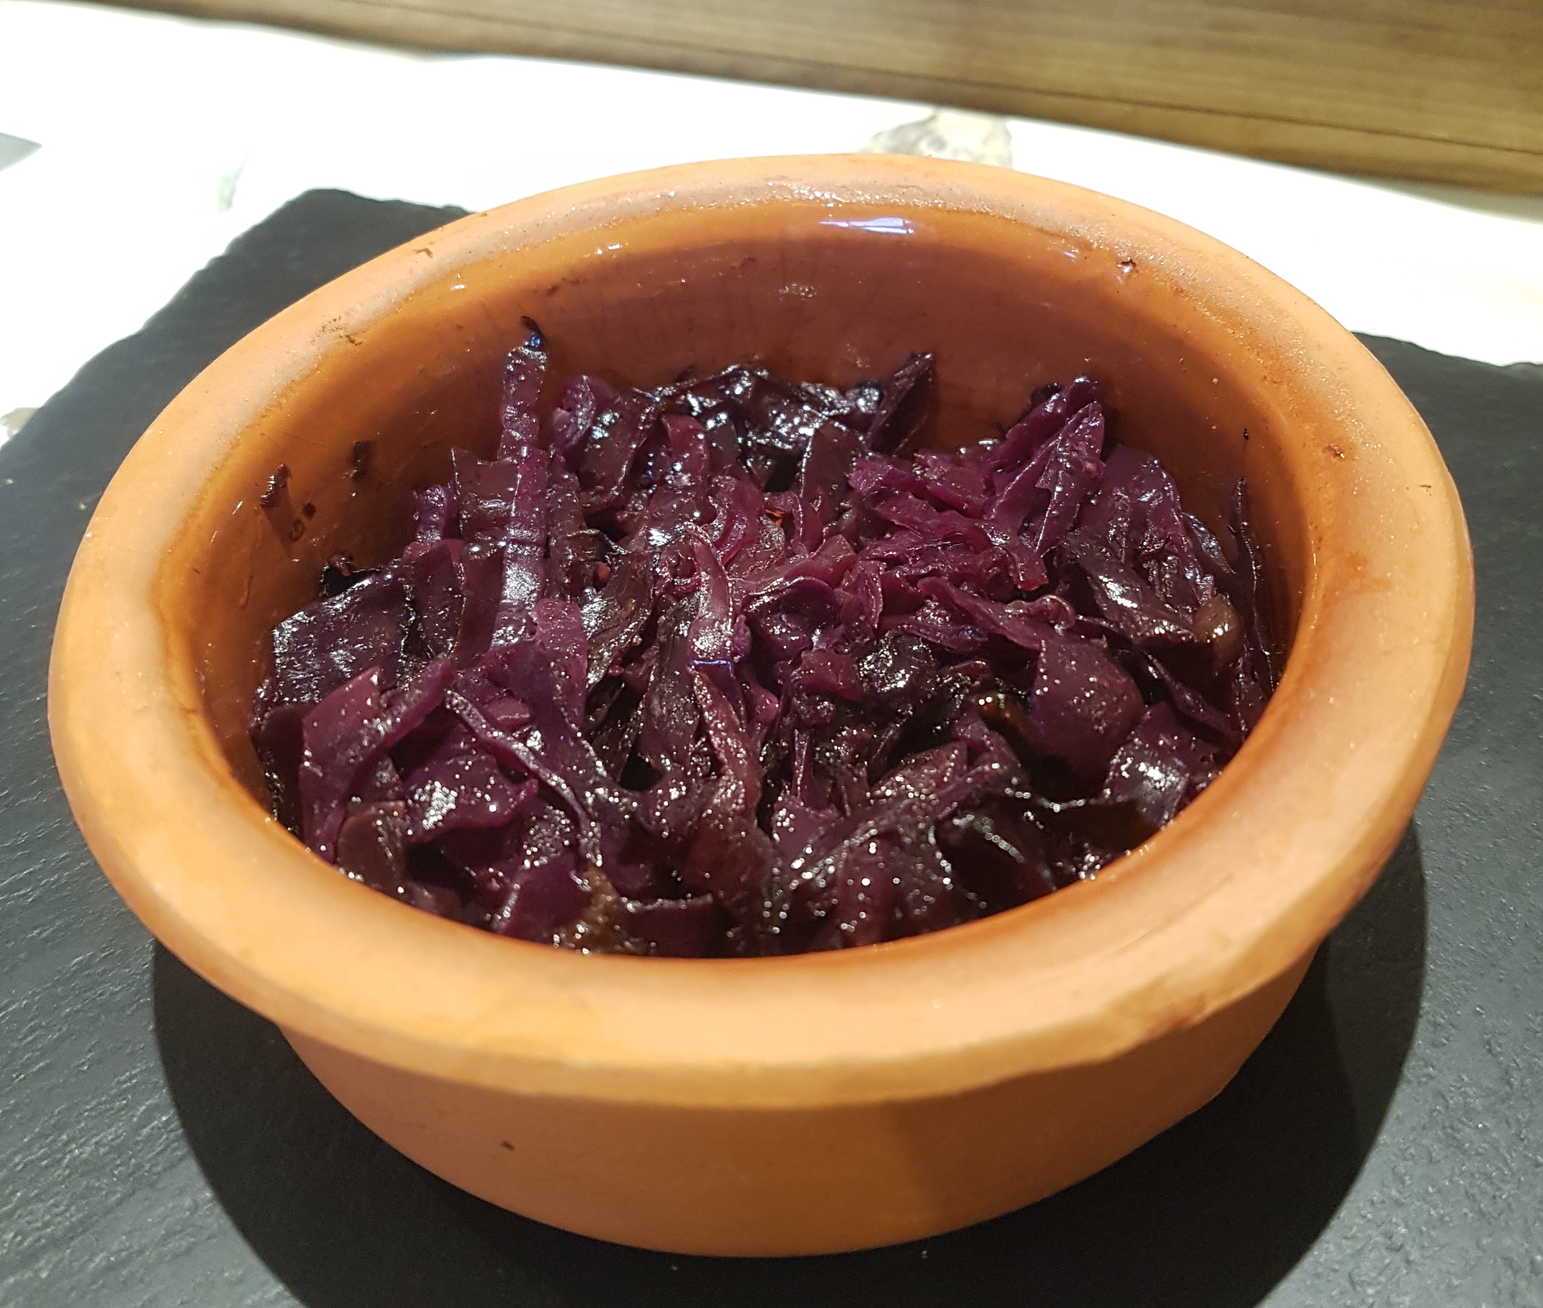
A very nice version of braised cabbage.
Its simplicity brings out the best in the flavour of the cabbage, and the lack of absolutely any liquid other than the vinegar gives a deeply rich result.
I imagine it could easily burn though, so be wary of overcooking it.
I imagine it could easily burn though, so be wary of overcooking it.
Ingredients
- red cabbage
- red onion
- quality balsamic vinegar
- butter
For the Rosemary Salt:- fresh rosemary leaves
- sea salt
- mixed peppercorns
Preheat the oven to Gas Mark 2.
Strip the leaves from about 4 stalks of rosemary, then grind them up with a few teaspoons of salt and one or two teaspoons of mixed peppercorns in a spice grinder. You probably won't manage it with a pestle and mortar - those rosemary leaves are tough little beggars.
Slice the cabbage fairly thinly and the onion even thinner. You probably want 4 or 6 to one cabbage to onion. Mix them together.
Place a few shavings of butter in the bottom of your casserole dish,
then build up layers of cabbage and onion mix seasoning each one with the rosemary salt and few butter shavings.
Season the final layer, top with butter shavings and drizzle over a quality, preferably nicely aged, balsamic vinegar.
Seal the casserole dish well with foil, then bake for 2 hours.
It tastes as good as it smells - delicious!
Though the dish doesn't need it, you could probably enhance the salt by adding other herbs, say sage, some lemon zest and a little garlic into the grind.
Though the dish doesn't need it, you could probably enhance the salt by adding other herbs, say sage, some lemon zest and a little garlic into the grind.
Mexican Sweetcorn Salad with Chicken
Esquites
Esquites
Working from SeriousEats
salad veg mexican
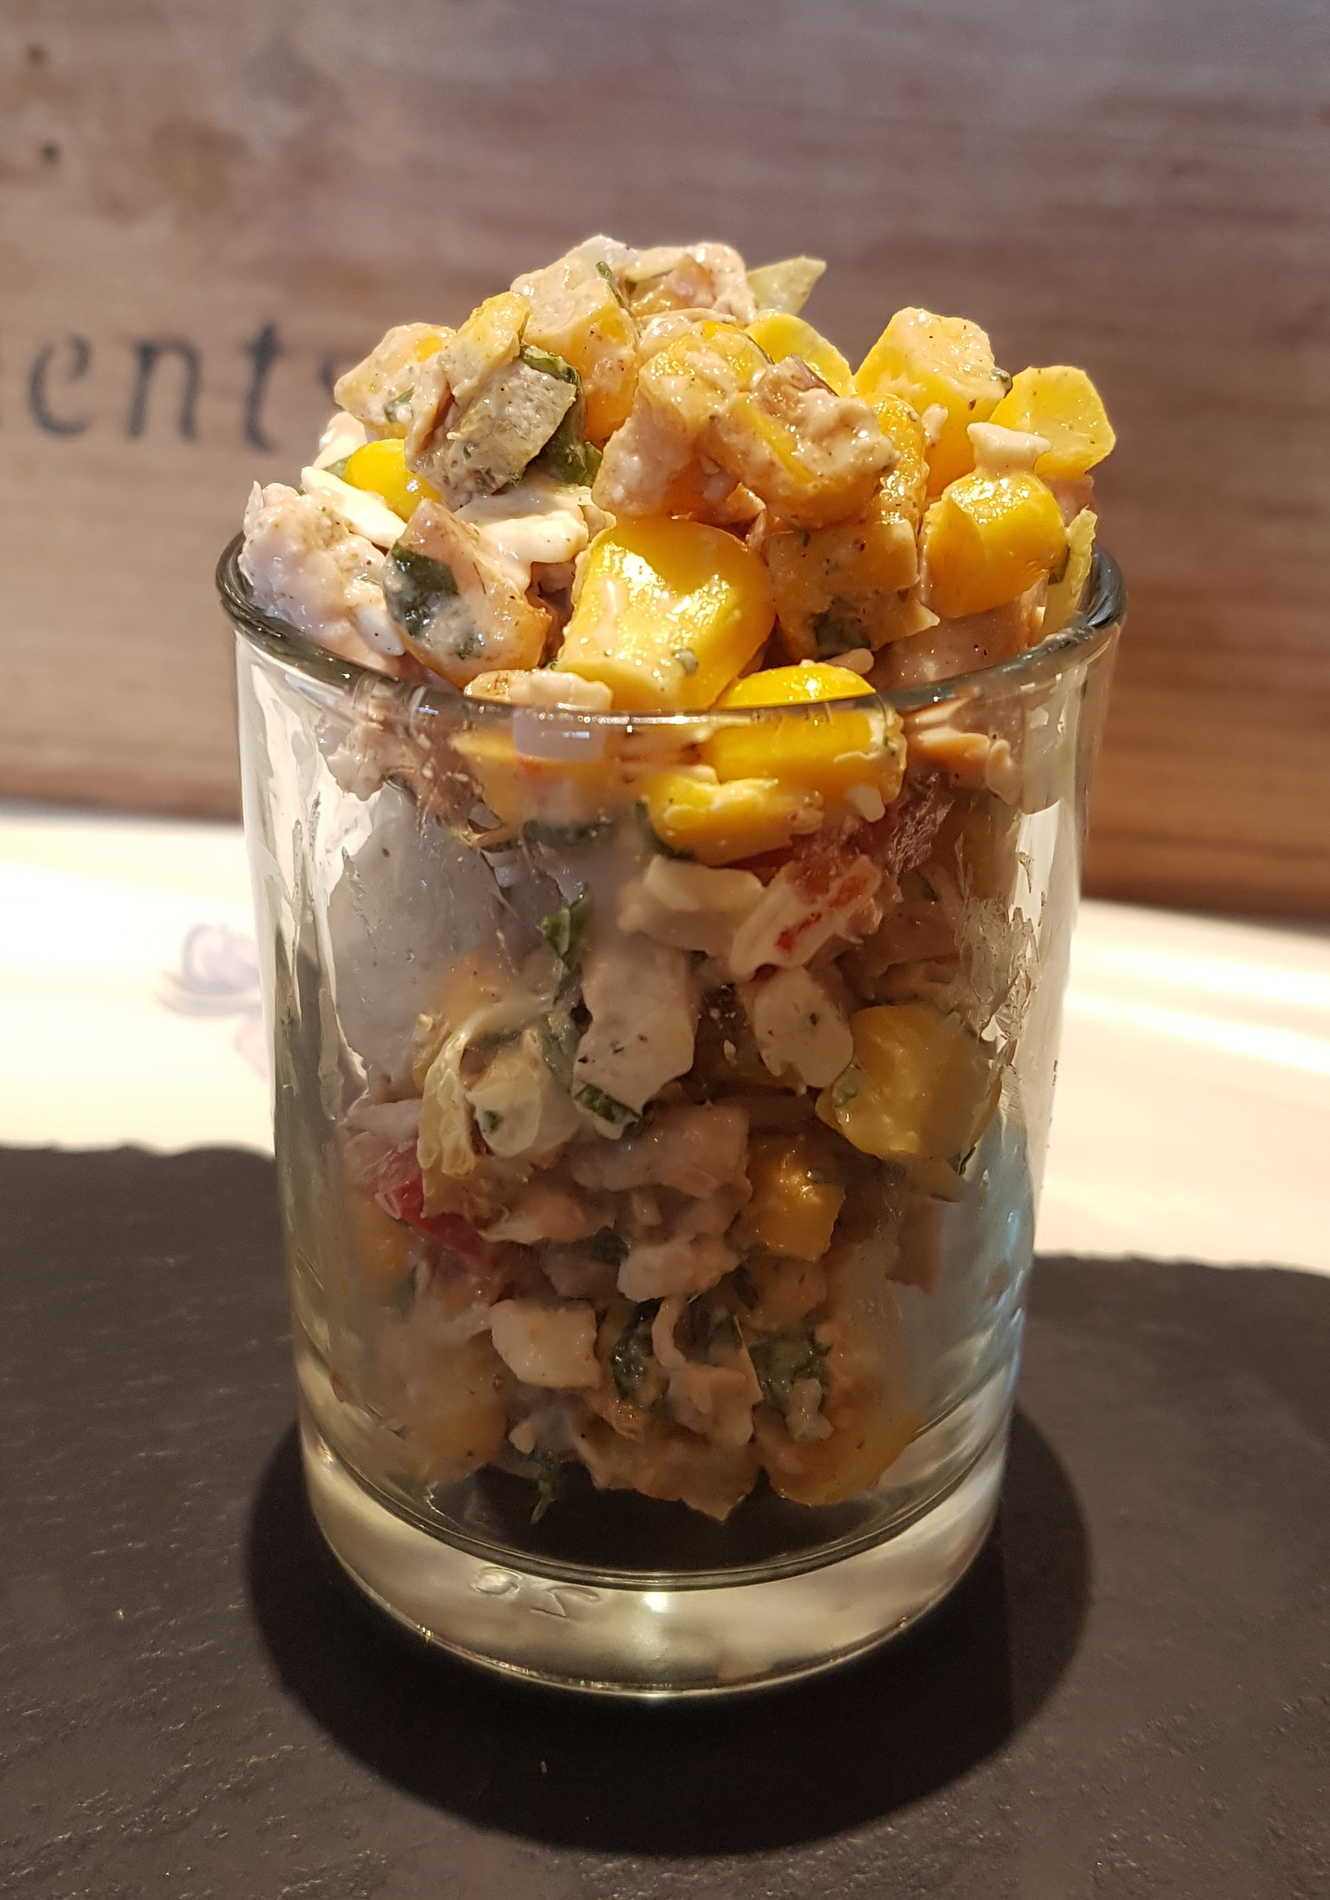
Mexican street food, apparently.
You can make this using corn kernels sliced off freshly barbecued, or oven-roasted, cobs, or you can make a pale imitation by slicing the kernels off a raw cob and pan-frying them as instructed below. Supposedly you can use frozen corn; I made mine with a (drained) tin of sweet corn. They charred up pretty well all the same.
You can use feta if you can't find Mexican Cotija cheese, which I didn't even bother trying.
I also threw in some diced red pepper, and chicken chunks to make it avowedly non-vegetarian which worked well, and garnished with slices of avocado, that seemed appropriately ethnic. My jalapeños were pickled, but I think that might have even been better.
Serves 4
Ingredients
- 2 tablespoons unsalted butter or extra-virgin olive oil
- 3 cups corn kernels (16 ounces frozen or from about 4 fresh cobs)
- ½ teaspoon fine salt
- 2 ounces (60g) feta or Cotija cheese, finely crumbled, plus extra for garnish
- ½ cup finely sliced scallions, green parts only
- ½ cup (½ ounce) fresh cilantro leaves, finely chopped
- 1 jalapeño pepper, seeded and stemmed, finely chopped
- 1-2 medium cloves garlic, pressed or minced on a microplane grater (about 1 to 2 teaspoons)
- 2-4 tablespoons (30-60ml) mayonnaise
- 1 tablespoon (15ml) fresh lime juice from 1 lime
- 1 teaspoon chilli powder or hot chilli flakes, to taste
- Pinch of cayenne pepper (optional, for extra heat)
Extras:- red pepper, diced
- chicken, cooked, diced
- avocado, sliced or diced
Melt the butter or oil in a large skillet, preferably cast iron, over high heat.
Add corn kernels (if using frozen corn, no need to defrost first), season to taste with salt, toss once or twice,
and then cook for a few minutes without moving until charred on one side.
Toss corn, stir, and repeat until charred on second side, about 2 minutes longer.
Continue tossing and charring until corn is well charred all over, about 10 minutes total.
Transfer to a large bowl.
Mix in all the other ingredients and toss to combine. Taste and adjust seasoning with salt and more chilli powder to taste.
To serve, divide the mixture between small bowls and garnish them with a wedge of lime, perhaps a sprinkle of additional cheese and chili powder.
Leftovers keep well, refrigerated, for about 4 days.
Tasty, zesty stuff indeed.
Lamb with Cassoulet of Summer Beans with Rosemary and Basil Oil
main meat
Supposed to be made with double-cut rib lamb chops, which have two ribs per chop making them quite a bit fatter,
but all I had were lamb (I think shoulder) steaks.
Which overcook very easily, so don't put them in the oven for very long, or at all.
On the subject of Quick Sauces Thomas Keller notes:
On the subject of Quick Sauces Thomas Keller notes:
In fact, they are anything but quick-unless you’re comparing them to classical stocks made in big batches over several days.
Quick sauces should take about two hours to prepare.
They’re not meant to be made at the last minute. Make them early in the day.
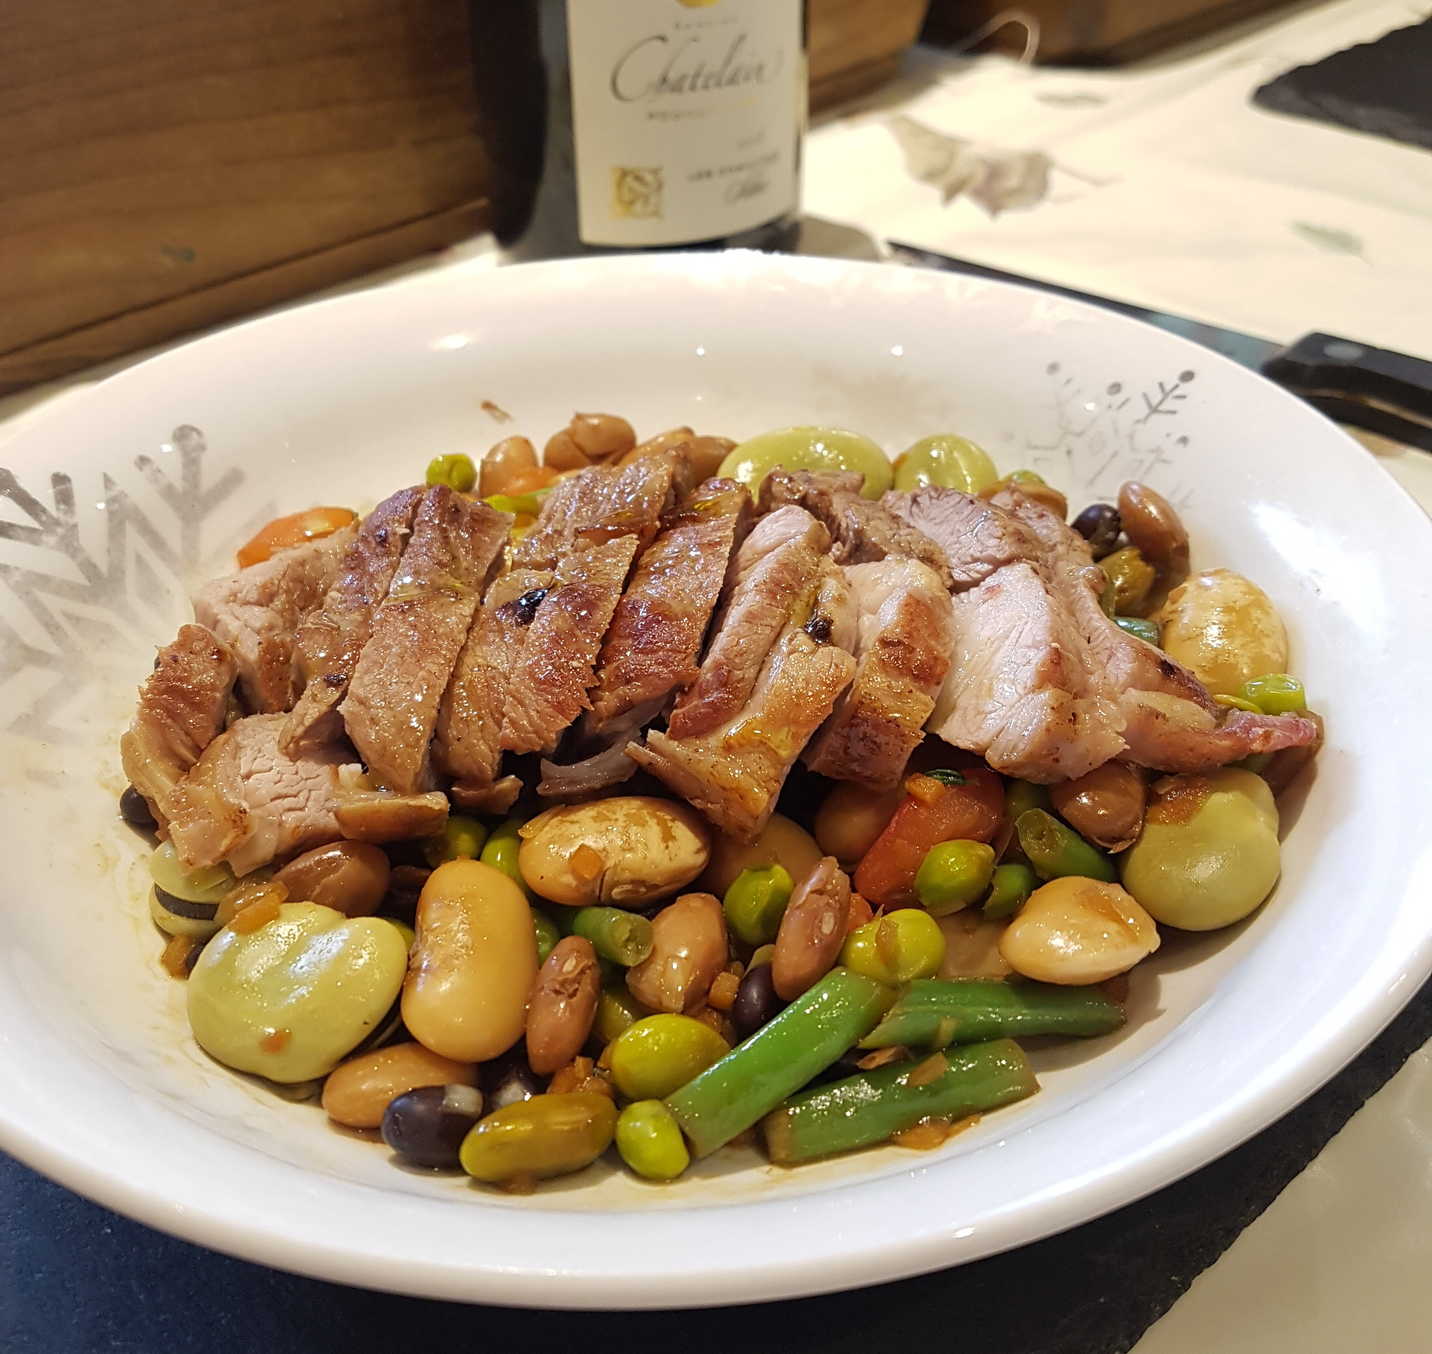
Ingredients
For the Bean Cassoulet:- ¼ cup fava (broad) beans, peeled
- ¼ cup soy beans
- 2 tablespoons dried marrow beans or other white beans, soaked overnight, at room temperature, in 1 cup of water
- 2 tablespoons dried cranberry (borlotti) beans, soaked overnight, at room temperature, in 1 cup of water
- ½ cup chicken stock
- 2 (2-inch) pieces leek, white parts only
- 2 (2-inch) pieces carrot
- 2 (2 inch) pieces of onion wedge
- ¼ cup green beans, trimmed, blanched until tender, cooled in an ice bath and drained
- ¼ cup yellow wax beans, trimmed, blanched until tender, cooled in an ice bath and drained
- 1 recipe Quick Sauce, lamb variation
- 1 teaspoon butter
- 1 plum tomato, peeled and seeded, flesh cut into ½-inch diamonds you might need two
- 2 teaspoons very finely minced mixture leek, carrot and onion
- Coarse salt
- Freshly ground pepper
For the Lamb:- 6 double-cut rib lamb chops, trimmed of excess fat and silverskin, bones frenched (about 4 to 5 ounces each)
- Coarse salt
- Freshly ground pepper to taste
- Oil
- 2 tablespoons butter
- 3 cloves garlic, crushed
- 6 sprigs thyme
- 1 sprig rosemary
- Basil oil
For the Quick Lamb Sauce:- ½ cup oil
- 1½ pounds bones preferably lamb!, cut or chopped into 1-inch pieces
- 3 cups water, divided
- 2½ cups chicken stock, divided
- 1 cup finely minced onions
- 1 cup finely minced leeks, white part only
- 1 cup finely minced carrots
- 2 cups veal stock or 1 cup veal stock plus 1 cup stock made with same bones
- 2 sprigs thyme
- 1 cup chopped tomatoes
- 2 crushed cloves garlic
Make the Sauce:
Heat the oil over high heat in a wide heavy pot large enough to hold the bones in 1 layer. When the oil just begins to smoke, add the bones. Sear the bones, without stirring until well browned, about 10 minutes. If the bones are moved before they are browned, they will give off their juices and begin to steam rather than brown. Turn the bones and cook until evenly colored, about 10 minutes more.
Add 1 cup water to the pot. Listen as the liquid goes into the pot: You will hear it sizzling as it hits the hot pot, then, as it reduces, it will become quiet. When the water has reduced to a syrup, about 15 minutes, stir with a wooden spoon, scraping up any glazed juices clinging to the bottom of the pot. Continue cooking until the water has completely evaporated and the pot is reglazed and sizzling again.
When the water has evaporated, deglaze the pot with ½ cup of chicken stock, following the same steps as the water. This time, as the stock boils down, the color of the bones and liquid will become deeper and the natural gelatin in the stock will glaze the bones.
Add the onions, leeks and carrots. The water in the vegetables provides enough liquid for a quick deglazing. Cook as above until the moisture has evaporated and the vegetables are lightly caramelized, about 10 minutes.
After the vegetables are lightly caramelized, add 2 sprigs thyme, 1 cup chopped tomatoes and 2 crushed cloves garlic and cook until the juices of the tomato as well as those from the vegetables evaporate to form another glaze
Add the remaining 2 cups chicken stock, the veal stock and the remaining 2 cups of water. Deglaze the pot, scraping up the glazed juices from the bottom, then transfer the stock and bones to a smaller, narrower pot so that it will be easier to skim.
Bring to a simmer with the pot set partially off the burner to force the impurities to the side of the pot and ladle them off as they rise to the top. Simmer until the stock has reduced to the level of the bones, about 1 hour.
Strain the sauce through a fine strainer and repeat. Do not force any of the solids through the strainer or they will cloud the sauce. You should have about 2 cups of liquid.
Pour the liquid into a small saucepan, reduce to about 1 cup and strain.
Cook the Bean Cassoulet:
Remove the little “germ” that is attached to the side of each fava bean. Blanch the beans in plenty of rapidly boiling salted water until tender, 1 to 2 minutes, then transfer them to an ice bath with a slotted spoon to cool. Drain when cool. My fat broad beans took longer - 3 or 4 minutes. Don't forget to peel off their tough outer skin. Blanch the soy beans the same way, 3 to 4 minutes, chill and drain.
Remove and discard any skins from the soaking beans that have risen to the top of the water. Drain and rinse the marrow beans and cranberry beans and place them in 2 separate pots. Cover each with cold water by at 2 inches and bring to a boil. Remove any bad beans that float to the surface. Drain the beans and run under cold water to cool.
Return the beans to the pots and cover each with ¼ cup chicken stock and enough water to cover the beans by three times. Add a slice of leek, carrot and onion to each pot. Heat the liquid slowly and bring to a simmer. Some beans that have not hydrated, and any loose skins will come to the top. Skim them and discard. Simmer the beans until they are tender, 40 to 50 minutes. (The recipe can be prepared up to this point one day ahead and the beans refrigerated in their cooking liquid, tightly covered.)
Cut the green beans and the yellow wax beans on the bias into pieces that are about 1 inch long.
When almost ready to serve, drain the cooked marrow and cranberry beans from their liquid and combine with the fava and soy beans in a skillet with about ½ of the “Quick” Sauce. Bring to a simmer, skim any impurities and cook until warmed through, about 1 to 2 minutes. Stir in 1 teaspoon of butter, then the green and yellow wax beans, the tomato diamonds, the minced carrot, celery and leek and the salt and pepper to taste. Keep warm while cooking the lamb.
Cook the Lamb:
Loop a piece of kitchen twine around the backside of the bone of a lamb chop. Wrap both ends of the twine around the meat and back to the bone. Tie the twine around the bone to give a uniform shape to the chop. Cut the excess twine and repeat with the remaining chops.
Wrap the bones in aluminum foil to protect them from burning, season the chops with salt and pepper, and let rest at room temperature for an hour.
Heat the oven to 375°F/Gas Mark 5.
Heat ⅛ inch of oil in a skillet over medium-high heat. Add the lamb chops and cook for about 3 minutes to brown. Turn the chops and continue to cook for another 3 minutes. Place the chops on their sides and rotate them to brown the sides for another 1 to 2 minutes. The meat should be well browned but still slightly rare.
Remove the excess fat from the pan (leave the original amount) and add the butter, basting the lamb chops with the butter as it melts. Top the lamb with the garlic cloves and the sprigs of thyme and rosemary. Place the pan in the oven for about 2 minutes or until the meat is medium rare and a meat thermometer registers 115 to 120 degrees. Remove the pan from the oven and let the meat rest for 3 to 4 minutes.
Serve:
Place a portion of the warm bean mixture on each plate. Stand a lamb chop upright on its edge with the bone facing up over the beans. Arrange a few rosemary leaves Surely not rosemary leaves - nasty spiky things. I think he must mean thyme? on the beans and spoon a few drops of basil oil over the beans and the lamb.
Heat the oil over high heat in a wide heavy pot large enough to hold the bones in 1 layer. When the oil just begins to smoke, add the bones. Sear the bones, without stirring until well browned, about 10 minutes. If the bones are moved before they are browned, they will give off their juices and begin to steam rather than brown. Turn the bones and cook until evenly colored, about 10 minutes more.
Add 1 cup water to the pot. Listen as the liquid goes into the pot: You will hear it sizzling as it hits the hot pot, then, as it reduces, it will become quiet. When the water has reduced to a syrup, about 15 minutes, stir with a wooden spoon, scraping up any glazed juices clinging to the bottom of the pot. Continue cooking until the water has completely evaporated and the pot is reglazed and sizzling again.
When the water has evaporated, deglaze the pot with ½ cup of chicken stock, following the same steps as the water. This time, as the stock boils down, the color of the bones and liquid will become deeper and the natural gelatin in the stock will glaze the bones.
Add the onions, leeks and carrots. The water in the vegetables provides enough liquid for a quick deglazing. Cook as above until the moisture has evaporated and the vegetables are lightly caramelized, about 10 minutes.
After the vegetables are lightly caramelized, add 2 sprigs thyme, 1 cup chopped tomatoes and 2 crushed cloves garlic and cook until the juices of the tomato as well as those from the vegetables evaporate to form another glaze
Add the remaining 2 cups chicken stock, the veal stock and the remaining 2 cups of water. Deglaze the pot, scraping up the glazed juices from the bottom, then transfer the stock and bones to a smaller, narrower pot so that it will be easier to skim.
Bring to a simmer with the pot set partially off the burner to force the impurities to the side of the pot and ladle them off as they rise to the top. Simmer until the stock has reduced to the level of the bones, about 1 hour.
Strain the sauce through a fine strainer and repeat. Do not force any of the solids through the strainer or they will cloud the sauce. You should have about 2 cups of liquid.
Pour the liquid into a small saucepan, reduce to about 1 cup and strain.
Well, I didn't have any bones, not even lamb ones, nor any veal stock.
But I did have chicken stock.
So I started with the vegetable mirepoix, caramelised them well over a low heat (watching and stirring towards the end so they didn't burn), then deglazed with wine, reduced to caramel, deglazed again with wine and reduced, repeated with just water, then repeated with chicken stock a couple of times.
The final time reducing and caramelising the chicken stock I added the thyme, bashed garlic cloves and the bits of tomato left from peeling seeding and chopping. Then I finished off with adding water and more chicken stock for simmering and straining.
It took a couple of hours and the result seemed pretty acceptable, though I say so myself.
Cook the Bean Cassoulet:
Remove the little “germ” that is attached to the side of each fava bean. Blanch the beans in plenty of rapidly boiling salted water until tender, 1 to 2 minutes, then transfer them to an ice bath with a slotted spoon to cool. Drain when cool. My fat broad beans took longer - 3 or 4 minutes. Don't forget to peel off their tough outer skin. Blanch the soy beans the same way, 3 to 4 minutes, chill and drain.
Remove and discard any skins from the soaking beans that have risen to the top of the water. Drain and rinse the marrow beans and cranberry beans and place them in 2 separate pots. Cover each with cold water by at 2 inches and bring to a boil. Remove any bad beans that float to the surface. Drain the beans and run under cold water to cool.
Return the beans to the pots and cover each with ¼ cup chicken stock and enough water to cover the beans by three times. Add a slice of leek, carrot and onion to each pot. Heat the liquid slowly and bring to a simmer. Some beans that have not hydrated, and any loose skins will come to the top. Skim them and discard. Simmer the beans until they are tender, 40 to 50 minutes. (The recipe can be prepared up to this point one day ahead and the beans refrigerated in their cooking liquid, tightly covered.)
Cut the green beans and the yellow wax beans on the bias into pieces that are about 1 inch long.
When almost ready to serve, drain the cooked marrow and cranberry beans from their liquid and combine with the fava and soy beans in a skillet with about ½ of the “Quick” Sauce. Bring to a simmer, skim any impurities and cook until warmed through, about 1 to 2 minutes. Stir in 1 teaspoon of butter, then the green and yellow wax beans, the tomato diamonds, the minced carrot, celery and leek and the salt and pepper to taste. Keep warm while cooking the lamb.
I found some frozen soy beans in Tesco (they are very green so I think they are actually immature soybeans also known as Edamame).
They cooked quickly after coming to the boil - only a minute or two.
I didn't have any yellow wax beans, so I also threw in some fresh peas, which only need to be brought back to a boil to blanch.
You can combine the blanching of all the fresh beans in the same pot if you add them in order of their cooking needs.
I didn't have any yellow wax beans, so I also threw in some fresh peas, which only need to be brought back to a boil to blanch.
You can combine the blanching of all the fresh beans in the same pot if you add them in order of their cooking needs.
Cook the Lamb:
Loop a piece of kitchen twine around the backside of the bone of a lamb chop. Wrap both ends of the twine around the meat and back to the bone. Tie the twine around the bone to give a uniform shape to the chop. Cut the excess twine and repeat with the remaining chops.
Wrap the bones in aluminum foil to protect them from burning, season the chops with salt and pepper, and let rest at room temperature for an hour.
Heat the oven to 375°F/Gas Mark 5.
Heat ⅛ inch of oil in a skillet over medium-high heat. Add the lamb chops and cook for about 3 minutes to brown. Turn the chops and continue to cook for another 3 minutes. Place the chops on their sides and rotate them to brown the sides for another 1 to 2 minutes. The meat should be well browned but still slightly rare.
Remove the excess fat from the pan (leave the original amount) and add the butter, basting the lamb chops with the butter as it melts. Top the lamb with the garlic cloves and the sprigs of thyme and rosemary. Place the pan in the oven for about 2 minutes or until the meat is medium rare and a meat thermometer registers 115 to 120 degrees. Remove the pan from the oven and let the meat rest for 3 to 4 minutes.
Serve:
Place a portion of the warm bean mixture on each plate. Stand a lamb chop upright on its edge with the bone facing up over the beans. Arrange a few rosemary leaves Surely not rosemary leaves - nasty spiky things. I think he must mean thyme? on the beans and spoon a few drops of basil oil over the beans and the lamb.
Most excellent.
The bean cassoulet definitely benefits from being well seasoned, and left to marinate for a while to develop its flavours.
So best mix it up before you cook the lamb.
I used some pinto beans instead of the cranberry or as we call them borlotti beans. If you use fava or as we call them broad beans don't like me forget to peel the inner beans too:
First you pop or tear open the outer sleeves which look like giant, hairy pea pods and pluck out the fat inner beans. Cook these for 3 or 4 minutes until they're quite tender; don't underdo it. Make small incisions in the edge of each bean and peel away the rather thick tough translucent skin, leaving the softer, creamy inner, inner, green bean.
Foraged Cherry Sauce with Port and Liquorice
sauce
Taking one of my periodic constitutionals around the neighbourhood I came across an ornamental cherry tree overhanging the footpath.
And it being the law, as I understand it, that fruit overhanging a public right of way belongs to the public, they now belong to me.
The cherries are small but quite tasty, if not all that sweet.
They make an excellent sauce for, say, pan-fried duck breasts. Even if pitting them is a bit of a faff.
They make an excellent sauce for, say, pan-fried duck breasts. Even if pitting them is a bit of a faff.

Ingredients
- 1 banana shallot or half a red onion, peeled and finely sliced
- 1-2 cups of small cherries, whole is fine
- a good handful of pitted cherries to serve
- sticks of liquorice root Sambuca might work well instead
- 50 ml good port
- 50 ml deep red wine
- 100ml rich chicken stock
- 1 tbsp runny honey
- 1 sprig of fresh thyme
- 1 bay leaf
Break up the liquorice root into pieces and bring to a boil with the shallots or red onion, red wine, port, the whole cherries and herbs.
Cook until everything is well softened and the flavours are drawn out.
Add cups of water as required to keep the mixture dilute.
Push through a sieve into a saucepan, then reduce the sauce together with the honey and stock until it is thick and sticky. Adjust the seasoning.
Meanwhile pit the decorative cherries. You can do this by pushing the stones out with a chopstick, or in the case of small foraged cherries, the flat end of a wooden skewer.
Warm the cherries in the sauce to serve. Don't overcook them or they'll wrinkle.
Serve with pan-fried duck breasts, charred pak choi, and cubes of crispy fried pork belly. If you like.
Excellent sauce.
Vanilla pods or star anise would make good substitutes for the liquorice. You might also try flavouring with vodka or other liquors instead of the port and wine.
Vanilla pods or star anise would make good substitutes for the liquorice. You might also try flavouring with vodka or other liquors instead of the port and wine.
Kohlrabi Remoulade
salad veg
Quite a nice remoulade, which is French for coleslaw.
You could add horseradish, replace or supplement the tarragon with minced cornichons (which is French for gherkins), capers, spring onions, chives, parsley, dill, or other leafy herbs.
You might also add a splash of anchovy essence or a minced anchovy fillet.
You could add horseradish, replace or supplement the tarragon with minced cornichons (which is French for gherkins), capers, spring onions, chives, parsley, dill, or other leafy herbs.
You might also add a splash of anchovy essence or a minced anchovy fillet.
Makes 1-2 Cups
Ingredients
- 1 kohlrabi
- juice of ½ a lime or a lemon, if you prefer
- tablespoon Chardonnay vinegar
- 1-2 teaspoons Dijon mustard
- mayonnaise
- tarragon,
- salt & pepper
- a dab of double cream or crème fraîche optional
Peel the kohlrabi - be sure to remove all the stringy outer layers. They're pretty horrible.
Julienne into matchsticks between 1mm and 2mm. I cut slices on a mandoline, then passed the slices through again vertically a few at a time.
Dress with the lime juice and vinegar as you go.
Finely slice the leaves from two or three sprigs of tarragon, and mix into the kohlrabi with the Dijon mustard and enough mayonnaise to coat.
Season well.
Add a dollop of cream or sour cream if you like.
Good. Refreshing. Plenty of flavour and bite.
No need to blanch or cure the kohlrabi either, unlike celeriac (possibly).
No need to blanch or cure the kohlrabi either, unlike celeriac (possibly).
Charred Pak Choi
side veg
I blanched the bok choy in some spare broth that I had used to cook lechon kawali (Filipino fried belly pork).
That's water seasoned with garlic, bay leaves, black peppercorns, salt, soy sauce, and maybe sugar.
That's water seasoned with garlic, bay leaves, black peppercorns, salt, soy sauce, and maybe sugar.
Serves 1 per Choy
Ingredients
- pak choi, or bok choy.
- stock or flavoured broth
- oil for frying not olive
Optional Dressing:- soy sauce
- herb oil
- salad dressing
Halve, or blanch the pak choi whole in stock or broth as stem-side down as you can, for 1-2 minutes. Just until the stems begin to soften.
They're certainly done when the leaves wilt. Bear in mind they'll continue cooking after they're removed.
Drain and dry. You can keep them in the fridge for a day or two if you like.
They're certainly done when the leaves wilt. Bear in mind they'll continue cooking after they're removed.
Drain and dry. You can keep them in the fridge for a day or two if you like.
No need to shock them in ice water immediately afterwards - they keep their colour really quite well.
And this means you get to keep any broth flavours that have attached to the veg.
Heat a frying pan with a drizzle of oil until it's smoking hot.
Slice each head in half lengthways unless you already did that
and fry cut-side down in the scorching pan over a low heat for several minutes
until the cut side is nicely charred and the pak choi is warmed all the way through.
Season, and feel free to drizzle a little soy sauce, herb oil or salad dressing over just before serving.
Pretty reasonable for pak choy. Not, I must say, the most exciting vegetable.
Lechon Kawali - Filipino Crispy Fried Pork Belly
meat snack
Joshua Bousel's deep-fried crispy pork belly is seriously delicious.
And best of all you leave the skin on!
Keep the flavoured boiling liquor you used for next time in the fridge for other uses. It will keep for ages.
Keep the flavoured boiling liquor you used for next time in the fridge for other uses. It will keep for ages.
Don't even think about trying this with leg of pork substituted for the belly.
Although the fattier parts might work, the meaty bits will be fibrously dry and overcooked.
Serves 8
Ingredients
- 2 pounds (900g) boneless skin-on pork belly, cut in half
- 8 medium cloves garlic, smashed
- 2 bay leaves
- 1 tablespoon black peppercorns
- ½ cup (120ml) soy sauce
- salt
- sunflower or peanut oil, for frying
For dipping:- spicy rice or cane vinegar, or a lechon sauce whatever that is
In a large pot, place pork belly, skin side down, and add enough water to completely submerge meat.
Add garlic, bay leaves, peppercorns, perhaps some brown sugar? and soy sauce. Slices of fresh ginger root and a splash of rice vinegar are good options too.
Bring to a boil over medium-high heat, then lower heat and reduce to a simmer. Cover and cook until pork skin can be pierced with a knife with no resistance, about 1 hour.
Transfer pork to a wire rack set in a rimmed baking sheet and season liberally with salt all over. Refrigerate pork until skin has completely dried, 6 hours or overnight.
Fill a wok or Dutch oven with at least 4 inches oil or just use your chip pan and heat to 375°F (190°C) over high heat.
Working in batches, fry pork until deeply browned and skin has bubbled and crisped, 7 to 10 minutes.
Transfer pork to a paper towel-lined plate and season with salt to taste.
Cut pork slices into 1-inch pieces.
Serve immediately with vinegar or Lechon sauce (a rather revolting-sounding thick vinegared liver paste) or toyomansi: minced garlic/shallot, red chilli, lemon/lime/calamansi/yuzu juice, soy sauce for dipping.
Add garlic, bay leaves, peppercorns, perhaps some brown sugar? and soy sauce. Slices of fresh ginger root and a splash of rice vinegar are good options too.
Bring to a boil over medium-high heat, then lower heat and reduce to a simmer. Cover and cook until pork skin can be pierced with a knife with no resistance, about 1 hour.
Transfer pork to a wire rack set in a rimmed baking sheet and season liberally with salt all over. Refrigerate pork until skin has completely dried, 6 hours or overnight.
I did wonder about pressing the pork - but it certainly fried up nicely without.
Remove pork from refrigerator and cut into 2-inch slices.
Contrary to Serious Eat's instructions here, the photos show quite clearly that he fries the pork in fat elongated cubes, not slices which he later cuts up.
The cubes are an ideal way to serve the pork, but it's probably a better balance of succulent and crisp to fry fat strips then slice those up to serve.
Fill a wok or Dutch oven with at least 4 inches oil or just use your chip pan and heat to 375°F (190°C) over high heat.
Working in batches, fry pork until deeply browned and skin has bubbled and crisped, 7 to 10 minutes.
Transfer pork to a paper towel-lined plate and season with salt to taste.
Cut pork slices into 1-inch pieces.
Serve immediately with vinegar or Lechon sauce (a rather revolting-sounding thick vinegared liver paste) or toyomansi: minced garlic/shallot, red chilli, lemon/lime/calamansi/yuzu juice, soy sauce for dipping.
It's nice drizzled with balsamic vinegar
though I found serving it with foraged cherry sauce with port and liquorice worked pretty well too.
It was crispy and delicious.
It doesn't stay crispy very well, so serve immediately.
It was crispy and delicious.
It doesn't stay crispy very well, so serve immediately.
Deep-Fried Asparagus in Horseradish Batter
side veg

I was making chips anyway (well, french fries actually) to go with my aged sirloin,
so I thought I'd try deep-frying the asparagus too.
I diluted the batter with some horseradish vodka (vodka with some horseradish pieces marinated in it), though using flat beer is recommended by people who've visited the Stockton Asparagus Festival
I diluted the batter with some horseradish vodka (vodka with some horseradish pieces marinated in it), though using flat beer is recommended by people who've visited the Stockton Asparagus Festival
Use a half-dozen spears per person
Ingredients
- asparagus spears
For the batter:- egg white, loosened
- 2 tblsps rice flour
- 3 tblsp cornflour
- 1 tblsps regular flour
- celery salt
- 1 tsp sodium bicarbonate
- horseradish vodka
To Serve:- Parmesan, grated
Mix the non-asparagus ingredients to make a thick batter - I used something like 3:1:2 cornflour:rice flour:wheat flour.
Season it.
Take the asparagus straight out of the fridge, snap off any woody stem, coat them in the batter and deep-fry at 170°C for 2 minutes until the batter turns golden. Drain on paper towels and serve them scattered with grated Parmesan.
Season it.
Take the asparagus straight out of the fridge, snap off any woody stem, coat them in the batter and deep-fry at 170°C for 2 minutes until the batter turns golden. Drain on paper towels and serve them scattered with grated Parmesan.
Not the best way to serve asparagus, if I'm honest. The batter is nice enough but the asparagus turn rather leathery.
Parsnip and Courgette Gratin
side veg
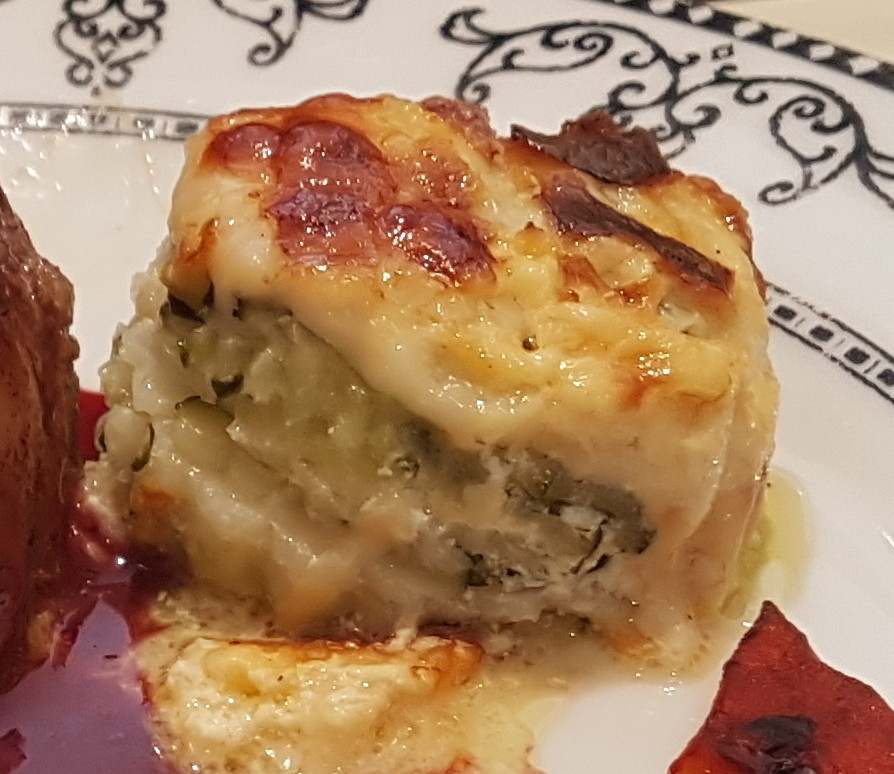
A slightly watery, but delicious gratin. That I (almost) invented.
I used my new favourite cheese in the whole world - the beautiful, pale, mild, nutty semi-hard goats cheese Rosso by Landana.
I used my new favourite cheese in the whole world - the beautiful, pale, mild, nutty semi-hard goats cheese Rosso by Landana.
Ingredients
- parsnip, thinly sliced
- courgette, thinly sliced
- double cream
- garlic, crushed
- Landana Rosso goats cheese
Slice the parsnip thinly on a mandoline into a bowl of cold water.
Heat a saucepan with the cream and crushed garlic. Season with salt & pepper. Add the sliced parsnip and simmer for couple of minutes to soften the parsnip, without cooking it through.
Start the first layer in a gratin dish with the parsnip.
Slice the courgette on the mandoline and lay the second layer.
Alternate parsnip and courgette layers in the dish, finishing with courgette.
Slice or grate the cheese on top - a hard cheese is best; the Landana Rosso was excellent As always - it being just about one of my favourite cheeses. Just recently., but you could use Parmesan, Gruyére or a cheddar.
Simmer the cream to reduce and thicken a little, then pour it over the gratin. Shake to settle.
Bake at Gas Mark 3-4 for an hour until the top is browned and bubbling.
Like I said - watery but delicious.
It would probably be improved by pre-frying the courgette slices to cook off their moisture, as for Elizabeth David's courgette bake.
It would probably be improved by pre-frying the courgette slices to cook off their moisture, as for Elizabeth David's courgette bake.
Edamame Beans and Pea Purée with Buttermilk and Basil Oil
side veg
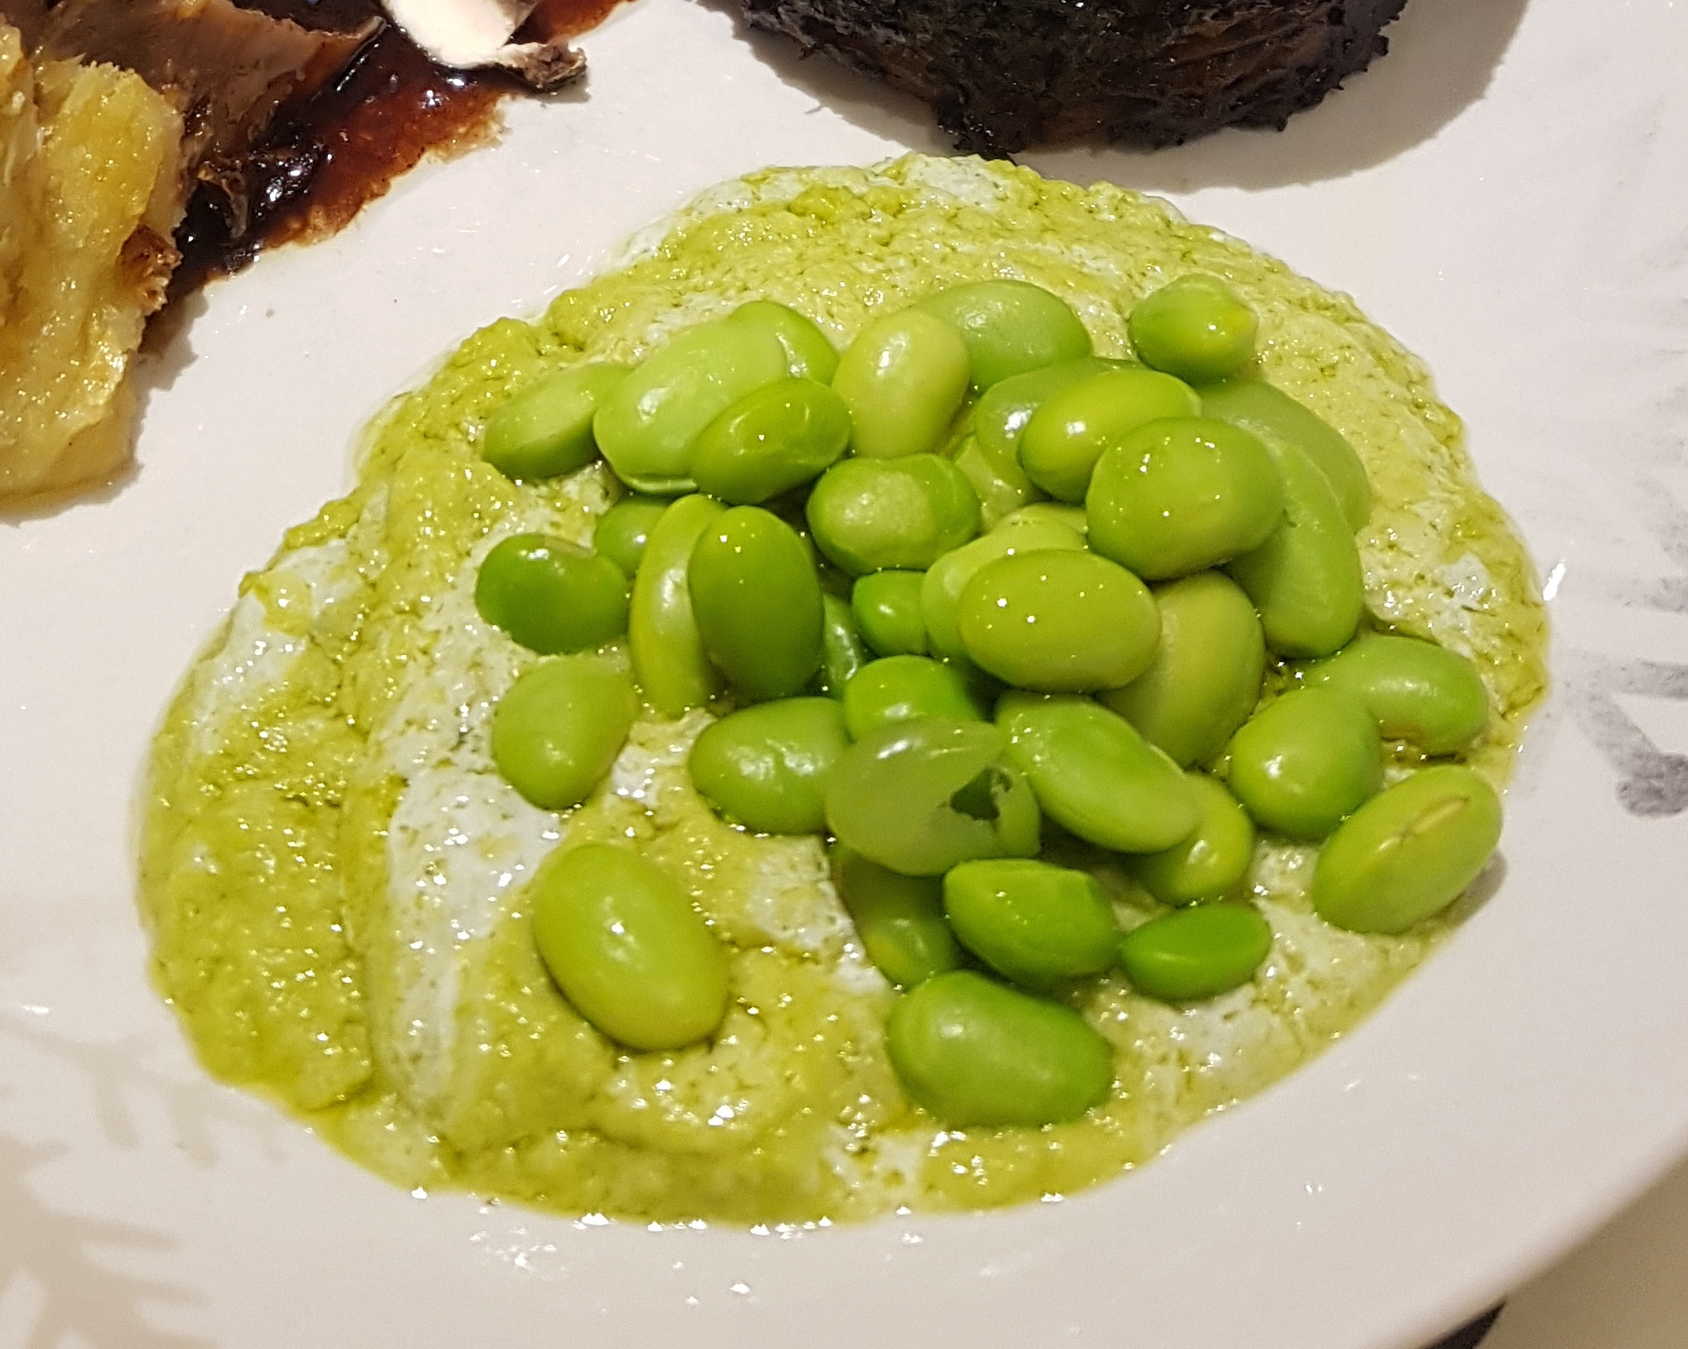
I used fresh peas, but likely frozen peas would work fine. Or you could just blend up more edamame beans.
You probably want about half the volume of sliced shallots as peas. I used one banana shallot and a couple of dozen pea pods.
Edamame beans are young green soy beans. They turn white and more leathery as they age. You can probably find them in the frozen section of your Local Fucking Supermarket™ labelled just Soy Beans.
Ingredients
- peas
- shallots
- buttermilk
- basil oil
- edamame beans
Mince the shallots.
Pod the peas unless they're frozen 🙂 and throw them into a pot of boiling water.
Bring them back to the boil and simmer them for a couple of minutes until they're tender. Add the shallots and return to the boil, then strain out.
Blend together with enough buttermilk and basil oil to lubricate everything. Push through a sieve if you want it super smooth.
Season to taste and keep warm.
Meanwhile cook the podded (or frozen) edamame beans for about 5 minutes, and drain.
Plate up a puddle of the pea purée and throw on some edamame beans.
Very good.
It will look even better if you can arrange the pea puddle to have swirls of unmixed buttermilk and oil throughout.
You'll need the purée to be pretty loose though (perhaps thinned with milk, cream or chicken stock?): stream in the coloured liquids, then pour out carefully.
It will look even better if you can arrange the pea puddle to have swirls of unmixed buttermilk and oil throughout.
You'll need the purée to be pretty loose though (perhaps thinned with milk, cream or chicken stock?): stream in the coloured liquids, then pour out carefully.
Pommes Anna aux Pruneaux
side
This slightly idiosyncratic take on Pommes Anna by Thomas Keller of
French Laundry fame adds prunes to the usual cooking process.
The result isn't half bad - it will probably work best if you can avoid the prunes squirting out of the edges and burning, at least for the appearance sake.
I made a single-serving version from a single potato and 5 prunes in a dinky little oven-proof milk pot, which being quite deep, I filled with many more double-potato layers than the three described here.
It means you don't get quite the same proportion of crispy outer potato to softer inner ones, but it looks rather nice when carefully unmoulded onto the serving plate.
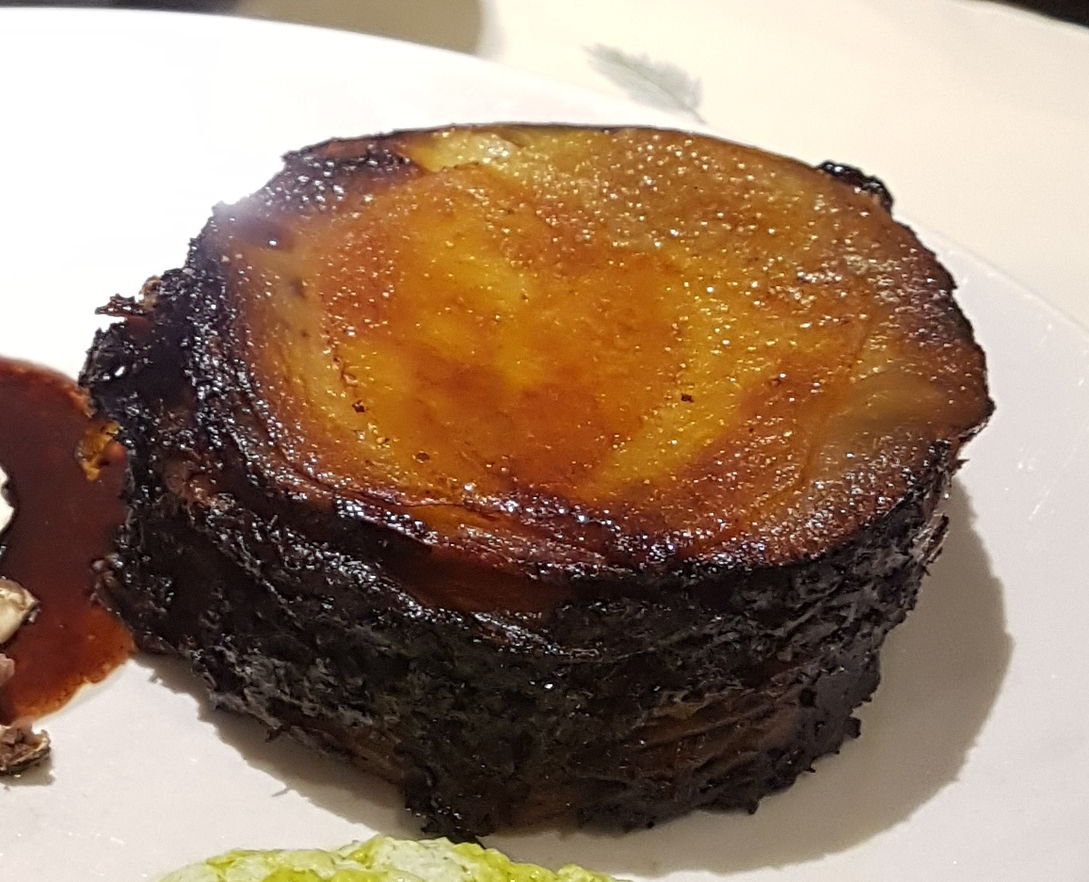
Ingredients
- 10 pitted prunes
- 1 cup Chicken Stock
- 1 tablespoon minced shallots
- salt grey salt is specified in the original
- 2 pounds Yukon Gold potatoes (about 3 large)
- 6 tablespoons Clarified Butter
- salt & freshly ground pepper
Place the prunes and chicken stock in a small saucepan.
Bring to a simmer and cook until the liquid has evaporated and the prunes are very soft, about 20 minutes.
Remove prunes to a cutting board and finely chop them.
Add the shallots and salt to taste.
Put 2 tablespoons of the clarified butter in an 8-inch ovenproof nonstick skillet. Place a slice of potato in the center of the pan. Lay more potato slices around the edge of the pan, overlapping them by half, until you have completely circled the pan. Depending on the size of the potatoes, continue with another overlapping circle of potatoes inside the first. When the entire bottom of the pan is covered, sprinkle a little salt and pepper over the potatoes and repeat the process to form a second layer.
Pour the remaining ¼ cup clarified butter over the potatoes and place the skillet over medium-low heat. Once the butter begins to bubble, cool for 3 to 4 minutes, shaking the pan occasionally to be sure that the potatoes are not sticking. Use a spoon to gently shape the top and sides of the potato cake, keeping the prune filling from leaking out. Transfer the pan to the oven and bake for 30-60 minutes, until the potatoes are well browned and crisp. Invert the potato cake onto a board or serving platter.
Or you can do as I mistakenly did - chop the prunes and then cook them in the stock.
I don't know if it makes any difference. I also used beef stock since I had no chicken.
And proportionally rather more shallots than indicated.
Preheat the oven to 450°F.
Or perhaps 400°F for a fat single serving.
Peel the potatoes. Using a mandoline or sharp knife, cut the potatoes crosswise into 1/16-inch slices.
Place the slices in a bowl of cold water for a minute to remove some of the starch, then drain and dry the slices on paper towels.Put 2 tablespoons of the clarified butter in an 8-inch ovenproof nonstick skillet. Place a slice of potato in the center of the pan. Lay more potato slices around the edge of the pan, overlapping them by half, until you have completely circled the pan. Depending on the size of the potatoes, continue with another overlapping circle of potatoes inside the first. When the entire bottom of the pan is covered, sprinkle a little salt and pepper over the potatoes and repeat the process to form a second layer.
The potato layers will benefit from a reasonably generous amount of salt.
The first layer will start to crisp up nicely in the butter as you work on the next layers if you have the pan on the heat, which is the traditional technique.
Spread half of the prune mixture over the potatoes, leaving a 1/2-inch border all around.
Make another two layers of potatoes, seasoning the first layer with salt and pepper, and spread the remaining prune mixture over them, again leaving a border.
Cover the prunes with a final two layers of seasoned potatoes.The first layer will start to crisp up nicely in the butter as you work on the next layers if you have the pan on the heat, which is the traditional technique.
Pour the remaining ¼ cup clarified butter over the potatoes and place the skillet over medium-low heat. Once the butter begins to bubble, cool for 3 to 4 minutes, shaking the pan occasionally to be sure that the potatoes are not sticking. Use a spoon to gently shape the top and sides of the potato cake, keeping the prune filling from leaking out. Transfer the pan to the oven and bake for 30-60 minutes, until the potatoes are well browned and crisp. Invert the potato cake onto a board or serving platter.
Bit tricky to get exactly right - potatoes (and fingers) crispy but not burned, prune mixture fully contained, well, but not over-seasoned.
But tasty when you do.
It easily reheats in a hot oven.
It easily reheats in a hot oven.
Truffled Red Wine sauce
sauce meat
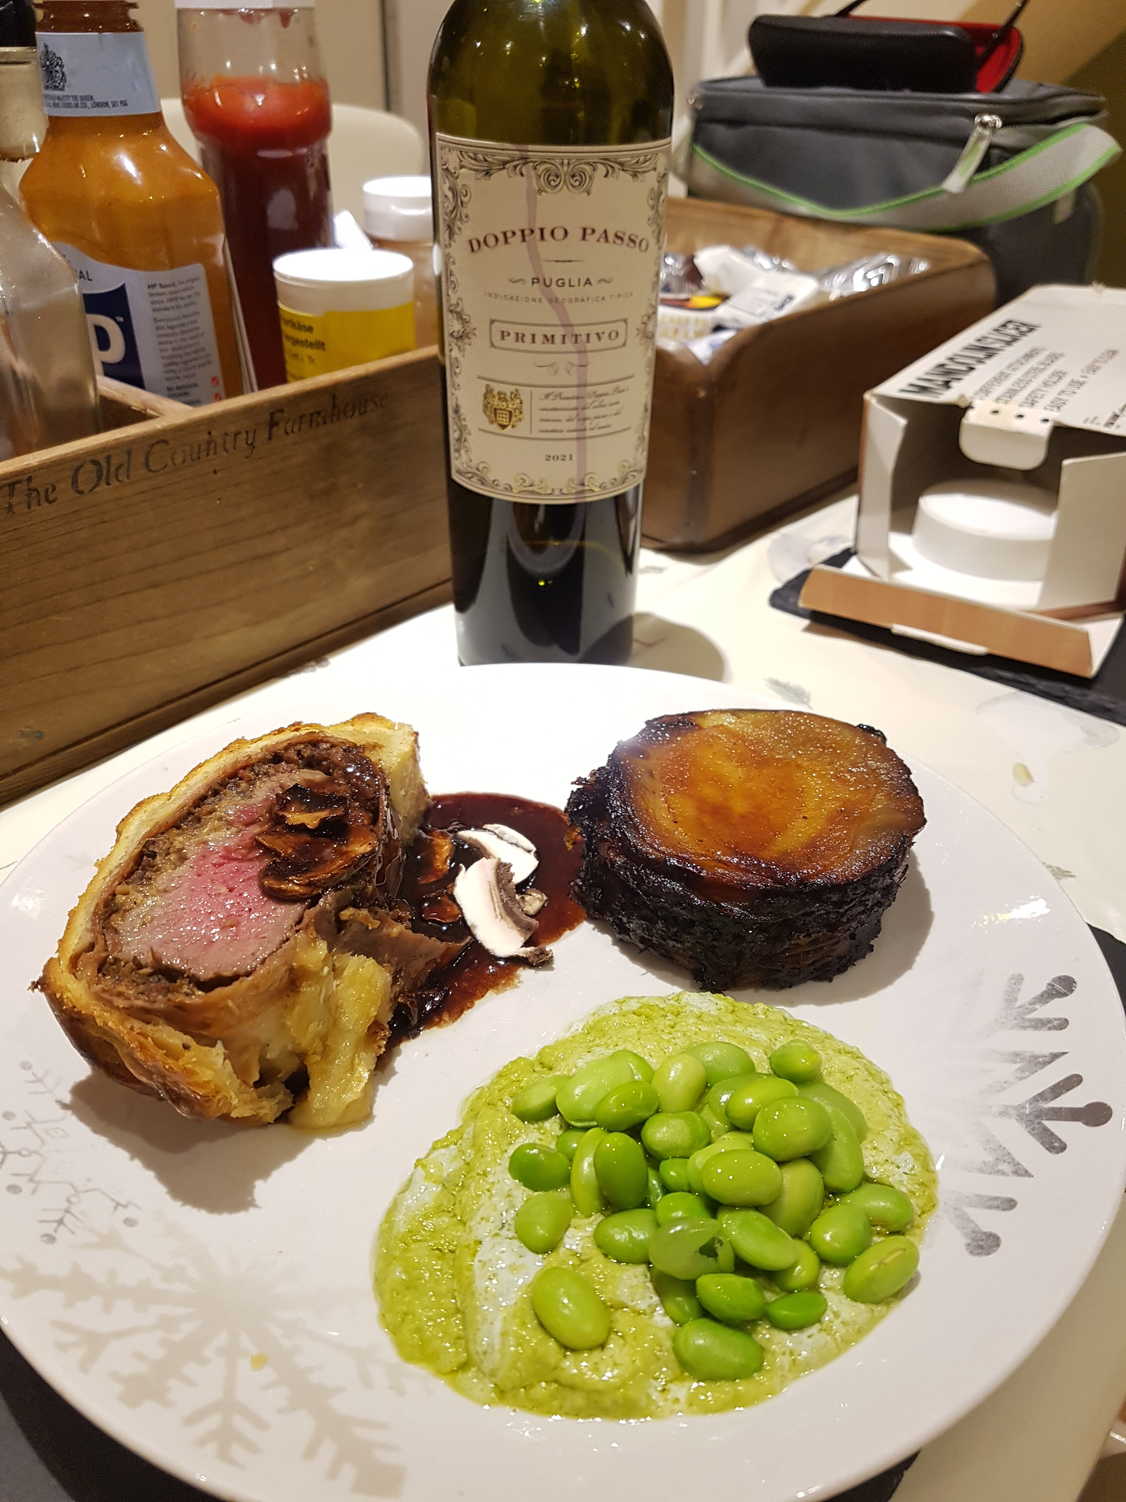
Goes rather well with a Beef Galosh. That's a miniature Beef Wellington 😀
I flavoured mine with rosemary, which is all I had, though maybe thyme would have worked better.
I flavoured mine with rosemary, which is all I had, though maybe thyme would have worked better.
Ingredients
- garlic
- rosemary
- shallots
- beef demi-glace
- red wine or port
- butter
- white truffle oil
Heat butter in a frying pan and fry the garlic until it colours, then add the shallots and rosemary, frying until they collapse.
Add a generous covering of red wine, bubble up and reduce, then add the beef stock or demi-glace and bubble and reduce again.
Strain out the solids and return to the pan. I also added some water to wash all the sauce off the strained content and reduced again. Whisk in small pieces of butter until the sauce begins to look rich and glossy, remove from the heat, season, and stir in a drizzle of truffle oil to taste.
Strain out the solids and return to the pan. I also added some water to wash all the sauce off the strained content and reduced again. Whisk in small pieces of butter until the sauce begins to look rich and glossy, remove from the heat, season, and stir in a drizzle of truffle oil to taste.
Pretty good sauce. I was about to go shopping for cream and make a white white truffle sauce instead, but this was a pretty good alternative.
Port might have worked better though.
White Truffle Sauce
sauce

A creamy truffle sauce this time.
Seems rather a lot of trouble to go to as opposed to just deglazing the steak pan with wine and cream, but you pays your money, you makes your choice.
It was rather good. Though I only had truffle oil, no actual truffle.
I added breadcrumbs to thicken the sauce a little (though that may not have been strictly necessary) and slightly re-ordered Michael Mina's straining directions so as not to lose as much creamy sauce in the process.
I made a smaller quantity from 1 leek, 1 banana shallot, 2 cloves garlic, enough wine and then stock to cover, and 200ml double cream.
Makes about 2 Cups
Ingredients
- 1 leek (white and pale green parts only), finely chopped
- 1¾ cups finely chopped shallot (10 ounces)
- 3 garlic cloves, finely chopped
- 2 cups dry white wine
- 2 large fresh thyme sprigs
- 1¼ ounces preserved black truffles (preferably winter truffles), finely chopped
- 4 cups chicken stock or low-sodium chicken broth
- 4 cups heavy cream
- 1 cup breadcrumbs if you think it might need thickening
- ¼ teaspoon black or white truffle oil, or to taste
Wash chopped leek in a bowl of cold water, then lift out and drain (do not pat dry).
Steam leek, shallot, and garlic (in any water clinging to leeks) in a 4-quart heavy saucepan, covered, over low heat, stirring occasionally, until softened, about 6 minutes.
Add stock and boil until reduced to about 2 cups, about 25 minutes. Stir in cream and simmer, stirring occasionally, until reduced to about 2¾ cups, about 40 minutes.
Mine took about 20 minutes on very low.
Add wine, thyme, and truffles or not! and boil, uncovered, until most of liquid is evaporated, about 12 minutes.Add stock and boil until reduced to about 2 cups, about 25 minutes. Stir in cream and simmer, stirring occasionally, until reduced to about 2¾ cups, about 40 minutes.
Seems like an oddly specific volume!
Anyway I threw a cup of breadcrumbs in with the stock for thickening, simmered for a while, then strained everything through a fine sieve before reducing, then adding the cream and reducing again.
Mind you, I was a bit short on cream.
Pour mixture through a fine sieve into another saucepan, pressing on and discarding solids.
Whisk in truffle oil and season with salt and pepper.
Anyway I threw a cup of breadcrumbs in with the stock for thickening, simmered for a while, then strained everything through a fine sieve before reducing, then adding the cream and reducing again.
Mind you, I was a bit short on cream.
Yum!
I had considered adding some grated cheese - Parmesan for instance, but I think the sauce is too delicate for it.
I had considered adding some grated cheese - Parmesan for instance, but I think the sauce is too delicate for it.
Celeriac, Leek and Rosemary Gratin
side veg

Yet another gratin. I seem to have made hundreds.
This one's a bit different in that it interposes layers of leeks.
The flavours work well together, especially with just a hint of Dijon mixed into the cream, but it is rather watery.
I used Comté cheese instead of Gruyère - the taste is equally good but perhaps the texture a little too rubbery - which makes the cutting and serving quite difficult.
Oh, though that might be because I only added the cheese on top, not in each layer.
It really does need to cook on low (Gas 4 or 3) for a good hour to soften the celeriac.
Serves 8. Allegedly.
Ingredients
- 25g butter
- 2 leeks, outer layer removed, washed of any grit and sliced into rings
- small handful rosemary leaves, roughly chopped
- 1 bay leaf
- a garlic clove, minced optional
- 300ml double cream
- 300ml milk or less
- Dijon mustard just a hint - if you like
- 1 celeriac (about 500g), peeled, quartered and thinly sliced
- 100g cheddar or gruyère or comté, coarsely grated
Heat the butter in a saucepan. Add the leeks, rosemary and bay leaf, then cover and cook very gently over a medium-low heat for 15-20 mins until the leeks are soft.
Pour over the milk and almost all of the cream, then season and bring to the boil. Remove from the heat and leave to cool a little, then scoop out the bay leaf.
Can be prepared up to a day ahead and kept in the fridge.
Heat oven to 180°C/160°C fan/gas 4. Bake the gratin for 1 hr-1 hr 15 mins until the top is golden and the celeriac is tender when poked with a knife. If the gratin is browning a little too much, cover the dish in foil.
Can be chilled, then reheated in a microwave or oven on a low heat with a drizzle more cream.
I preferred to leave the rosemary stalks whole and then remove them with the bay leaf - being so spiky I'm not sure they'd be good to find in the gratin.
A little garlic won't go amiss either.
Best to go easy on the milk and reduce the sauce well to thicken it - the dish will be quite watery enough anyway.
Pour a little of the leek mixture into an ovenproof gratin dish. Arrange a layer of celeriac in the dish, then season.
Spoon over some more of the leek mixture and scatter with a little cheese or keep it for just on top.
Repeat the process, alternating between layers of the leek mixture, cheese and celeriac slices, then finish with a drizzle of cream and the last of the cheese.Best to go easy on the milk and reduce the sauce well to thicken it - the dish will be quite watery enough anyway.
Can be prepared up to a day ahead and kept in the fridge.
Heat oven to 180°C/160°C fan/gas 4. Bake the gratin for 1 hr-1 hr 15 mins until the top is golden and the celeriac is tender when poked with a knife. If the gratin is browning a little too much, cover the dish in foil.
Can be chilled, then reheated in a microwave or oven on a low heat with a drizzle more cream.
Excellent, if a bit watery.
Perhaps adding cheese to the leek layers would have soaked up some of the liquid? Probably not comté though.
Perhaps adding cheese to the leek layers would have soaked up some of the liquid? Probably not comté though.
Green Tomato Salsa
salad raw veg vegan
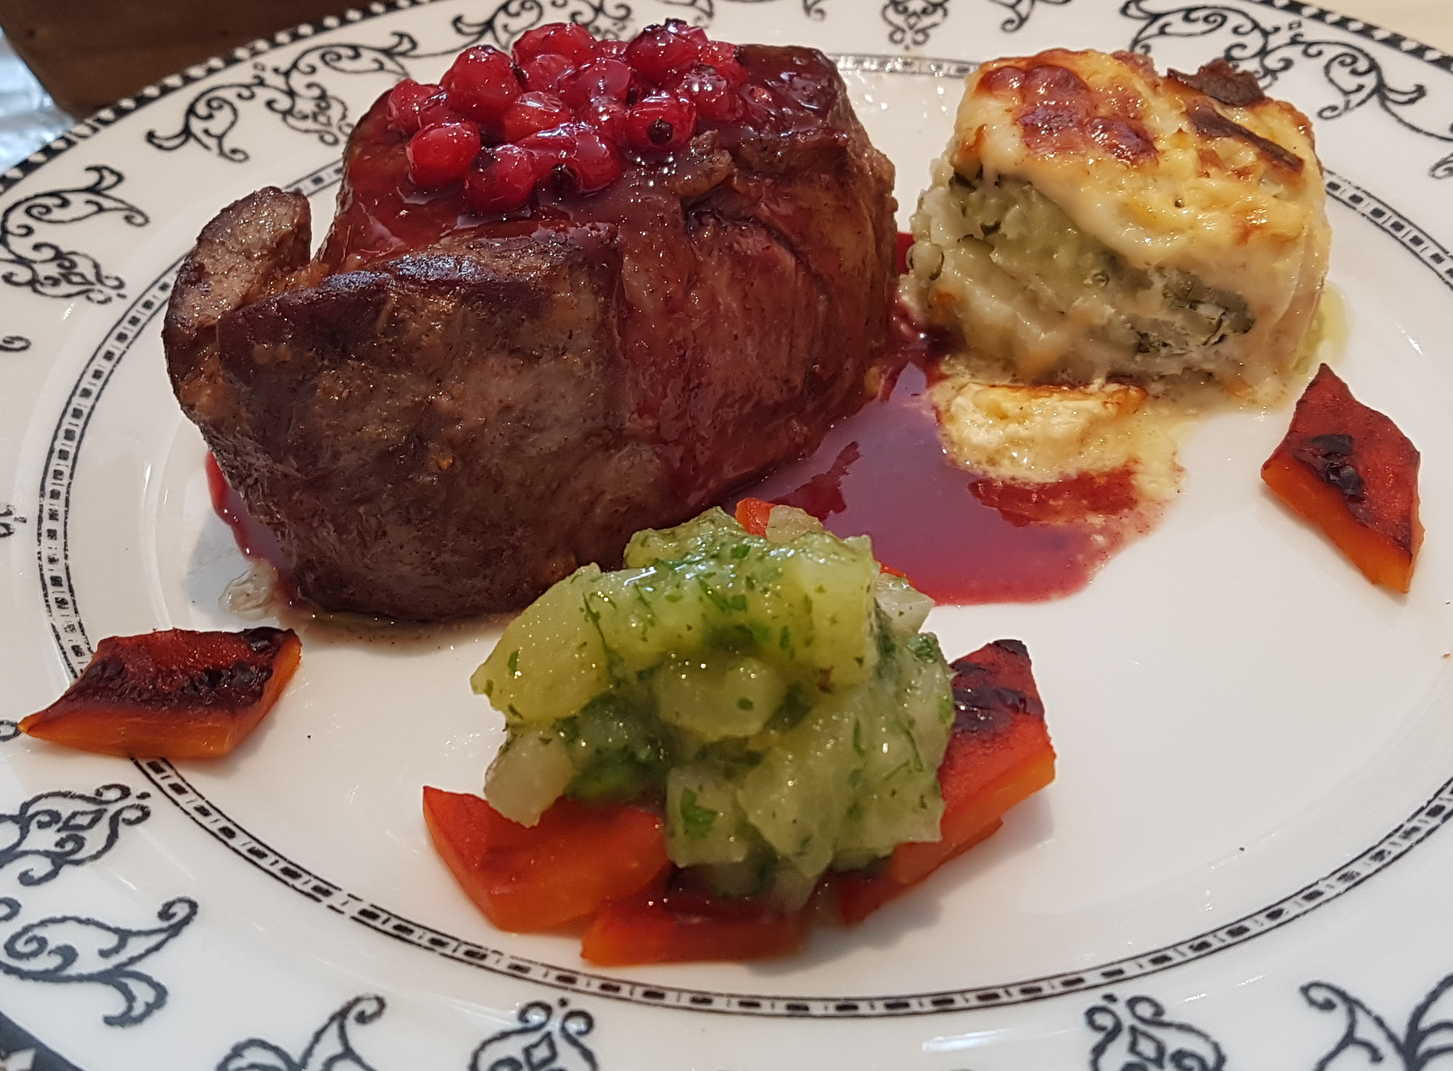
You can purée this up smoothly, blend some or all of it more coarsely or just chop it up if you prefer it chunky.
Makes 1½ cups
Ingredients
- 1 pound green tomatoes
- 2 to 3 jalapeño or serrano peppers (more to taste)
- ½ medium onion, preferably white
- Salt to taste
- ½ cup roughly chopped cilantro
- ¼ to ½ cup water, as needed (optional)
Chop the onion, soak for five minutes in cold water, drain, rinse then drain again on paper towels.
Preheat the broiler. Line a baking sheet with foil. Place the green tomatoes on the baking sheet, stem-side down, and place under the broiler about 2 inches from the heat. Broil two to five minutes, until charred. Using tongs, turn the tomatoes over, and grill on the other side for two to five minutes, until blackened. Remove from the heat. When cool enough to handle, core the tomatoes and remove the charred skin. Quarter and place in a blender or a food processor.
Add the remaining ingredients, except the water, to the blender or food processor, and blend to a coarse or a smooth puree (to your taste). Transfer to a bowl, taste and adjust seasonings, and thin out with water if desired. Allow to stand for 30 minutes or longer before serving to allow the flavors to develop. You may wish to thin out after it stands.
Preheat the broiler. Line a baking sheet with foil. Place the green tomatoes on the baking sheet, stem-side down, and place under the broiler about 2 inches from the heat. Broil two to five minutes, until charred. Using tongs, turn the tomatoes over, and grill on the other side for two to five minutes, until blackened. Remove from the heat. When cool enough to handle, core the tomatoes and remove the charred skin. Quarter and place in a blender or a food processor.
Or chop it up with a knife if you prefer it chunky.
Add the remaining ingredients, except the water, to the blender or food processor, and blend to a coarse or a smooth puree (to your taste). Transfer to a bowl, taste and adjust seasonings, and thin out with water if desired. Allow to stand for 30 minutes or longer before serving to allow the flavors to develop. You may wish to thin out after it stands.
Pretty sharp stuff.
Serve with a massive fillet steak McPhail with redcurrant sauce, lozenges of charred red peppers, and an unctuous parsnip and courgette gratin. For instance.
Serve with a massive fillet steak McPhail with redcurrant sauce, lozenges of charred red peppers, and an unctuous parsnip and courgette gratin. For instance.
Braised Red Cabbage with Pear
side veg vegan
We have a profusion of pears at the moment, so I thought I'd throw some in with (half) a red cabbage.
It's not bad. Might work well with a creamy gratin of some kind, but it's a bit on the sharp side.
I preferred my sweeter balsamic version.

Ingredients
- glass red wine
- splash red wine vinegar
- red cabbage, thinly sliced
- pear, peeled, cored, sliced
- red onion, thinly sliced
- rosemary oil, or finely chopped rosemary
- cloves, ground optional
- salt & generous pepper
Slice the red cabbage and the red onion fairly thinly and mix together.
Peel a pear or two, cut into quarters lengthways, remove the core from each, and slice thinly.
Fill a casserole with alternating layers of cabbage and pear, starting and ending with cabbage.
Season as you go, being generous with the freshly ground pepper.
Peel a pear or two, cut into quarters lengthways, remove the core from each, and slice thinly.
Fill a casserole with alternating layers of cabbage and pear, starting and ending with cabbage.
Season as you go, being generous with the freshly ground pepper.
If you don't happen to have rosemary oil around the place, mince or grind rosemary leaves - and maybe some cloves - and add them as you go too.
Reduce the red wine with a splash of vinegar by about ⅔. Pour over the casserole with a drizzle of rosemary oil, if you have it, or a few knobs of butter if you don't.
Cover tightly and bake at Gas Mark 2-4 for a couple of hours.
Has quite a strong, tannic, slightly bitter taste with the red wine and the rosemary.
Not bad, but would need careful pairing. Better than with my Filet McPhail anyway.
Not bad, but would need careful pairing. Better than with my Filet McPhail anyway.
Rosemary Salt
ingredient veg vegan
I was introduced to the concept of rosemary salt by YooToober That Dude Can Cook.
It's handy stuff. Calm down though - it won't change your life or anything. You can add other herbs or flavours too.
Makes 1 Cup
Ingredients
- 1 cup/250g kosher salt
- 14 sprigs/16g rosemary stripped
- 8 sprigs/8g sage stripped
- 3-5 cloves of garlic/20g (3 if they are big and 5 if small)
- 1 lemon zested
Blend it all up, and there you go.
Just use it like regular salt, and bask in the glow of its slightly herby flavour.