Introduction to Pâtisserie - Too Often to the Bakewell
The last pâtisserie class in this course. Sadness all round. And so we cheered ourselves up with tart.
The original Bakewell Pudding was created by mistake in the 1820s at the White Horse Inn (now the Rutland Arms Hotel) in Bakewell, Derbyshire.
Allegedly
According to this tall tail, the landlady at the time, a Mrs Greaves, left instructions on how to prepare a jam tart with an almond paste pastry base for her cook who misunderstood what was required (being apparently both incompetent and surprisingly unfamiliar with baking, for a cook) and accidentally baked the eggs and almond paste on top of the jam filling instead.
And thus was born the squat, misshapen pudding that kicked off the whole Bakewell family - basically a flaky-or-puff-pastried, slightly almondy custard tart with a jam filling.
Of course, other opinions are available: Mrs Beeton published a recipe in her 1861 Book of Household Management which has a breadcrumb base!
The later 20th Century interpretation known as the Bakewell Tart is made with a sweet shortcrust pastry ( sweet pastry or patê sucrée) filled with a frangipane almond sponge over the jam filling, and is usually garnished with almond flakes.
The equally modern variant - the Cherry Bakewell features a layer of almond icing over the frangipane and has half a glacé cherry on top. Hence the expression.
Possibly.
Paul had a helpful hint for dealing with cracking or splitting pastry:
Avoid over-working the pastry, which will develop the gluten and toughen the pastry. This includes not re-rolling strips or scraps of rolled pastry back together.
Paul recommends simply assembling such pastry pieces like a jigsaw into the pie tin without re-rolling, filling in any holes and pressing the edges together.
Apparently, once filled and baked, you won't be able to tell the difference. Even if it does look like Frankenstein's monster beforehand 🙂
He's also a big fan of using your hands to mix the fillings, but more on that later...
menu
Sweet Shortcrust Pastry
Insert recipe here!
Bakewell Tart
class sweet veg

Paul kindly provided the recipe below to work from, several days after the fact.
Not much of which remotely resembles what we did, and unfortunately also neglects to provide instruction on how to make the frangipane filling.
So I've remembered what we actually did for you as best I can...
Not much of which remotely resembles what we did, and unfortunately also neglects to provide instruction on how to make the frangipane filling.
So I've remembered what we actually did for you as best I can...
Makes 1 large or 2 small pies
Ingredients
- pre-made sweet shortcrust pastry
For the Almond Filling:- 100g unsalted butter, softened
- 100g caster sugar
- 100g ground almonds
- 2 large eggs
- 1 tsp almond or vanilla extract or other flavouring
- 1 tbsp plain flour if required
- 100g raspberry jam (or your choice of jam)
For the Topping:- A handful of flaked almonds (about 30g)
Begin by taking the prepared shortcrust pastry out of the fridge and allowing it to soften slightly (if it's very cold).
Preheat the oven to 180°C (160°C fan) / 350°F / Gas Mark 4.
Run around the edge of the tin with a knife and neatly cut away the excess pastry. If the pastry pulls away from the sides now, or contracts back down into the base, gently press it all the way back up the sides again.
Lay a couple of sheets of clingfilm across the pie and fill them, and the pie, right to the top with baking beans. Press the beans in gently, then fold the cling film across the top of the beans so they're completely enclosed.
Leave to cool while you make the filling. You can leave the bagged beans inside for now.
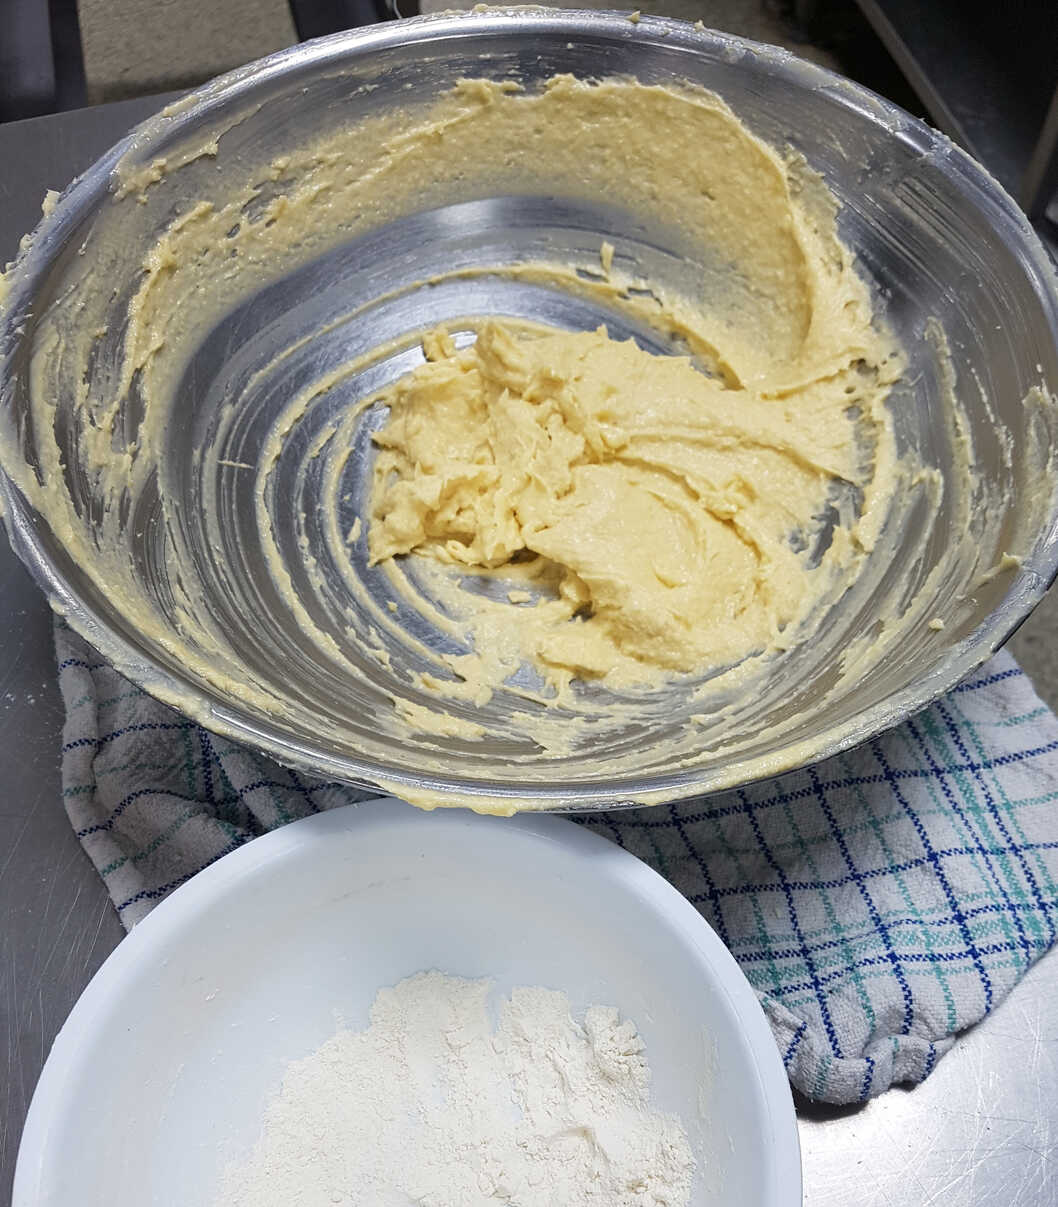
Cream the butter and the sugar together until it becomes almost fluffy and lighter in colour.
Very slowly add little dribbles of the beaten egg to the butter and mix vigorously.
Continue until all the egg has been incorporated and the mixture has developed a slightly curdled appearance. If the mixture curdles prematurely then beat in a little flour to bring it back together. Otherwise discard the flour if not needed. Finally mix in the ground almonds yep, still using your hand.
Remove the bagged baking beans and spread a thin layer of raspberry jam (or your choice of jam) over the base of the pastry.
Start final clean-up during this time.
By 19:30, the tart will be ready to go, and the kitchen should be cleaned up!
Preheat the oven to 180°C (160°C fan) / 350°F / Gas Mark 4.
Roll the pastry quite thinly - to about the thickness of a pound coin. It's a common beginner's mistake to make the pastry too thick.
You might prefer to roll the pastry in icing sugar rather than flour to add a degree of sweet caramelised crispiness to the finished pastry.
In any case, avoid adding too much more flour at this stage and toughening the pastry - scatter the flour thinly.
Using the rolling pin, lay the pastry across the pie tin and then with a curled finger, or a small ball of pastry,
press the pastry gently but firmly into the whole pie tin making sure to get it right into the corners.You might prefer to roll the pastry in icing sugar rather than flour to add a degree of sweet caramelised crispiness to the finished pastry.
In any case, avoid adding too much more flour at this stage and toughening the pastry - scatter the flour thinly.
Run around the edge of the tin with a knife and neatly cut away the excess pastry. If the pastry pulls away from the sides now, or contracts back down into the base, gently press it all the way back up the sides again.
Lay a couple of sheets of clingfilm across the pie and fill them, and the pie, right to the top with baking beans. Press the beans in gently, then fold the cling film across the top of the beans so they're completely enclosed.
You can use parchment paper or tin foil for this, in which case you don't need to wrap the beans,
but it's a lot easier doing this with clingfilm which conforms itself to the insides of the pie shape much more readily.
Despite what you might expect, as long as you fold the clingfilm back over the beans it won't melt in the hot oven.
Another common mistake is to not completely fill the pie with beans, which will allow the side walls to contract and collapse when blind baking.
Blind bake the bean-filled pie for about 7 minutes at 180°C until the edges of the pastry take on just a little colour.Another common mistake is to not completely fill the pie with beans, which will allow the side walls to contract and collapse when blind baking.
Leave to cool while you make the filling. You can leave the bagged beans inside for now.
Though it's worth noting that many recipes do remove the beans and return the pies to the oven for a few minutes at this stage to completely dry out the pastry.
Cream the butter and the sugar together until it becomes almost fluffy and lighter in colour.
Paul is very enthusiastic about baking with one's hands - and advocates for doing all this stirring, mixing and beating using the fingers of one hand
(keep one hand clean to hold jugs, bowls, utensils, or answer your phone).
Whisk up the eggs yes, using your fingers adding a little almond essence, which we used vanilla essence, grated lemon zest or whatever flavours you fancy..Very slowly add little dribbles of the beaten egg to the butter and mix vigorously.
Continue until all the egg has been incorporated and the mixture has developed a slightly curdled appearance. If the mixture curdles prematurely then beat in a little flour to bring it back together. Otherwise discard the flour if not needed. Finally mix in the ground almonds yep, still using your hand.
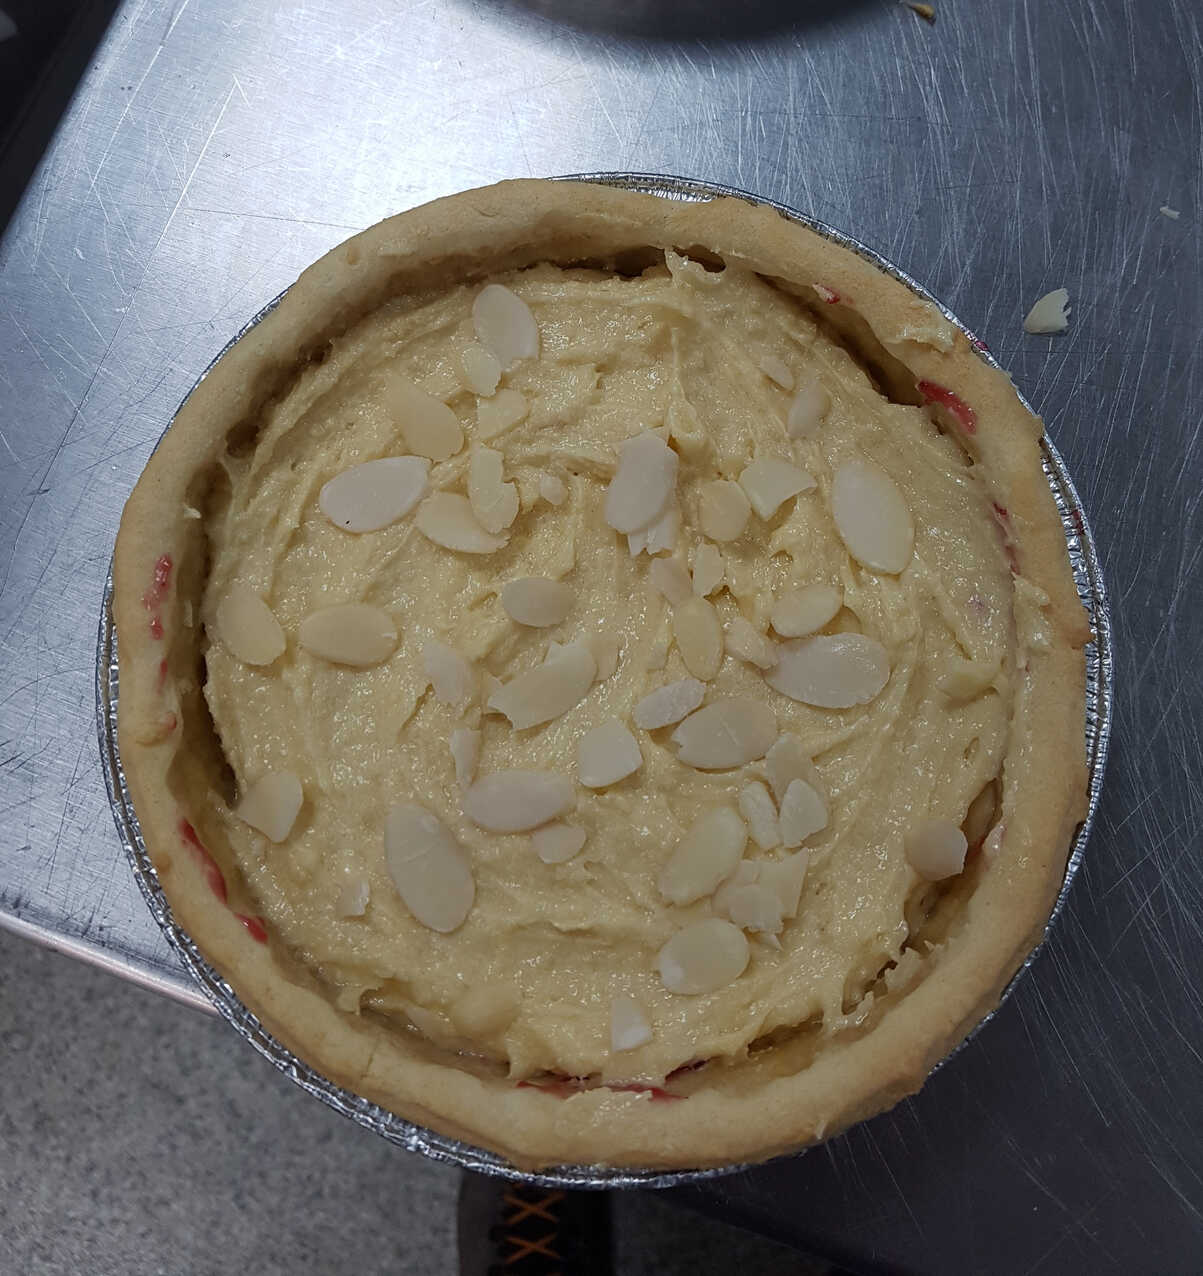
Remove the bagged baking beans and spread a thin layer of raspberry jam (or your choice of jam) over the base of the pastry.
Beating the jam first (yes, with your fingers) will loosen it and make it easier to spread.
Spoon the almond filling over the jam, smoothing it out with a spatula.
Paul recommends wetting your fingers (natch!) and using them to smooth in the almond filling.
Sprinkle flaked almonds on top.
Don't overdo it - as Paul says: they're just a garnish.
You could toast them first if you liked, but then they are going to be baked...
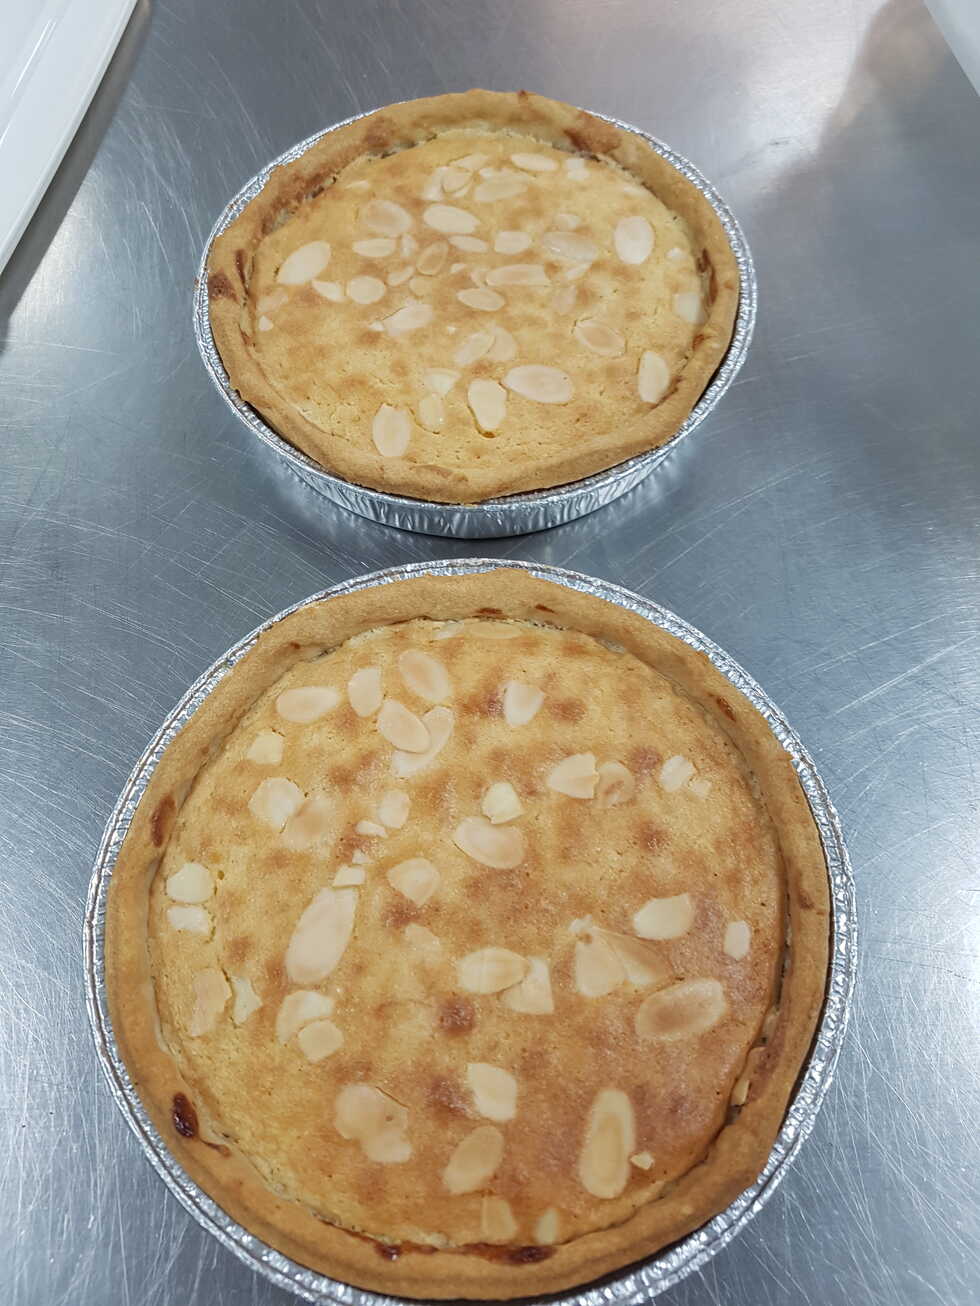
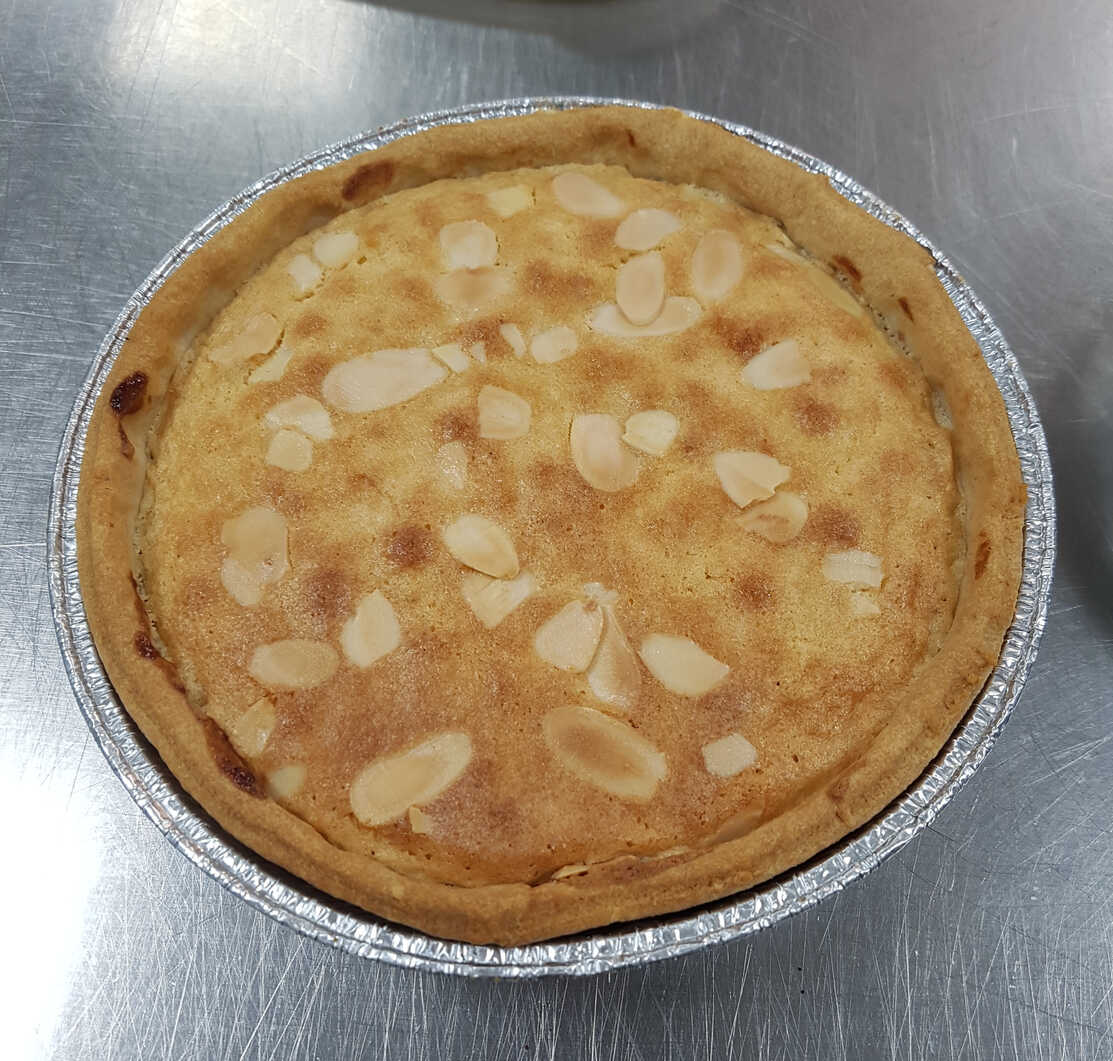
Place the assembled tart in the preheated oven. Bake for 25–30 minutes or until golden and firm to the touch. Start cleaning up in the meantime!
You could toast them first if you liked, but then they are going to be baked...
I'm pretty sure Paul told us 10 minutes baking time, but everyone else seems insistent on about 30 minutes,
including the recipe he sent us later,
and although we did make two smaller pies instead of one large one, I'd probably plan for the longer period.
After 25 minutes, check the tart. If it's golden and firm to the touch, remove it from the oven. If not, give it an extra 5 minutes.
Leave it to cool for 10 minutes, then once slightly cooled, remove the tart from the tin and allow it to cool completely on a wire rack.
Or leave it in the foil/tin - up to you!
Start final clean-up during this time.
By 19:30, the tart will be ready to go, and the kitchen should be cleaned up!
Did you spot the subtle clues that this was a catering school recipe?
The tart was excellent, and I have to say, once you get over the horror of having sticky, gooey hands, it's quite satisfying mixing with your fingers and gives you a very different appreciation of the materials you're working with.
Although now I'm struggling to get the image of a sweaty baker's filthy fat digits all up in my cupcakes out of my head.
Is this a fingernail??
When the pastry ball is softened slightly, press it into a vaguely conical shape by rolling the pin at an angle around the top of the ball.
This will help to avoid cracking around the edges as you roll the pastry out.