Artisan Bread - Oh Mother!
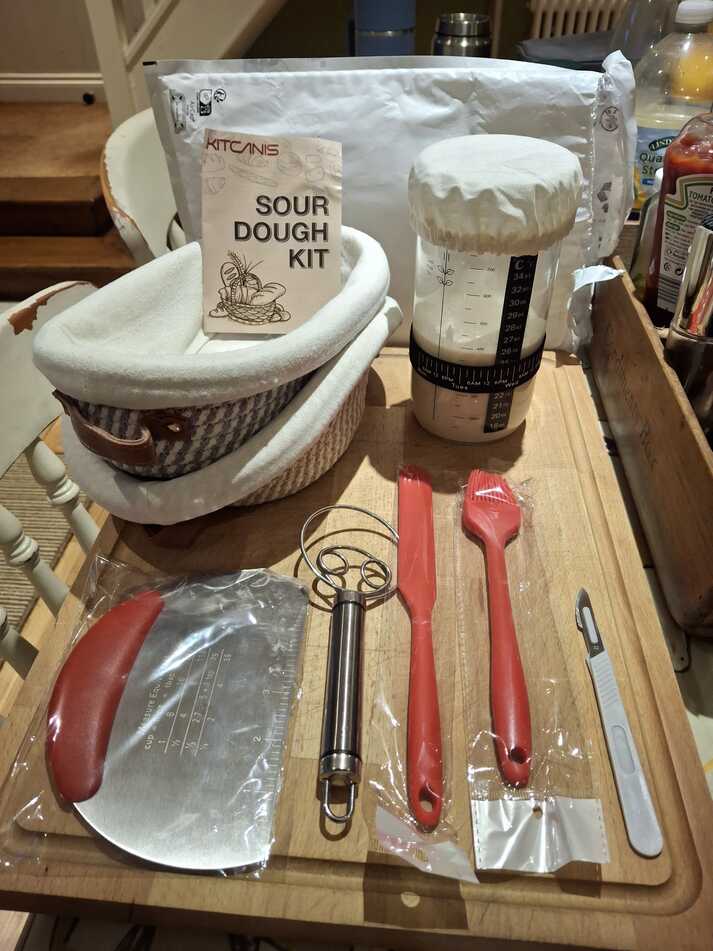
In which we receive our long-awaited sourdough starter kit (See what they did there?) and start baking bread with our class sourdough starter,
also known as a sourdough Mother, instead of yeast.
Although it was instructive to get some hands-in guidance (See what I did there 😂) on stretching and folding sourdough - how to handle the relative stickiness, what if feels like when it's worked sufficiently - I didn't find the class provided any useful overview of the whole sourdough bread-making process.
So here is one that I've gleaned from extensive Internet research though very little personal experimentation:
Making artisan sourdough bread is a much longer and more demanding process than making your standard yeast-based bread.
For that you mix the ingredients, knead like a mad masseur, let it rise for a couple of hours, knock it back, prove it in the bread tin for a couple more hours and bake it. Simples.
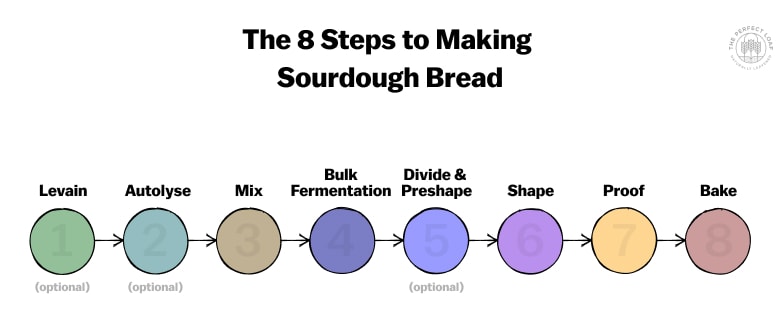
Making sourdough, on the other hand, can take days, and as far as I can tell can by roughly divided into the following stages, as illustrated by this handy graphic from The Perfect Loaf, though some steps may merge into each other or even disappear completely:
 Breed a Starter:
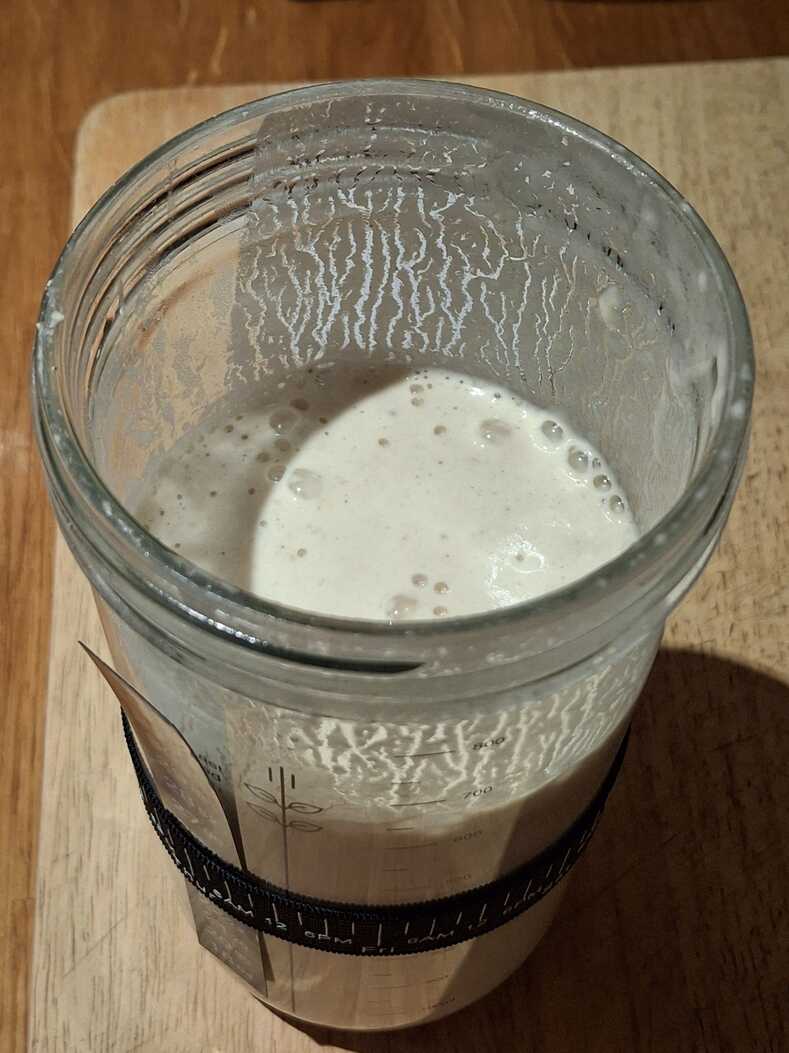
A sourdough starter, or mother, is a culture of naturally-occurring bacteria and yeasts fed regularly on a mixture of flour and water.
Although it is possible to cultivate one by just exposing flour and water to the air, it is more common to include fruit, honey or yoghurt to get the thing started 🤣.
For example here at Shipton Mill unwashed apples are quartered or chopped and covered with un-chlorinated water for a week until the mixture becomes bubbly and alcoholic. This is then strained, and the liquid fed with flour for a couple more days which further develops the fermenting living starter ecosystem.
You want to keep your starter at roughly 100% hydration - that's an equal weight of water and flour content. So feed your starter with roughly 50:50 flour and water. They really like a bit of rye flour in there too.
Typically you would feed it daily in the ratio 1:1:1, or 1:2:2 starter:flour:water. If you keep the starter in the fridge you can reduce its feeding interval to several days.
Then when you bake your bread you substitute about 100g of starter for a 7g packet of dried yeast, or 12-15g of fresh yeast.
Obviously this means that either you must bake bread every couple of days, or regularly discard some of your starter lest it take over your house.
Teacher Aaron charmingly refers to this as discharge and I give you something to do with it below instead of flushing it down the toilet.
Create the Levain:
A Levain is the sourdough leavening agent used to raise a batch of dough. It's made from taking some of the ongoing long-lived starter and modifying, feeding, enriching or en-biggening it. Though it could simply be just an extracted un-modified portion of the starter.
But all of the levain gets used to proof the dough, as opposed to the starter itself which will continue to live on independently.
If you're just using some of the starter then it's better to take it when the starter reaches the peak of its rise - around 4-6 hours after feeding.
Autolyse:
An optional rest period after combining the flour with water, during which the flour fully hydrates and the enzymes in the flour begin to break down the proteins and develop sugars from the starches. Usually lasting betwen 20 and 60 minutes, the dough will be more coherent and easier to work afterwards.
Strictly speaking just flour and water should be incorporated, with the salt and yeast only added afterwards, but when using a liquid sourdough starter, this is usually also incorporated for the autolyse.
This period is particularly helpful with sourdough since the relatively high levels of hydration (around 72%) already makes the dough unusually sticky and difficult to work with.
Mix & Knead:
This gets a little complicated.
Sourdough bread is not often kneaded vigorously like yeast-based loaves: so as not to squeeze out all the lovely air pockets which give sourdough loaves their airy crumb.
Various kinds of stretching or slapping and folding techniques are used instead which gently develop the gluten whilst encouraging the inclusion of even more air. This produces a silky-smooth, puffy dough.
Furthermore, there appears to be quite a lot of contention over when exactly in the development cycle this soft kneading should happen. Before or during the bulk fermentation, or before or during the proving.
Your recipe may vary.
The whole mass of dough is covered, possibly in a lightly oiled bowl, and allowed to rise to roughly double in size, encouraging the gluten matrix to develop within.
There looks to be massive variation in the time and temperature required for this stage, depending on the specific method you're following. It might take between 2 and 5 hours at room temperature, or it might happen over the course of days in the fridge. Some people seem to differentiate this cold fermentation and call it Bulk Retardation. Which is kind of rude.
In either case you should begin the process at a warm temperature for at least long enough to get the fermentation off to a good start, then you can retard the process in the fridge if you want it to slow down and take longer.
There may or may not be stretching and folding during this period, and there seems to be no definitive means of determining when your bulk fermentation is finished.
Unless it's gone too far and the dough has become flat and lifeless (see the poke test below).
However, here are some hints from The Pantry Mama who says your bulk fermented dough should:
If you've only made enough dough for one loaf, then there will of course be no dividing, and subsequent stages will apply to all of your dough.
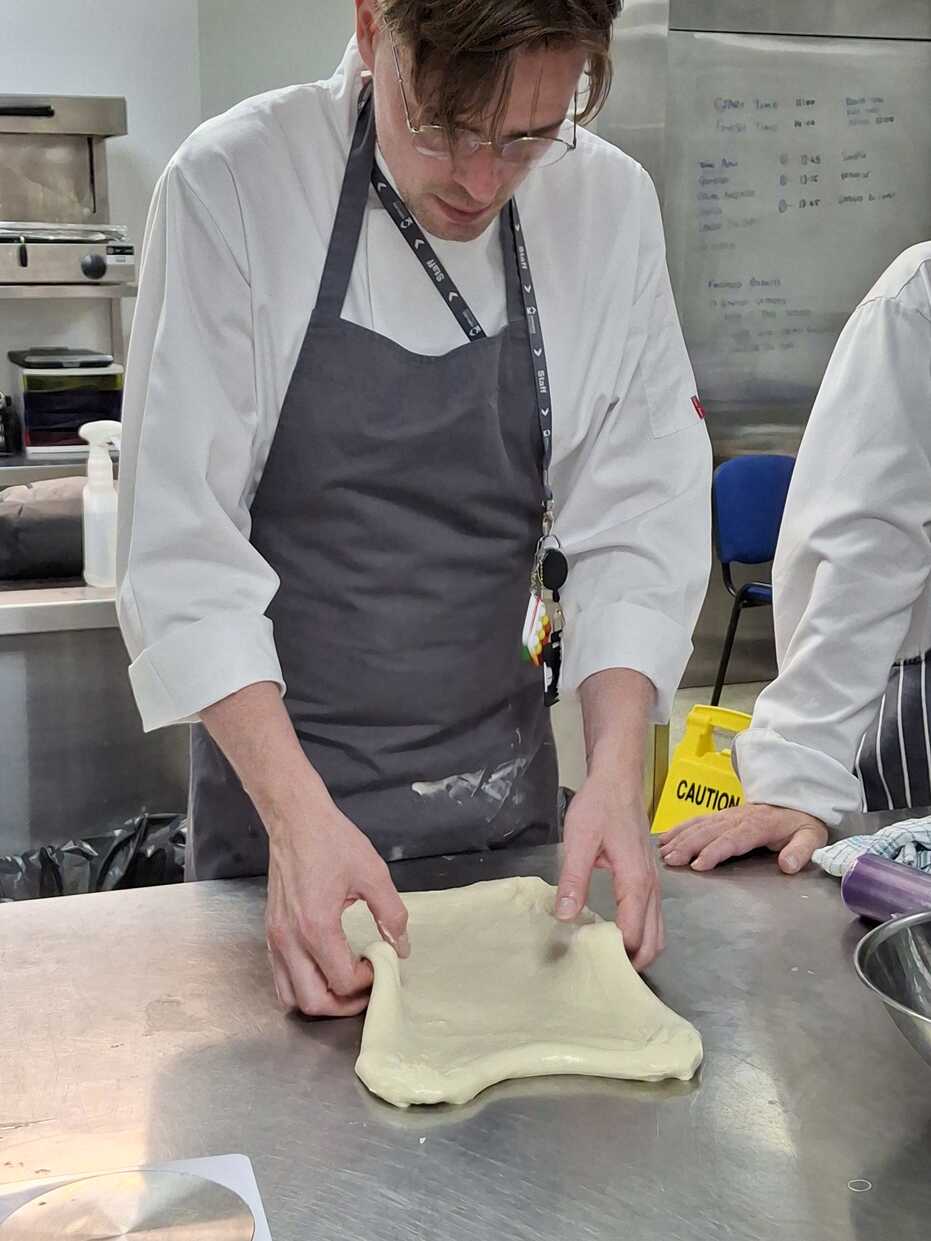
In any case this part is pretty straightforward - chop the dough up into loaf- or bun- sized portions, do some (more) stretching and folding as required, then fold up your dough into the required shape.
It's important to get a tight, tense skin to your loaf which will hold a good shape when it bakes, and build a nice, crisp crust. That's what the shaping is intended to achieve, by pulling or stitching a seam into one side of the loaf which tightens up the other surface.
This will become the upper surface when it comes to baking.
Prove:
Set your shaped loaf(s) to prove until the dough has perfected it's final development and is ready to be baked. Rather like the bulk fermentation this can be long or short, be done in a warm or a refrigerated environment depending on your favoured recipe's instructions. There really are no hard and fast rules 🙄
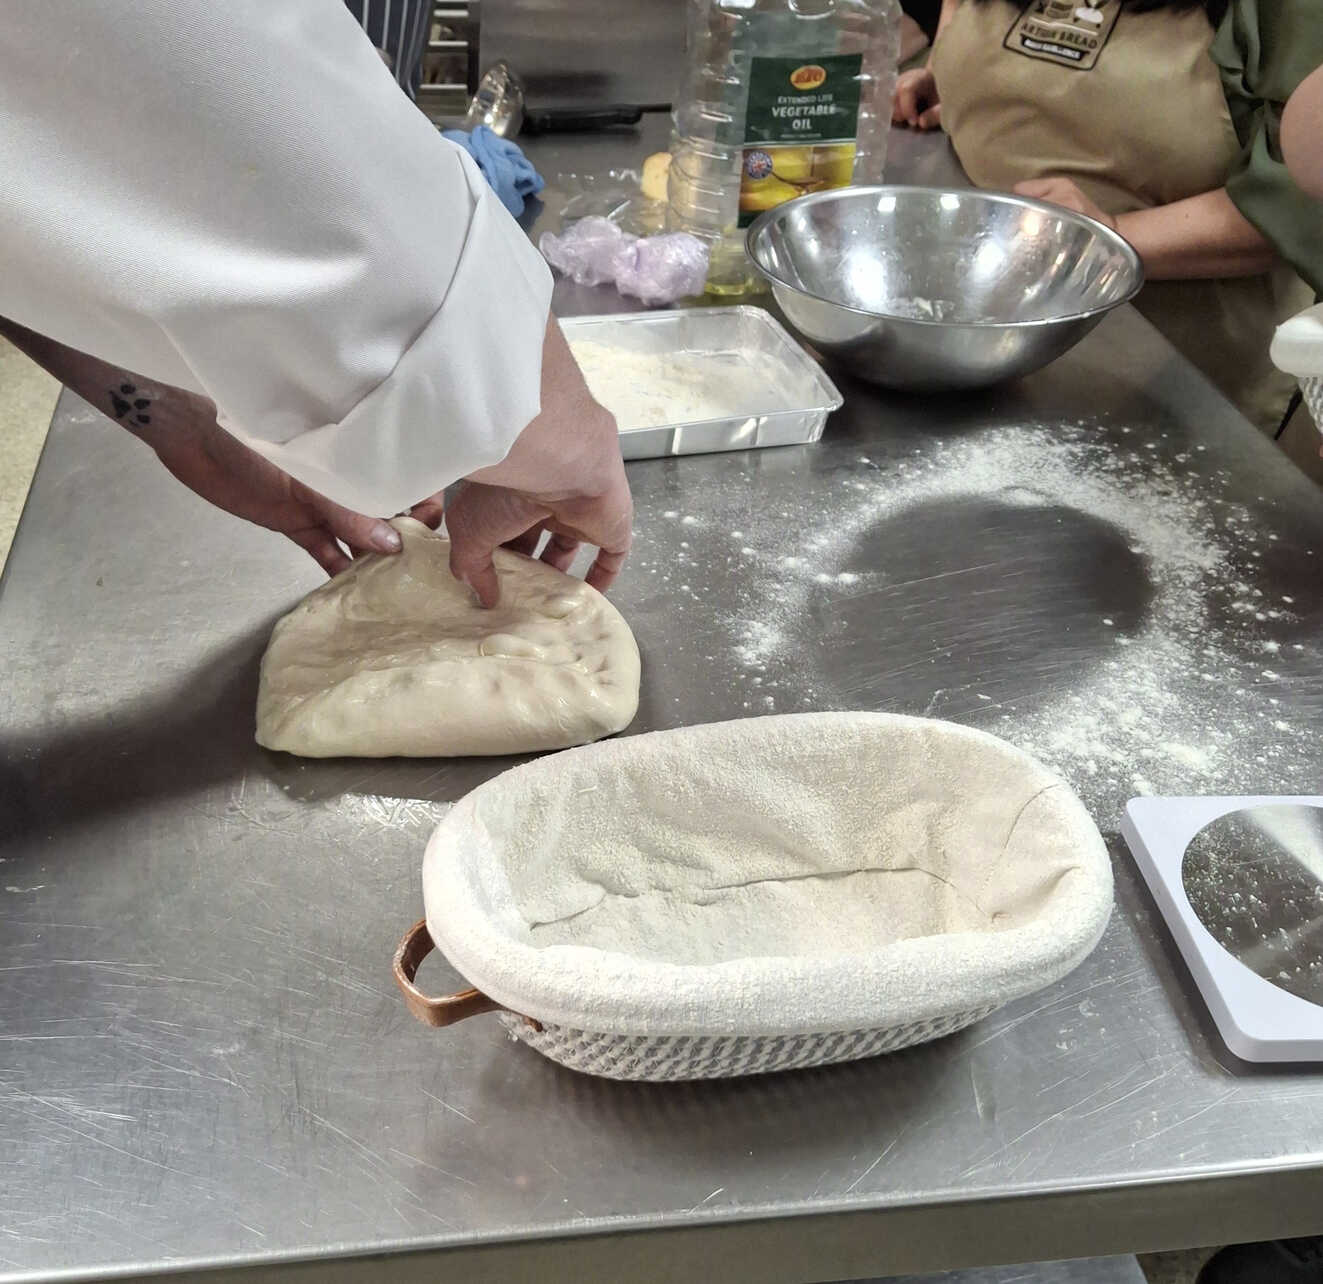
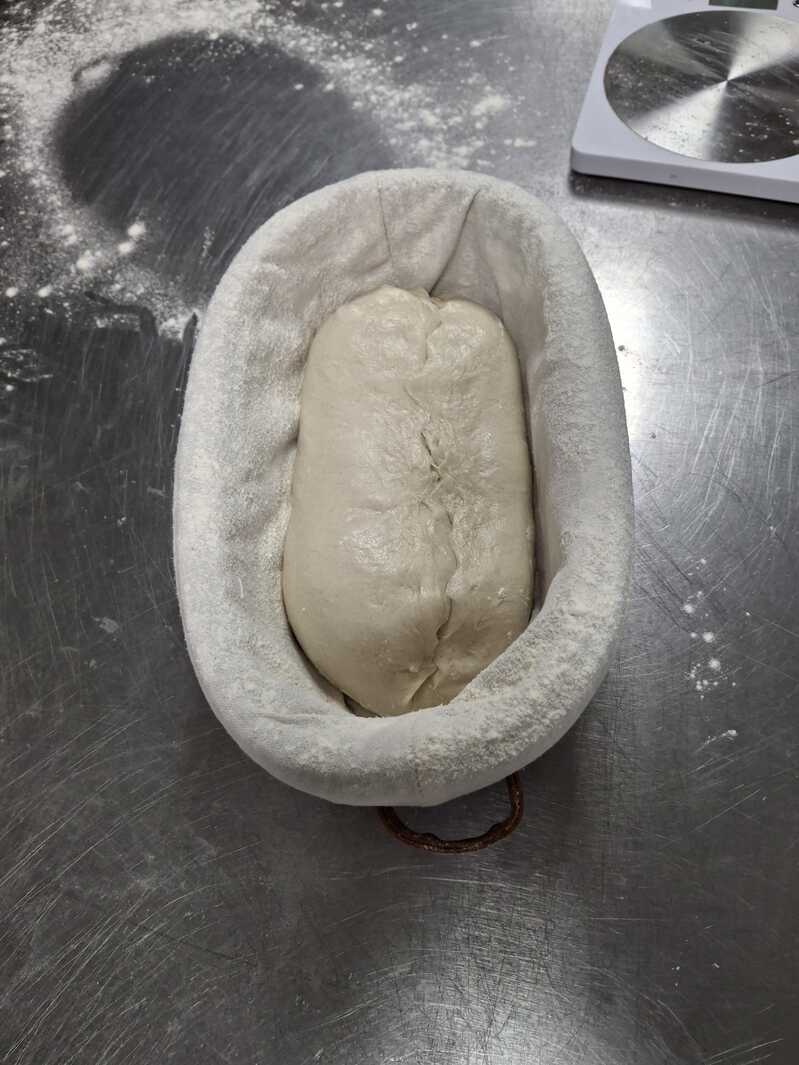
Sourdough aficionados like to prove their loaves in a little wicker basket called a Brotform or Banneton lined with linen. In which case place the loaf seam-side facing upwards so the tight, smooth, baking surface will be pressed against the material.
First dredge the lining with flour, particularly rice flour, to help prevent the dough from sticking. Be especially generous if the lining is new - even spraying with water, then flouring, then drying a few times in preparation.
Here is a handy poke test for testing how the proving is progressing - gently press your finger into the surface of the dough to make a dent:
Although the class' recipes always seem to require the baking to be done at normal bread temperatures of 180-200°C, most online sources recommend baking sourdough bread at much higher temperatures.
Because the loaf's skin quickly forms an impermeable crust which prevents your beautifully gaseous, springy dough from properly leaping out of the oven It's literally called oven spring! it's best to bake at an initial high temperature, in a moist environment (which retards the crust formation), and to make at least one, long, slash in the top of the loaf with a super-sharp knife to allow the crust to split open or ear.
You can turn this scoring into quite an art form, though your loaf will collapse if you overdo it, or let the scored loaf hang around too long before baking.
The crusty ear formation can be encouraged by re-scoring the same slash after 5 minutes of baking.
Gently roll your proved loaf out of its banneton onto floured baking paper, or a peel (a board used to slide the loaf into the oven - like a pizza) so that the seam-side is now downwards, and set to slashing that lovely smooth surface with your razor blade.
Many sourdough bakers favour using a dutch oven (a giant cast iron pot) to bake their bread in to keep it moist, even adding additional water to the bottom.
You can attempt to simulate this environment by spraying water over your bread, into the oven, or filling a baking tin with water to put in the bottom of the oven at the start.
See your recipe for details.
Although it was instructive to get some hands-in guidance (See what I did there 😂) on stretching and folding sourdough - how to handle the relative stickiness, what if feels like when it's worked sufficiently - I didn't find the class provided any useful overview of the whole sourdough bread-making process.
So here is one that I've gleaned from extensive Internet research though very little personal experimentation:
Making artisan sourdough bread is a much longer and more demanding process than making your standard yeast-based bread.
For that you mix the ingredients, knead like a mad masseur, let it rise for a couple of hours, knock it back, prove it in the bread tin for a couple more hours and bake it. Simples.
Making sourdough, on the other hand, can take days, and as far as I can tell can by roughly divided into the following stages, as illustrated by this handy graphic from The Perfect Loaf, though some steps may merge into each other or even disappear completely:
A sourdough starter, or mother, is a culture of naturally-occurring bacteria and yeasts fed regularly on a mixture of flour and water.
Although it is possible to cultivate one by just exposing flour and water to the air, it is more common to include fruit, honey or yoghurt to get the thing started 🤣.
For example here at Shipton Mill unwashed apples are quartered or chopped and covered with un-chlorinated water for a week until the mixture becomes bubbly and alcoholic. This is then strained, and the liquid fed with flour for a couple more days which further develops the fermenting living starter ecosystem.
You want to keep your starter at roughly 100% hydration - that's an equal weight of water and flour content. So feed your starter with roughly 50:50 flour and water. They really like a bit of rye flour in there too.
Typically you would feed it daily in the ratio 1:1:1, or 1:2:2 starter:flour:water. If you keep the starter in the fridge you can reduce its feeding interval to several days.
Then when you bake your bread you substitute about 100g of starter for a 7g packet of dried yeast, or 12-15g of fresh yeast.
Obviously this means that either you must bake bread every couple of days, or regularly discard some of your starter lest it take over your house.
Teacher Aaron charmingly refers to this as discharge and I give you something to do with it below instead of flushing it down the toilet.
Create the Levain:
A Levain is the sourdough leavening agent used to raise a batch of dough. It's made from taking some of the ongoing long-lived starter and modifying, feeding, enriching or en-biggening it. Though it could simply be just an extracted un-modified portion of the starter.
But all of the levain gets used to proof the dough, as opposed to the starter itself which will continue to live on independently.
If you're just using some of the starter then it's better to take it when the starter reaches the peak of its rise - around 4-6 hours after feeding.
Autolyse:
An optional rest period after combining the flour with water, during which the flour fully hydrates and the enzymes in the flour begin to break down the proteins and develop sugars from the starches. Usually lasting betwen 20 and 60 minutes, the dough will be more coherent and easier to work afterwards.
Strictly speaking just flour and water should be incorporated, with the salt and yeast only added afterwards, but when using a liquid sourdough starter, this is usually also incorporated for the autolyse.
This period is particularly helpful with sourdough since the relatively high levels of hydration (around 72%) already makes the dough unusually sticky and difficult to work with.
Mix & Knead:
This gets a little complicated.
Sourdough bread is not often kneaded vigorously like yeast-based loaves: so as not to squeeze out all the lovely air pockets which give sourdough loaves their airy crumb.
Various kinds of stretching or slapping and folding techniques are used instead which gently develop the gluten whilst encouraging the inclusion of even more air. This produces a silky-smooth, puffy dough.
Furthermore, there appears to be quite a lot of contention over when exactly in the development cycle this soft kneading should happen. Before or during the bulk fermentation, or before or during the proving.
Your recipe may vary.
- There is the stretch and fold technique in which the dough is stretched in one direction, then folded all the way back over itself, turn 90° and repeat 4-8 times.
- There are coil folds, which are done with the dough in the bowl by by lifting it, allowing it to stretch itself out, then lowering it back into the bowl in such a way that it folds up naturally. Turn 90° and repeat.
- Then there are letter folds, in which the dough is stretched into a rectangle, after which the shorter edges are folded over like a letter, then the dough is rotated and the exercise repeated. Or possibly rolled up in the opposite direction like a fat sausage.
- There is lamination in which the dough is stretched into an enormous thin sheet or pane, then folded back into itself. You can fold it like the letter method building 3 layers, or tuck two halves to the middle then the two sides together like making a book building 4 layers. This long strip can then also be similarly folded up, or rolled. This is a useful method if you want to incorporated layers of fillings.
The whole mass of dough is covered, possibly in a lightly oiled bowl, and allowed to rise to roughly double in size, encouraging the gluten matrix to develop within.
There looks to be massive variation in the time and temperature required for this stage, depending on the specific method you're following. It might take between 2 and 5 hours at room temperature, or it might happen over the course of days in the fridge. Some people seem to differentiate this cold fermentation and call it Bulk Retardation. Which is kind of rude.
In either case you should begin the process at a warm temperature for at least long enough to get the fermentation off to a good start, then you can retard the process in the fridge if you want it to slow down and take longer.
There may or may not be stretching and folding during this period, and there seems to be no definitive means of determining when your bulk fermentation is finished.
Unless it's gone too far and the dough has become flat and lifeless (see the poke test below).
However, here are some hints from The Pantry Mama who says your bulk fermented dough should:
- Have doubled (or just under).
- Have a slightly domed surface and be coming away from the edges of the bowl or container.
- Have a smooth surface with bubbles starting to form - it shouldn't be sticky. Yeah, good luck with that!
- It should feel light and airy like a giant pillow or big marshmallow.
If you've only made enough dough for one loaf, then there will of course be no dividing, and subsequent stages will apply to all of your dough.
In any case this part is pretty straightforward - chop the dough up into loaf- or bun- sized portions, do some (more) stretching and folding as required, then fold up your dough into the required shape.
It's important to get a tight, tense skin to your loaf which will hold a good shape when it bakes, and build a nice, crisp crust. That's what the shaping is intended to achieve, by pulling or stitching a seam into one side of the loaf which tightens up the other surface.
This will become the upper surface when it comes to baking.
Prove:
Set your shaped loaf(s) to prove until the dough has perfected it's final development and is ready to be baked. Rather like the bulk fermentation this can be long or short, be done in a warm or a refrigerated environment depending on your favoured recipe's instructions. There really are no hard and fast rules 🙄
Sourdough aficionados like to prove their loaves in a little wicker basket called a Brotform or Banneton lined with linen. In which case place the loaf seam-side facing upwards so the tight, smooth, baking surface will be pressed against the material.
First dredge the lining with flour, particularly rice flour, to help prevent the dough from sticking. Be especially generous if the lining is new - even spraying with water, then flouring, then drying a few times in preparation.
Here is a handy poke test for testing how the proving is progressing - gently press your finger into the surface of the dough to make a dent:
- If the dough springs right back immediately then it is under-proved and needs to be left for longer.
- If the hollow slowly fills back out but not completely then your dented loaf is now ready to bake.
- If the dough doesn't spring back at all then it is over-proved and you must throw it away.
JOKING - if you don't want to incorporate it into the next dough round you can still bake it, but it might need the support of a baking tin since it probably won't rise the way it should.
Although the class' recipes always seem to require the baking to be done at normal bread temperatures of 180-200°C, most online sources recommend baking sourdough bread at much higher temperatures.
Because the loaf's skin quickly forms an impermeable crust which prevents your beautifully gaseous, springy dough from properly leaping out of the oven It's literally called oven spring! it's best to bake at an initial high temperature, in a moist environment (which retards the crust formation), and to make at least one, long, slash in the top of the loaf with a super-sharp knife to allow the crust to split open or ear.
You can turn this scoring into quite an art form, though your loaf will collapse if you overdo it, or let the scored loaf hang around too long before baking.
The crusty ear formation can be encouraged by re-scoring the same slash after 5 minutes of baking.
Gently roll your proved loaf out of its banneton onto floured baking paper, or a peel (a board used to slide the loaf into the oven - like a pizza) so that the seam-side is now downwards, and set to slashing that lovely smooth surface with your razor blade.
Many sourdough bakers favour using a dutch oven (a giant cast iron pot) to bake their bread in to keep it moist, even adding additional water to the bottom.
You can attempt to simulate this environment by spraying water over your bread, into the oven, or filling a baking tin with water to put in the bottom of the oven at the start.
See your recipe for details.
Sourdough Loaf
class bread
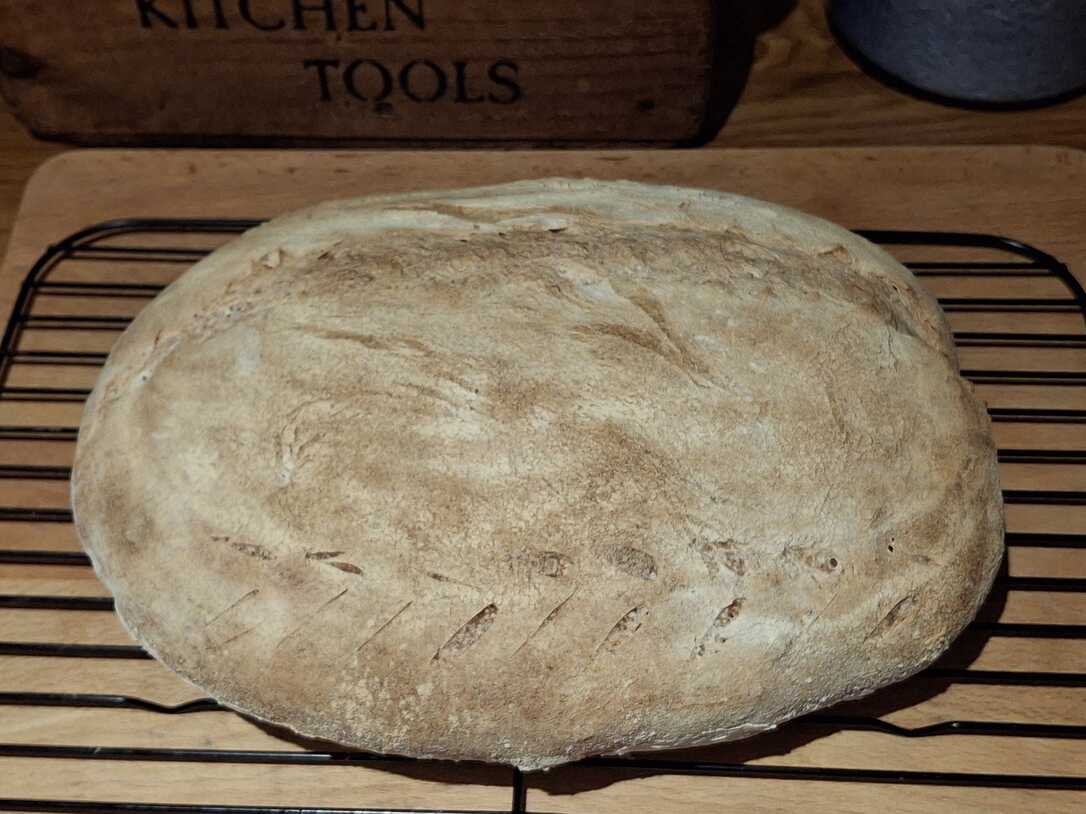
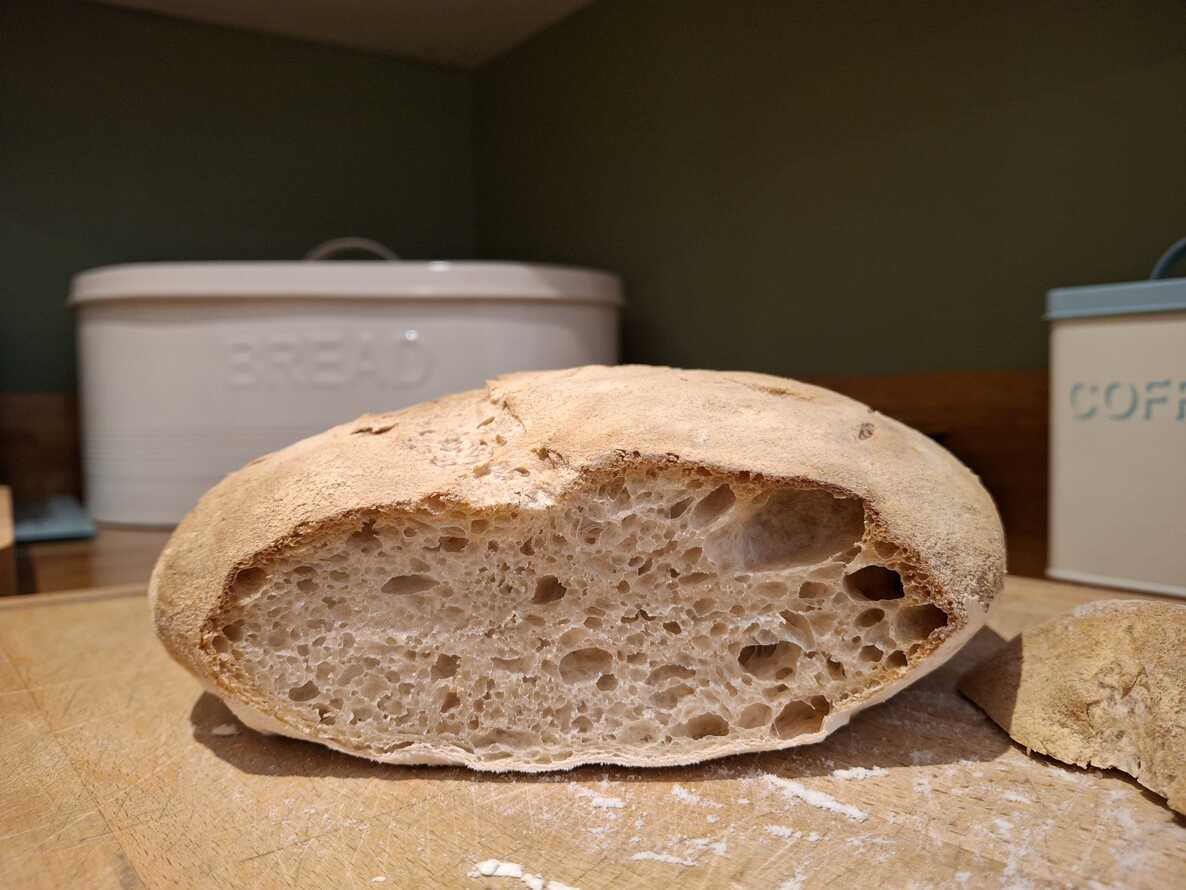
I'm not quite sure where Aaron got this recipe from - it was printed out for us.
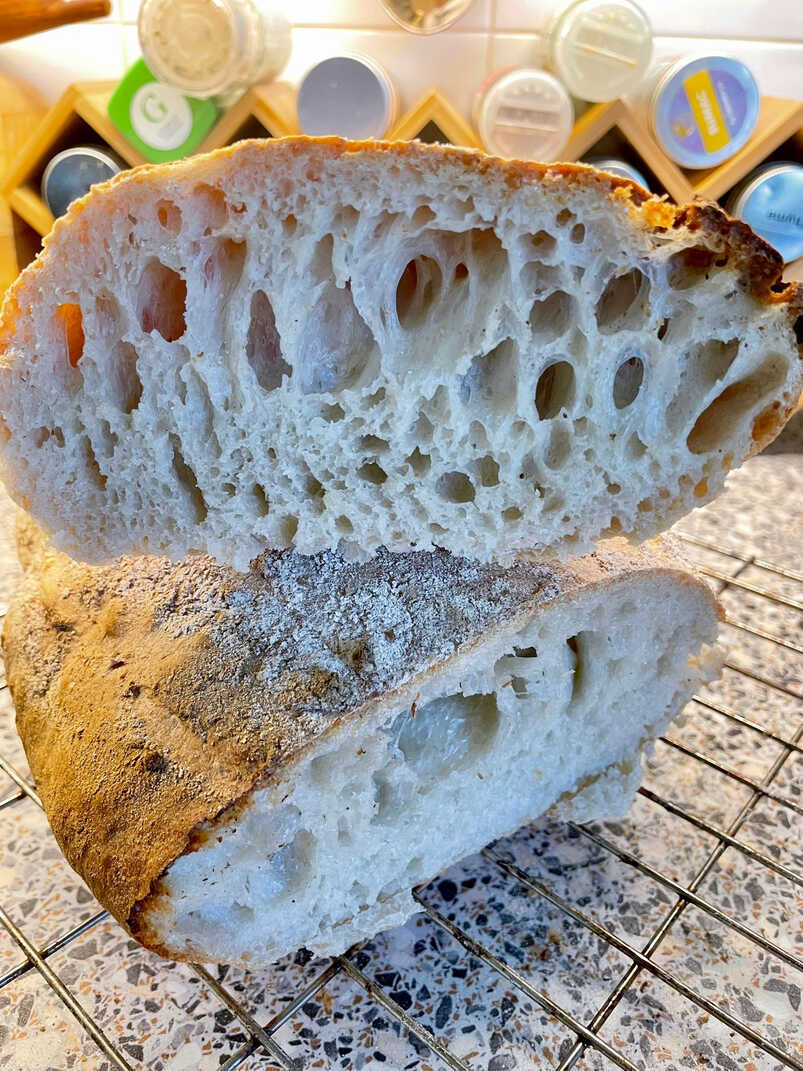
I have to say it doesn't seem to represent a typical sourdough recipe since it has extremely short raising periods, which are usually many hours or even days for most high-hydration sourdough, er, dough. The hydration is the weight of water divided by the weight of flour - don't forget to include what's contained in the starter though.
This recipe has 350g water / 500g flour which gives 70% hydration.
If you include the 50g of 100% hydrated starter (half water, half flour) then you get 71.4% hydration.
Hydrations are usually in the 65-75% range: Low ranges of 60-65% will produce a stiff, dense crumb with a thick crust, while 75-80% will generate a wet, sticky, difficult to manage dough but with an excellent open, airy crumb and thin crust.
Once you get beyond 80% you're producing ciabatta or focaccia.
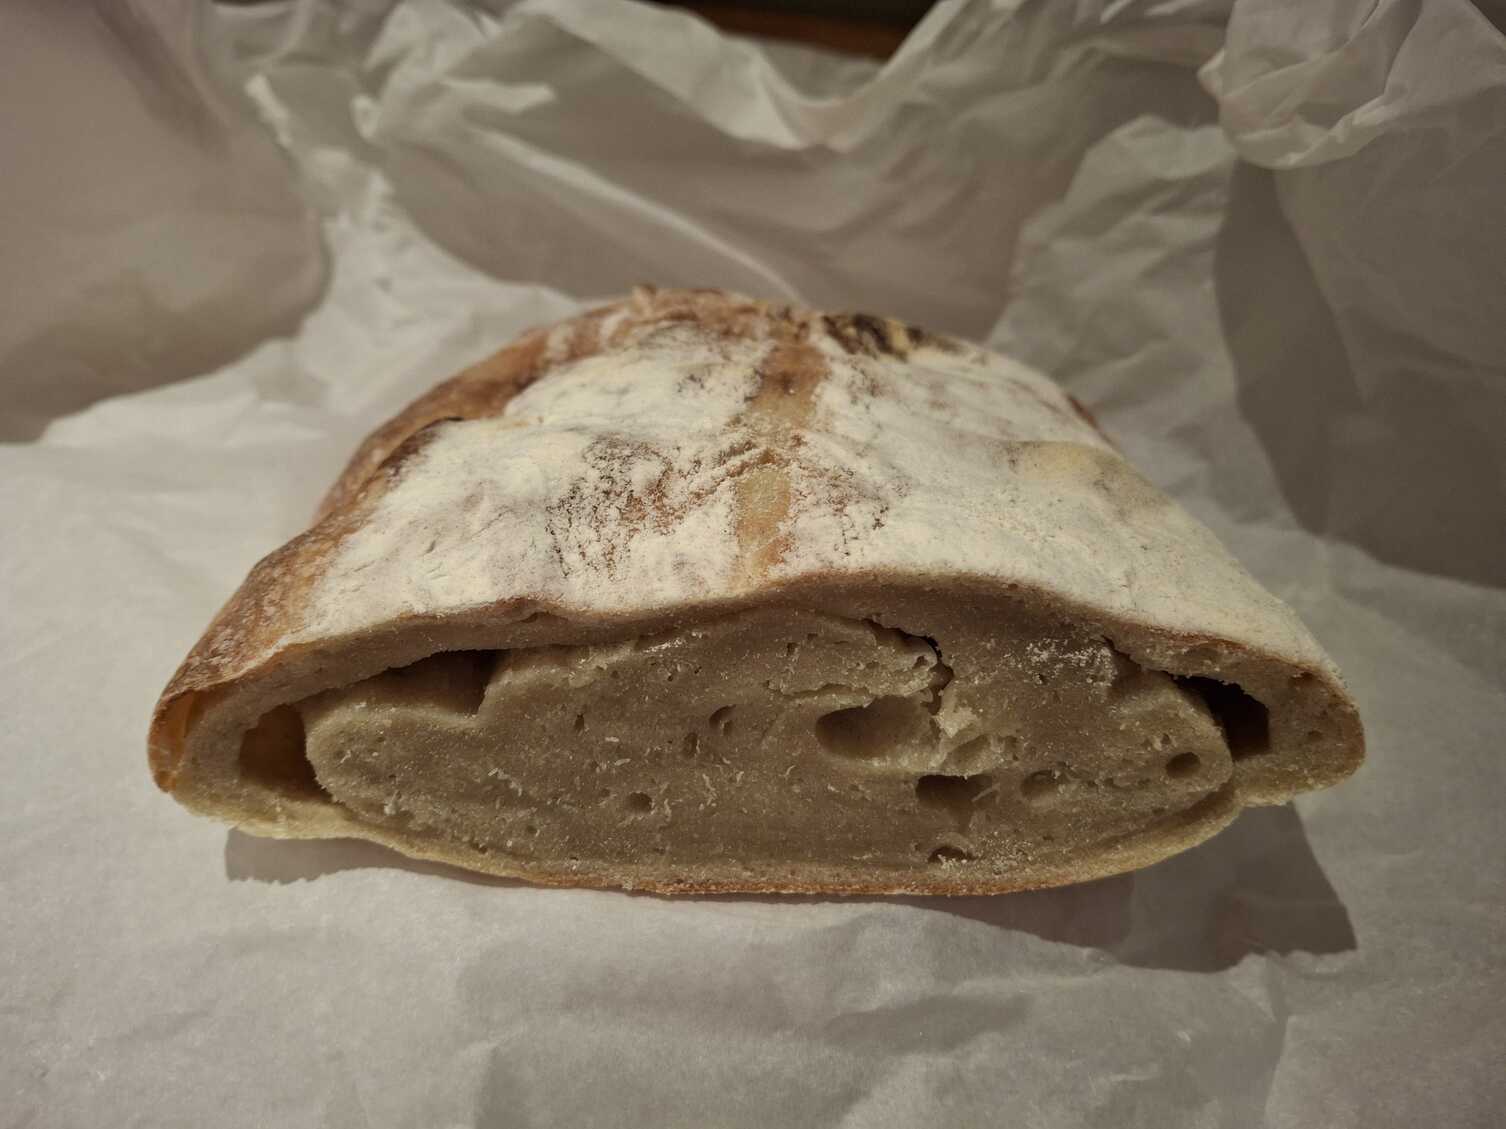
The bread I baked in class was a total disaster - it failed to rise at all in the oven. Probably because of the lack of proving time - even less than the minimal periods in the actual recipe.
Tut!
Moreover, I can attest that it was actually possible to create the most fabulously holey bread from this very same dough, as demonstrated by Classmate Gita.
She has this to say about what was required: I left it to ferment overnight and I did about four other test (stretch? - Ed) and turns every few hours after I left Class.
I have to say it doesn't seem to represent a typical sourdough recipe since it has extremely short raising periods, which are usually many hours or even days for most high-hydration sourdough, er, dough. The hydration is the weight of water divided by the weight of flour - don't forget to include what's contained in the starter though.
This recipe has 350g water / 500g flour which gives 70% hydration.
If you include the 50g of 100% hydrated starter (half water, half flour) then you get 71.4% hydration.
Hydrations are usually in the 65-75% range: Low ranges of 60-65% will produce a stiff, dense crumb with a thick crust, while 75-80% will generate a wet, sticky, difficult to manage dough but with an excellent open, airy crumb and thin crust.
Once you get beyond 80% you're producing ciabatta or focaccia.
The bread I baked in class was a total disaster - it failed to rise at all in the oven. Probably because of the lack of proving time - even less than the minimal periods in the actual recipe.
Tut!
Moreover, I can attest that it was actually possible to create the most fabulously holey bread from this very same dough, as demonstrated by Classmate Gita.
She has this to say about what was required: I left it to ferment overnight and I did about four other test (stretch? - Ed) and turns every few hours after I left Class.
Makes a 500g Loaf
Ingredients
- 500g strong bread flour
- 10g salt
- 50g starter
- 350ml warm water
Mix the Dough
In a large bowl, combine flour, salt, and starter.
Add warm water.
Mix until it forma s rough, sticky dough.
Knead
Turn onto a lightly floured surface.
Knead for 8-10 minutes until smooth and elastic. (Alternatively: stretch-and-fold method if you prefer a wetter dough)
First Rise (Bulk Fermentation)
Place the dough in a lightly oiled bowl.
Cover and leave in a warm place for 1-2 hours, until doubled in size.
Every 30 minutes do your fold.
Shape
Gently turn out the dough (don't knock all the air out).
Shape into a round or oval loaf.
Place on a baking tray (lined or floured) or into a floured proofing basket.
Second Rise
Cover loosely and leave for 30-60 minutes until puffy.
Prepare the Oven
Preheat the oven to 220°C (200°C fan) / 425°F
Place a tray or dish in the bottom of the oven (for steam).
Score & Bake
Slash the top of the loaf with a sharp knife.
Put the loaf in the oven.
Pour a cup of water into the hot tray to create steam.
Bake for 25-30 minutes until golden brown.
Cool
Transfer to a rack and let it cool fully before slicing (important for texture).
In a large bowl, combine flour, salt, and starter.
Add warm water.
Mix until it forma s rough, sticky dough.
Knead
Turn onto a lightly floured surface.
Knead for 8-10 minutes until smooth and elastic. (Alternatively: stretch-and-fold method if you prefer a wetter dough)
Wait - don't you know how wet the dough is going to be from your measurements??
First Rise (Bulk Fermentation)
Place the dough in a lightly oiled bowl.
Cover and leave in a warm place for 1-2 hours, until doubled in size.
Every 30 minutes do your fold.
Shape
Gently turn out the dough (don't knock all the air out).
Shape into a round or oval loaf.
Place on a baking tray (lined or floured) or into a floured proofing basket.
Second Rise
Cover loosely and leave for 30-60 minutes until puffy.
Prepare the Oven
Preheat the oven to 220°C (200°C fan) / 425°F
Place a tray or dish in the bottom of the oven (for steam).
Score & Bake
Slash the top of the loaf with a sharp knife.
Put the loaf in the oven.
Pour a cup of water into the hot tray to create steam.
Bake for 25-30 minutes until golden brown.
Cool
Transfer to a rack and let it cool fully before slicing (important for texture).
As I said, the bread baked in class was rubbish - it didn't rise at all.
So I made another loaf at home, more following a Tom Aikens recipe which Aaron recommended using 200g of starter, doing a lot more folding, and leaving the bulk fermentation overnight in the fridge. The resulting loaf was muchbetter. It was filled with bread - not pancake!
Still no decent ear though 🙁
Starter Discard Spring Onion Pancakes
class oriental bread snack

What the Yanks call scallion pancakes.
A simple way of using up your sourdough starter's daily discharge.
Hmmmmm discharge.
Perhaps it's more palatable to call it discard?
Anyway, it seems best to drain whatever-you-call-it from the starter when it's on the rise only a few hours after feeding longer if you're keeping it in the fridge, since it can get unpleasantly acidic if you wait until it's hungry.
It occurs to me that sweetcorn might be a nice ingredient too - and I've also seen cheese suggested, but um, I don't know about that. Unless maybe it was feta?
Sweetcorn is OK, but a bit bland.
Feta is probably best in a salad on the side, but comté was surprisingly pleasant.
Feta is probably best in a salad on the side, but comté was surprisingly pleasant.
Makes 4 x 6" Pancakes
Ingredients
For the Pancakes:- 8 tablespoons sourdough starter discard
- 4 sliced spring onions
- 2-8 tablespoons water optional
- 2 tsps sesame or onion seeds
For a Dipping Sauce:- 4 tsps soy sauce
- 4 tsps rice vinegar
- 1 tsp sesame oil
- sugar to taste
Optional Sauce Extras:- couple cloves minced garlic
- 1" grated ginger
- 1 tblsp minced spring onion
- ponzu or lemon juice
- chilli oil or flakes
- 1 tsp oyster sauce
- 2 tblsps hoisin sauce
- up to 2 tblsps dashi or water for thinning
Stir up some soy sauce with rice vinegar and a dash of sesame oil.
Add any other ingredients you fancy for flavour or variation. The quantities above are just suggestions.
Adjust the thickness and sweetness with water and sugar to taste.
Mix the starter discard with thinly sliced spring onions and sesame seeds in a bowl.
Melt a puddle of butter in a frying pan over medium heat and pour in enough batter to cover.
When the pancake has cooked almost through and the bottom is nice and golden flip and fry the other side. You may need more butter.
Repeat for the remaining batter. Serve with your choice of dipping sauce.
Add any other ingredients you fancy for flavour or variation. The quantities above are just suggestions.
Adjust the thickness and sweetness with water and sugar to taste.
I made a really good version the other day:
- 3 generous tblsps soy sauce
- 3 skimpy tblsps rice vinegar
- 1 tblsp toasted sesame oil
- 6 cloves garlic, mashed
- juice of ½ lime
- 2 tblsps mushroom dashi
- 1 teaspoon crispy chilli oil
- grind of mixed peppercorns
Mix the starter discard with thinly sliced spring onions and sesame seeds in a bowl.
You can thin the mixture with a little water if you don't like your pancakes to be quite so thick and gummy.
Stir through the spring onions and sesame or onion seeds.
If you prefer them more crispy-fried you can just scatter them on the top of the batter after pouring it into the pan before flipping.
Melt a puddle of butter in a frying pan over medium heat and pour in enough batter to cover.
When the pancake has cooked almost through and the bottom is nice and golden flip and fry the other side. You may need more butter.
Repeat for the remaining batter. Serve with your choice of dipping sauce.
A tasty lunch or snack.
You definitely want to aim to get the outsides of the pancakes nice and crispy for best results.
You definitely want to aim to get the outsides of the pancakes nice and crispy for best results.
But avoid citrus fruits and particularly fruits containing protease enzymes like actinidin; such as kiwi, pineapple, papaya and mango. (Which are coincidentally also those which make great marinades for tenderising meat.)