Christmas Corn

Well, 'tis the season to be practicing my Christmas delicacies.

Despite the discomfiting and inconvenient absence of Mum this year, my brother and I plan on bravely continuing our family customs, with Kurt taking on the goose, vegetables and steaming up one of Mum's puddings, whilst his ex-wife partner yes, it's both complicated and ridiculous ;) shoulders the baking duties. I rarely bother practicing the stuffing (too much to eat), and I have long since perfected the art of gravy, but I like to have a stab at the starter before the big day.
Dammit, I should have used that as a pun last year for my Christmas sausages!
On the practice menu this year:
Gravlax on Rye Crispbread
This year's novelty starter.
another round of the dread sprouts
Inspired by tales of
caramalised bacon
(!!!) I decide to have another bash at the hated staple.
Fear not - the recipe won't be making it into this year's Christmas dinner which will be served with the traditional grey, overboiled, cabbagey squash balls just joking Kurt!, it's more out of academic interest and a compulsive desire for sprouty completeness.
Sweet Potato and Pumpkin Mash
Fear not - the recipe won't be making it into this year's Christmas dinner which will be served with the traditional grey, overboiled, cabbagey squash balls just joking Kurt!, it's more out of academic interest and a compulsive desire for sprouty completeness.
Yep, I still have leftover pumpkins!
Corn Fritters
Just for the LOLs - and our shared history with farty salt.
I have to say, the starter was well worth practicing too -
there was a marked improvement in both the fish and crispbreads between the rehearsal and Christmas dinner.
I should probably have taken on the pudding, then Flora could have had dessert too - I was just lazy. Sorry Kurt!
I should probably have taken on the pudding, then Flora could have had dessert too - I was just lazy. Sorry Kurt!
Gravlax or Gravad Lax
A scandinavian salt-cured dill-flavoured salmon
fish starter snack

Based on an amalgamation of sources including
Tim Hayward's recipe from the Guardian.
Incidentally, the quantities in that recipe would make enough for about 4lb of salmon if you were interested!
Apart from the fresh dill, the choice of flavourings and spices seems quite individual, you could include coriander, caraway, cumin or fennel seeds; some add citrus peel or juice; many suggest a couple of tablespoons of aquavit.
My fishmonger, who makes his own gravlax, tells me that when he unwraps his cured fillets their salt cure mixture has completely disappeared leaving only a shiny texture to the surface of this fish.
Well, I didn't have the same experience myself - there was quite a lot of the salt mixture still coating the fish which needed to be scraped away (it doesn't taste too good).
The difference might be that my fishmonger cures whole sides of salmon leaving them for 4 days (rather than the poxy half-pound fillets that I was buying). But then he also adds lime juice and clementine peel to his cure mixture, mixes his chopped dill (as well as some dried dill) in with the salt rather than applying a layer directly to the fish, and regularly drains off the extracted liquid from his curing fish.
Take your pick.
I decided to go with the coriander seeds with a touch of fennel and caraway mixed in, and the aquavit...
Serves 4-6
Ingredients
- about 1 lb Salmon in two fillets
- 4 teaspoons/30g chunky sea salt
- 7 teaspoons/40g caster sugar
- 1 teaspoon brown sugar
- 60g dill, minced really finely with a few sprigs reserved
- 4 teaspoons/7.5g coriander seeds
- 4 teaspoons/12.5g black peppercorns
- 1 teaspoon each of fennel & caraway seeds optional
- 1 tablespoon aquavit or lime juice optional
Mustard Dressing:- 3 tablespoons (wine or cider) vinegar
- 3 tablespoons muscovado sugar
- 2 tablespoons honey
- 4 tablespoons Dijon mustard
- a big bunch of dill
- 2 fl oz vegetable oil
Get your fishmonger to cut two matching fillet pieces, one from from either side of the same fish.
Or simply choose appropriate cuts from the display stack which your fishmonger will assure you was
freshly cut this morning.
It's better if they can be cut square for reasons of neatness and economy.
De-scale the fillets and carefully remove any bones.
At some point you can make up a sauce to serve with the salmon (a good idea - the salmon is quite intense on its own). You can either blend up the (traditional) mustard sauce ingredients above, make a dill/mustard mayonnaise by blending the same ingredients into a couple of egg yolks, or make some horseradish sauce (as I did).
You choose.
Unwrap the cured fish fillets, scrape them clean of the cure and chopped dill you can rinse it off if you like and pat them dry. Now lay it skin side down and take thin diagonal slices which include a lovely green layer of the cure along one edge.
Serve on crispbread with your choice of sauce, capers or dill cucumbers, and a scattering of fresh dill.
De-scale the fillets and carefully remove any bones.
Don't feel you have to use all the cure mixture if you've ground up too much for the quantity of salmon,
though you could always spread it on the skin-side too.
Turn over one fillet and fit it on top of the other, cut side to cut side,
rotating it so the thick edge of one fillet fits on top of the thin edge of the other
then wrap the whole sandwich tightly in several layer of clingfilm.
Store in a bowl, in the fridge, for 48 hours. Turn and drain off any exuded liquid every 12 hours.At some point you can make up a sauce to serve with the salmon (a good idea - the salmon is quite intense on its own). You can either blend up the (traditional) mustard sauce ingredients above, make a dill/mustard mayonnaise by blending the same ingredients into a couple of egg yolks, or make some horseradish sauce (as I did).
You choose.
Unwrap the cured fish fillets, scrape them clean of the cure and chopped dill you can rinse it off if you like and pat them dry. Now lay it skin side down and take thin diagonal slices which include a lovely green layer of the cure along one edge.
Serve on crispbread with your choice of sauce, capers or dill cucumbers, and a scattering of fresh dill.
My first attempt at this produced fish which was more salty than flavoured, so I 'improved' the curing mix by
added some brown sugar, the aquavit, a few extra spices, and reducing the relative weight of salt to sugar from the original 50/50.
The result was much improved, and well received. Though I might consider leaving out the coriander seeds.
The result was much improved, and well received. Though I might consider leaving out the coriander seeds.
Rye Crispbread
veg bread


I had in mind makind something very much like Ryvitas - crisp, but thick and airy crunchy?.
In fact what this recipe turns out is more like hardtack or a brittle cracker.
They do have the pleasant sourness of the rye, but I'm not sure how to go from here to a puffed up knäckebröd.
Maybe I need to encourage the yeast to do it's rising thing more vigorously during the baking?
Some recipes seem to add a proportion of wheat flour too. Perhaps that helps?
Makes about a dozen small crispbreads roughly the size of a coaster
Ingredients
- 250g/8 oz rye flour
- 1 tsp fine sea salt
- 1 tsp honey
- 6g fresh yeast
- 200ml water
- 1 tsp caraway seeds optional
- 1 tsp fennel seeds optional
Sift the flour into a bowl, adding back the bran caught in the sieve.
Lightly grind the seeds (if using) with the salt in a pestle and mortar and mix into the flour.
Warm the water to 25°C, dissolve in the honey and then whisk in the yeast so it looks milky. If using dried yeast, just mix it with the flour.
Gradually stir in the liquid until you reach a stiff, wet paste. Cover with clingfilm and leave in a warm place for an hour or so. Though it won't rise like normal bread it should become spongy and a little drier.
Preheat the oven to 220°C/Gas Mark 7.
Heavily flour your work surface and rolling pin. Roll out balls of dough about the size of tennis balls as thinly as you can manage, then use a pastry cutter to cut out three or four discs. Lift them onto a parchment-lined baking tray, using a palette knife if necessary, and repeat. (You will probably need to bake in batches.)
I think they look much nicer cut out neatly this way than roughly hand-rolled.
You can roll out the crispbreads on baking paper if you like - but make sure to flour it first, and then just lift the whole thing onto the tray.
Prick holes all over each crispbread using a fork or a chopstick.
Brush the surface with water (this helps the toppings stick), and lightly sprinkle with caraway and fennel seeds and sea salt
if you want.
Bake for 12-15 minutes, until the crispbreads have darkened almost all way across (a lighter centre is alright),
but before they turn oak-coloured and grey or black,
just start to colour. Keep an eye on the oven, as they can burn easily. Repeat for the next batch.
If the crispbreads are not crisp enough, at the end return them to a very low temperature oven to dry out and cool on a wire rack.
You can roll out the crispbreads on baking paper if you like - but make sure to flour it first, and then just lift the whole thing onto the tray.
You don't need to knead this mixture particularly - we aren't stretching the gluten to produce a bready texture since we are aiming for crispy!
Personally I don't understand baking parchment - it seems to be specifically designed to stick to your baking like glue. Thank God for the silicone coated stuff - which I now use exclusively for baking. As should you.
Personally I don't understand baking parchment - it seems to be specifically designed to stick to your baking like glue. Thank God for the silicone coated stuff - which I now use exclusively for baking. As should you.
Sweetcorn Fritters
veg snack starter

Ever since
stealing discovering Tony Singh's farty salt
I've been planning on trying it out with some corn fritters.
I thought it might work in the mixture - but I forgot to add it so I just provided it on the side.
Apparently you can also deep-fry these critters, which seems like a nice alternative - they look a rich golden colour in all the pictures!
Opinions vary according to how to make the batter - some don't have eggs at all, some have very little milk.
Although I didn't do it this time, I think puréeing up some of the sweetcorns to add to the mixture would be a good route to adding more sweetcorn flavour.
Makes 8-12
Ingredients
- 100g plain flour
- 2 tsps baking powder
- 1 egg
- ¼ cup milk
- 3 spring onions, trimmed and sliced diagonally
- 1 chilli (red or green) seeds removed and chopped finely optional
- a small handful of coriander, chopped roughly
- 2 corn cobs kernels separated, or 300g tin of sweetcorn, drained
- 2 chicken breasts, cooked, shredded optional - but not recommended
- sea salt & freshly ground black pepper
- a few tablespoons butter for frying
Accompaniment:- lime wedges
- Indian black salt
Into a bowl, place the flour, egg and milk. Using a balloon whisk, mix them well until combined into a sticky, thick batter.
Add the spring onions, chilli, coriander and sweetcorn, plus a little seasoning. Stir until all the vegetables and herbs are covered with a light coating of the batter.
Pour the rapeseed oil into a frying pan on a medium heat. Once the oil is heated through, add tablespoonfuls of the fritter mixture - four usually makes a good number without cooling the frying pan and stopping the cooking process.
Once the underside of the mixture has set slightly, spread the blob out a little and continue to cook until golden brown.
Turn the fritter and press down with the back of the spatula, just for a moment or two. Continue to fry until this second side is also golden brown.
Place the fritters onto kitchen paper and keep in a warm place until they are all cooked, then serve with some sweet chilli dipping sauce - or whichever type of sauce you fancy!
Add the spring onions, chilli, coriander and sweetcorn, plus a little seasoning. Stir until all the vegetables and herbs are covered with a light coating of the batter.
You don't want too much batter or the fritters will be too stodgy - the more corn the better.
I did add some shredded chicken, but I think that was a mistake - it didn't really contribute anything.
I did add some shredded chicken, but I think that was a mistake - it didn't really contribute anything.
Pour the rapeseed oil into a frying pan on a medium heat. Once the oil is heated through, add tablespoonfuls of the fritter mixture - four usually makes a good number without cooling the frying pan and stopping the cooking process.
Once the underside of the mixture has set slightly, spread the blob out a little and continue to cook until golden brown.
Turn the fritter and press down with the back of the spatula, just for a moment or two. Continue to fry until this second side is also golden brown.
Place the fritters onto kitchen paper and keep in a warm place until they are all cooked, then serve with some sweet chilli dipping sauce - or whichever type of sauce you fancy!
A squeeze of lime with a scattering of black salt does complement these fritters well,
but you could always just serve them with a tomato sauce. Maybe a spicy one.
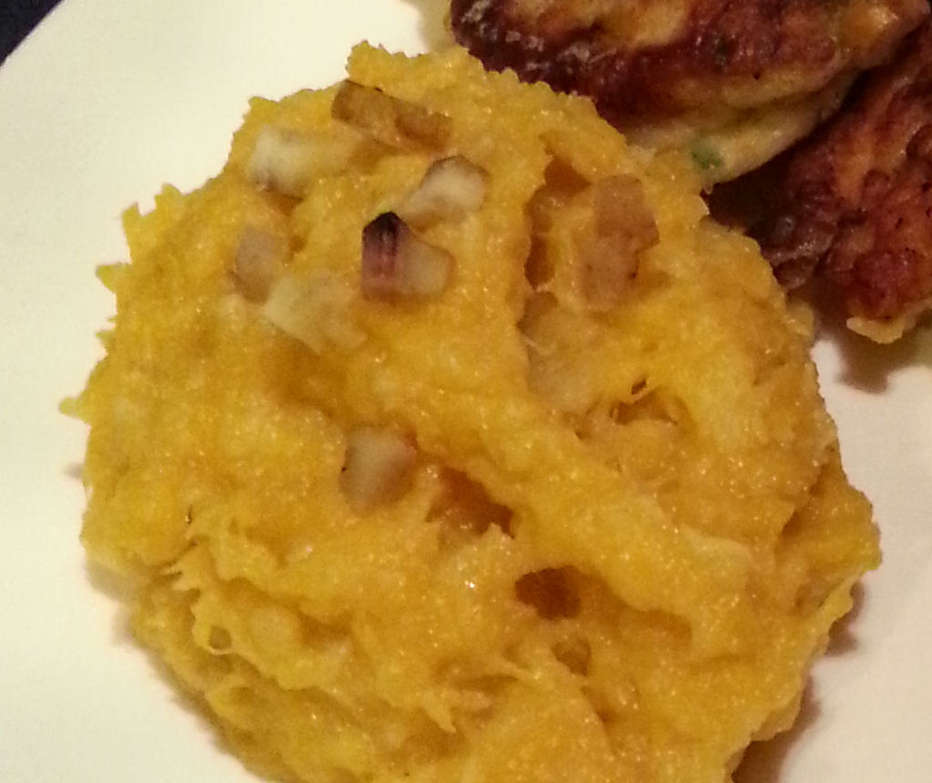
Sweet Potato and Pumpkin Mash
veg vegan staple
Quite a nice flavour combo. If you're looking to use up some old pumpkin you have hanging about.
You could sprinkle it with nuts or chestnuts for that special touch of class :)
You could sprinkle it with nuts or chestnuts for that special touch of class :)
Ingredients
- sweet potato
- pumpkin
Cut the pumpkin in half, de-seed and bake with the sweet potato at Gas Mark 6 for half an hour or so until they're soft.
Mash them up together.
Season, grate in some nutmeg if you like and a dash of cream or a blob of butter.
Mash them up together.
Season, grate in some nutmeg if you like and a dash of cream or a blob of butter.
Chestnut Sprouts with Candied Bacon
a.k.a. The Best Damn Brussels Sprouts in the World!
a.k.a. The Best Damn Brussels Sprouts in the World!
side meat

This recipe is the pinnacle of a long sprout-based journey chronicled here.
I'm not entirely convinced that candied bacon is better than the regular kind though it makes for a more impressive finish,
and I do like the touch of lemon, but it's your call.
One thing's for sure - the secret of its success is my patented bicarbonate of soda chestnut-softening technique. Hurrah for me!
Flora said these were the best sprouts she'd ever tasted and Flora doesn't even like sprouts!
One thing's for sure - the secret of its success is my patented bicarbonate of soda chestnut-softening technique. Hurrah for me!
Flora said these were the best sprouts she'd ever tasted and Flora doesn't even like sprouts!
Serves 2
Ingredients
- butter
- a dozen chestnuts
- a dozen sprouts maybe 250g
- 2-3 slices of smoked streaky bacon, not too thin
- about 30g soft muscovado sugar
- 1-2 cloves garlic optional
- 1 tablespoon or so bicarbonate of soda
- ½ cup wine or stock, or a combination
- grated rind and juice of ½ lemon
- seasoning
Pre-heat the oven to 200°C/Gas Mark 6.
Spread soft brown sugar in a shallow bowl and generously coat both sides of 2 or 3 slices of smoked streaky bacon not too thin is best. Cover a baking sheet with parchment and lay on the bacon. Sprinkle with a little extra sugar.
Bake for about 10 minutes until the surface of the bacon bubbles and darkens (don't worry if the excess sugar starts to burn).
Lift out to cool and harden on a wire rack. Stick them back in the oven for a bit longer if they're still too soft.
Snip them up with kitchen scissors and set aside.
Select about as many chestnuts as you have brussels sprouts, cut little crosses in them and simmer for a few minutes until the skins soften enough to peel easily. The inner membrane should also come away cleanly. Throw away any hard or black ones, or those which put up too much of a fight.
Bring a fresh pot of water to the boil, add the peeled chestnuts and a tablespoon yes a tablespoon or so of bicarbonate of soda. Simmer for 15 minutes, or until the chestnuts are meltingly soft but not disintegrating.
Rinse thoroughly, then cut into quarters or slivers.
Peel and trim the sprouts and cut into halves, or quarters. Gently sweat in a little butter until they are glistening. With a little pressed garlic if you like Add the chestnuts, throw in a glass of white wine or stock, or both, to almost cover the sprouts.
Season.
Partially cover and simmer for 15-20 minutes until the sprouts are done to your satisfaction and the liquid absorbed. Toss thoroughly with the grated lemon peel, lemon juice and the candied bacon bits.
Leave to stand for a minute or two before serving to let the flavours meld and the bacon soften ever-so slightly.
Spread soft brown sugar in a shallow bowl and generously coat both sides of 2 or 3 slices of smoked streaky bacon not too thin is best. Cover a baking sheet with parchment and lay on the bacon. Sprinkle with a little extra sugar.
Bake for about 10 minutes until the surface of the bacon bubbles and darkens (don't worry if the excess sugar starts to burn).
Lift out to cool and harden on a wire rack. Stick them back in the oven for a bit longer if they're still too soft.
Snip them up with kitchen scissors and set aside.
Select about as many chestnuts as you have brussels sprouts, cut little crosses in them and simmer for a few minutes until the skins soften enough to peel easily. The inner membrane should also come away cleanly. Throw away any hard or black ones, or those which put up too much of a fight.
It's a good idea to boil a few extra in anticipation of casualties.
Bring a fresh pot of water to the boil, add the peeled chestnuts and a tablespoon yes a tablespoon or so of bicarbonate of soda. Simmer for 15 minutes, or until the chestnuts are meltingly soft but not disintegrating.
Rinse thoroughly, then cut into quarters or slivers.
Peel and trim the sprouts and cut into halves, or quarters. Gently sweat in a little butter until they are glistening. With a little pressed garlic if you like Add the chestnuts, throw in a glass of white wine or stock, or both, to almost cover the sprouts.
Season.
Partially cover and simmer for 15-20 minutes until the sprouts are done to your satisfaction and the liquid absorbed. Toss thoroughly with the grated lemon peel, lemon juice and the candied bacon bits.
Leave to stand for a minute or two before serving to let the flavours meld and the bacon soften ever-so slightly.
The best damn sprouts in the world!
I've never come across anyone who actually does this.
Tim arse-covering Heywood also tells you that you can leave the scales on, but I wouldn't - even if you're planning on slicing the finished fillets away from their skin those scales get everywhere.