What Have the Romans Ever Done For Us?

Well spring is springin' around here - the birds are singin', the wild garlic is sproutin' and the crocuses crocci? are bloomin'.
Cue massive snow storm 😂
I've been experimenting a lot with guanciale - cured pig's cheek - since it appeared on limited offer at my local Lidl.
It turns out that this cured porky jowl is the basis for a series of pasta dishes from the Lazio region around Rome, elaborating on the basic cacio e pepe pasta (cheese and pepper - the local Roman cheese pecorinio romano, spiced with ground black pepper and usually served on spaghetti, bucatini or tonnarelli).
The first of these is pasta alla Gricia - basically just the inclusion of fried guanciale.
Then we add eggs to get carbonara, or tomato giving Amatriciana.
Or we combine these two, throw in some sausage, and get pasta alla zozzona. A slutty mess - for some reason rarely included in compendia of famous Roman pastas.
Despite the confusing order in which I presented them, Pasta all Gricia may be the oldest of this collection, perhaps going back to the 5th Century, though it's origins are controversial and obscure. Certainly it's older than the arrival from the Americas of the tomatoes and hot chillies (peperoncini) used in Amatriciani or zozzona. And pepper was a fairly rare and expensive spice until relatively recently, so not something peasants would have been chucking into their pasta by the handful.
Pasta carbonara was an unknown (or at least, unrecorded) dish before the Second World War, and several origin stories implicate occupying American forces and their prolific supplies of bacon.
This season I will be mostly cooking these for one 😢
Lidl also had scamorza cheese along with their guanciale - must be Italy week or something, so I bought some of that too. It's less interesting than pig cheek, but you can melt it over most any cooked vegetables as an antipasto. Potatoes, courgettes, mushrooms, asparagus, aubergines, even experimental roast baby ones.
Most Italians seem like their scamorza sliced and pan-fried or griddled so it develops a nice crisp golden crust with a gooey interior, though you might want to us a very un-sticky pan or you'll be scraping off a lot of crispy golden crust!
It's been a busy week for bargain spotting:
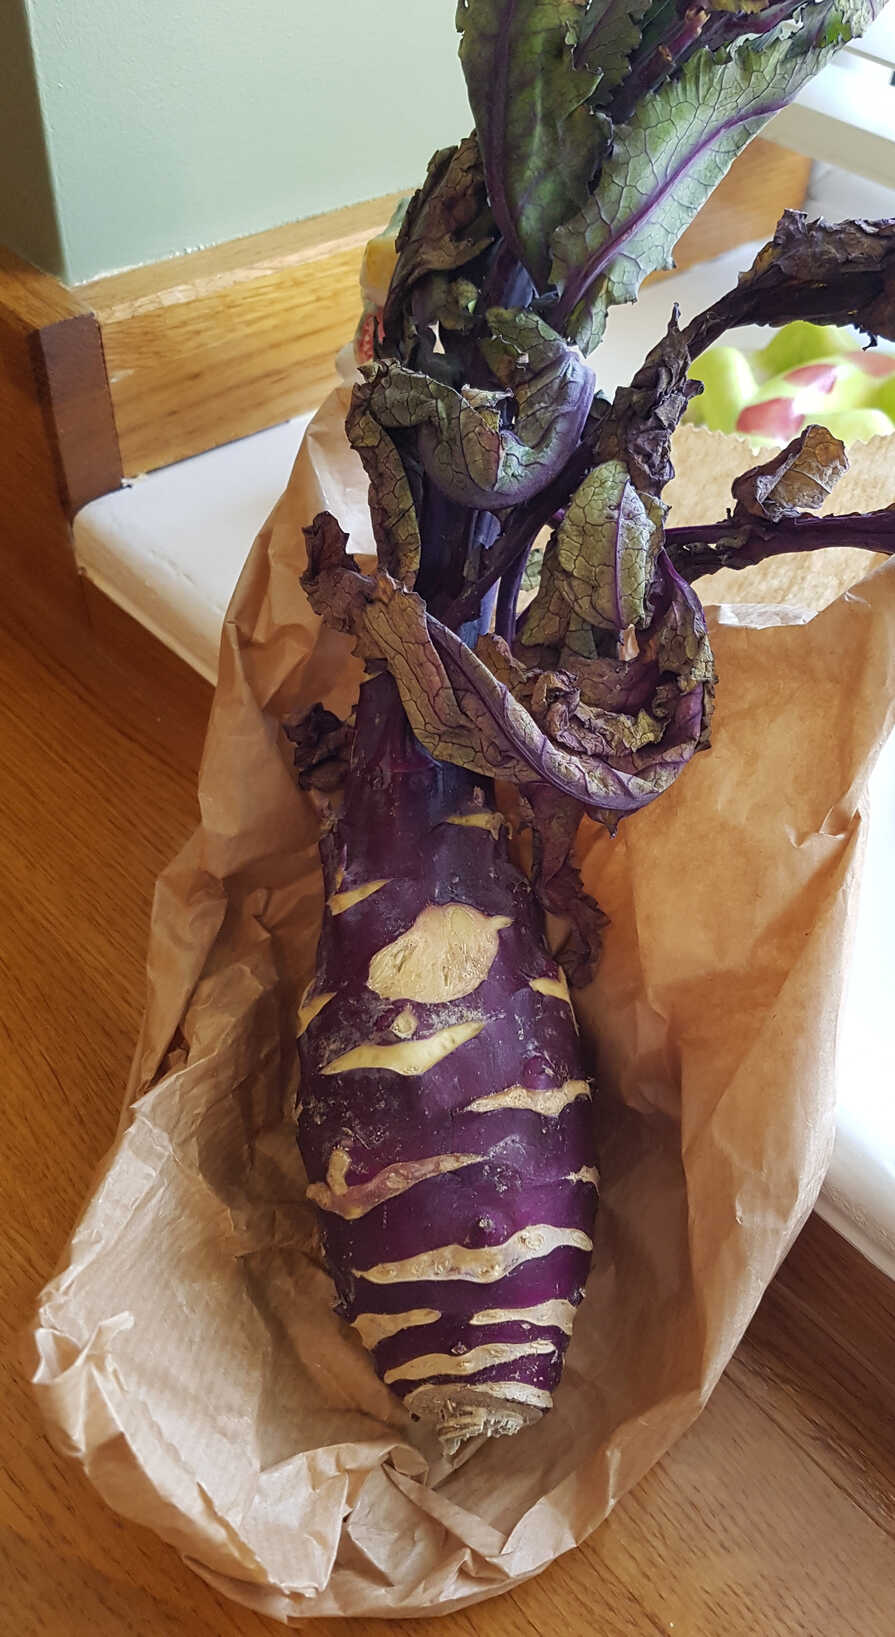
My local health and wholefoods store had some weird-looking alien vegetable for sale that turned out to be kohlrabi.
Not the smooth green-skinned kind though, the cracked red-skinned kind. Didn't even know that was a kind.
So I figured I'd look up things to do with them other than shredding in coleslaw or salad - it's refreshingly crisp, sweet and vaguely nutty like a cross between a radish and a turnip. Which is funny because Brassica oleracea are, in fact, a cross between a wild cabbage and a turnip, the direct translation of its German name: Cabbage Turnip.
Or possibly they're a cross of a wild cabbage and a beet.
This is distinct from a rutabaga (Brassica napus), also known as swede in England, although wrongly called turnip or neep in Scotland, which is definitely a cabbage-turnip hybrid.
These damn promiscuous vegetables!
Anyhoo, it's been suggested that kohlrabi also tastes great steamed, mashed, or added to soups, and I can now attest that it roasts up really well too. I thought that this would mean they would also make great deep-fried chips, but so far they haven't quite lived up to that.
You might need to do a fair bit of vigorous peeling though - they can have very thick fibrous skin.
Anyway.
I came here to talk about shipping companies.
Absolute dog shit aren't they? The lot of them.
Finding myself requiring additional guanciale, I recently ordered some from Amazon, who ordered it from Italy, who shipped it with OOPS - an American shipping company who's service is, you guessed it, dogshit.
OOPS' first optimistic delivery window was 08:20-10:20. (Odd isn't it how very specific these ficitious delivery windows are?)
As usual with these predictions, they are only useful as a guide for knowing when you absolutely do not need to be in, since this is the one period during which you can guarantee their Dogshit Delivery Drone™ will not attempt delivery.
4 hours later, they updated their delivery prediction to before the end of the day, whenever that is, only to revert to the original window now 14 hours in the past around midnight.
See. Absolute dogshit.
I stopped checking with them after that.
So an interesting question is, why are they so fucking useless? Don't they operate in a competitive capitalist environment renowned for driving innovation and efficiency?
Well the answer, my friends, is that the shipping companies don't work for you, and you aren't their customers. They work for the seller, because the seller pays them.
Have you ever tried complaining about your delivery, or lack of? You'll find there is absolutely no mechanism for you to send them meaningful feedback, and they don't give a shit if you do. Because they aren't competing for your business, so quite naturally they couldn't give less of a fuck about your delivery experience.
And the sad thing is - there actually is a simple solution: Payment on Delivery.
You can bet your arse that the instant their payment depends on your satisfaction they'd start to give a fuck about what you thought about their service. There'd be a lot less pushing a card through your letterbox and running away if the shitbags didn't get paid for doing it.
You'd be amazed how capable a shipping company could become at delivering a parcel into your hands if their profit depended on it, and how reluctant they would be to hide your parcel in your bin, or their depot in the next county if they suddenly weren't going to get paid for that.
You know what I want from my Dogshit Delivery Drone™? I want a notification about a day ahead, another about an hour ahead, and a final one about a minute ahead.
That's it.
You know what OOPS gave me? A detailed breakdown of the exact times my guanciale passed through all the their depots in Italy, three days ago.
You know what I don't give a fuck about? A detailed breakdown of the times my guanciale passed through their depots in Italy, three days ago.
You know what I do care about? Roughly when I'm to expect the parcel, and then a heads up just before it arrives.
Instead my OOPS guanciale arrived without warning several days later.
Fucknuggets.
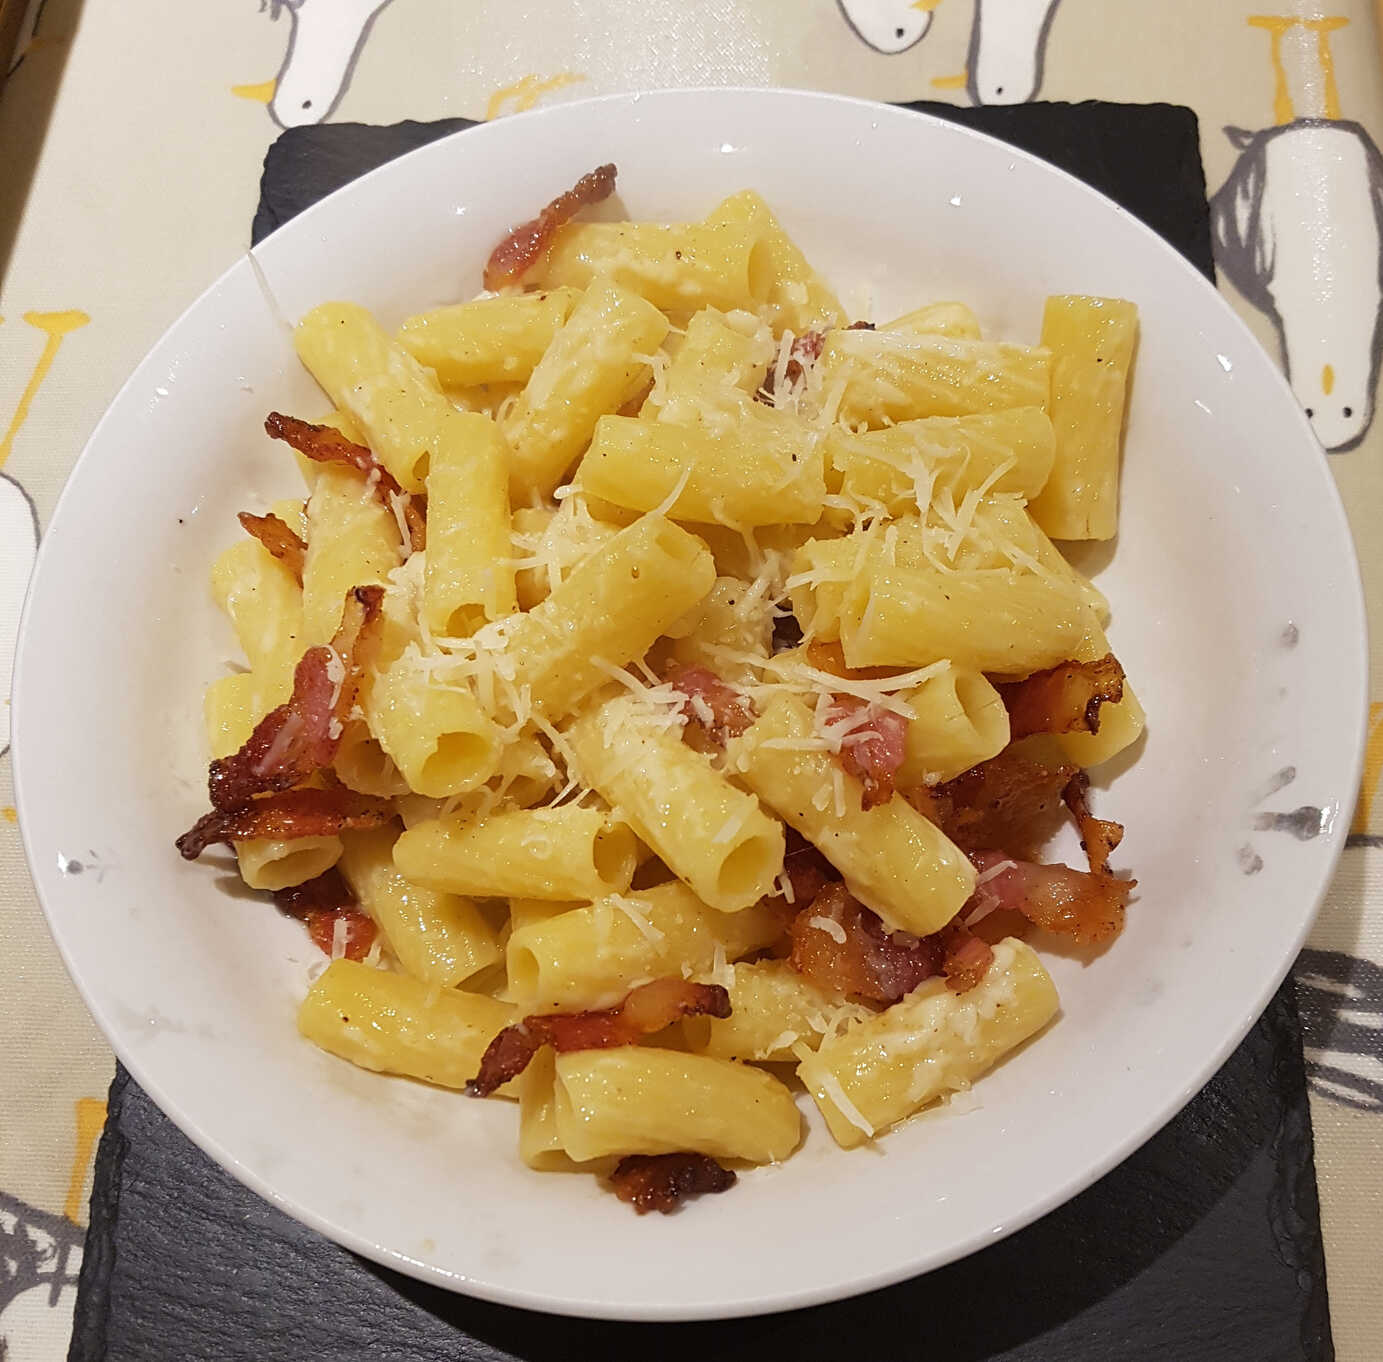
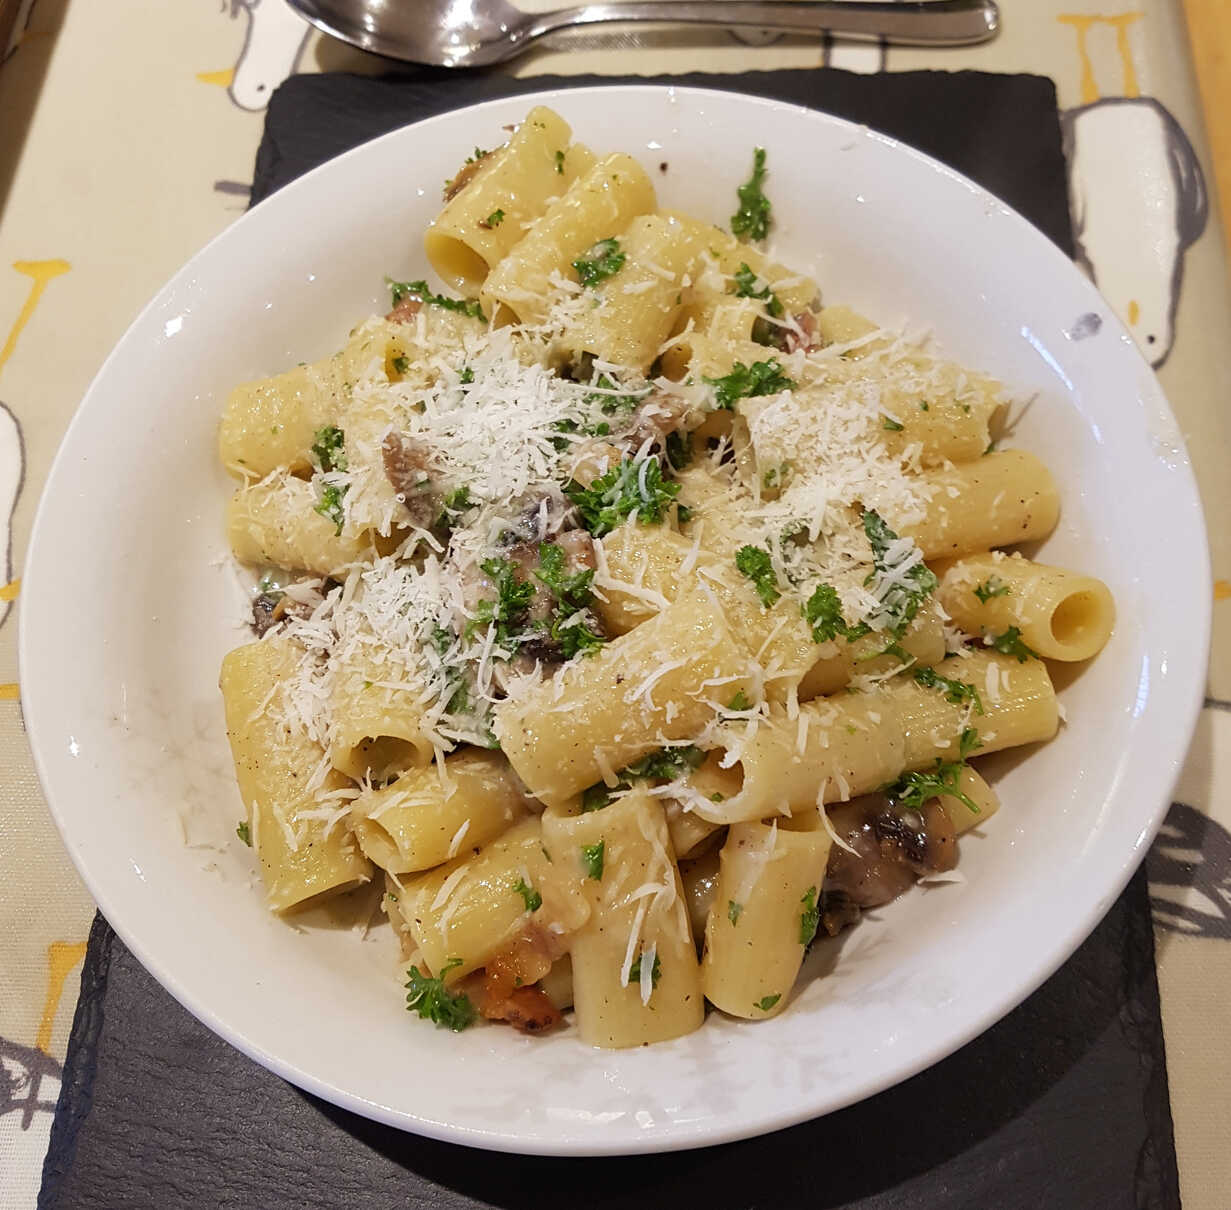
Rigatoni Alla Gricia
meat pasta cheese
One of the origin stories of past alla Gricia references the slang name given to Swiss immigrants of the 14th and later.
This doesn't quite accord with the claim that the source of the sauce (🙂) goes back as far as 400 A.D. though. So who knows really.
Though just in case the dish actually came from Grisciano near Amatrice, I shall be capitalising it.
Anyway, all you need are quality ingredients and you will have a reasonable dish.
Getting the best coating sauce from the cheese dissolving smoothly into the pasta water is another issue though.
Photographs of typical servings of this dish do look quite watery, so perhaps plenty of pasta liquor is the secret?
Although commonly served with rigatoni or the shorter mezze maniche, as always you can use almost any pasta you fancy. Spaghetti or bucatini would not be controversial.
A comedy pasta like caccavelle or fusilli capri will get you shot.
Serves 1
Ingredients
- 100g rigatoni
- 70g guanciale
- 30g pecorino romano plus extra for serving
- splash of olive oil
- salt
- freshly ground black pepper
Start a pot of lightly salted water boiling - with just enough depth to cover the pasta.
Remove the guanciale skin, and slice vertically into fairly thin slices - not the thinnest possible though, perhaps the thickness of a penny. Slice in such a way as to have some fat and some meat running across each slice, then portion the slices into strips about 1cm x 4cm.
Pour a little olive oil into a fairly large frying pan and cook the guanciale gently until the fat is mostly rendered and the strips are turning golden and crispy.
Add the pasta to the water and cook for about 5 minutes less than the recommended time. Return the frying pan to a high heat and add about ¼ cup of the pasta water to the frying pan and swirl it around to emulsify with the fat. Drain the pasta, keeping the rest of the water, and add it to the frying pan. Swirl, stir or toss to coat the pasta until the sauce thickens and the pasta is cooked through to al dente. Add more reserved pasta water if required.
Now off the heat stir in half the pecorino. You want it to dissolve as much as possible, so it's best to clear a space in the pasta and stir it rapidly into the sauce, then mix the pasta through the emulsified cheese. Reheat, add the rest of the cheese and repeat.
Remove the guanciale skin, and slice vertically into fairly thin slices - not the thinnest possible though, perhaps the thickness of a penny. Slice in such a way as to have some fat and some meat running across each slice, then portion the slices into strips about 1cm x 4cm.
Pour a little olive oil into a fairly large frying pan and cook the guanciale gently until the fat is mostly rendered and the strips are turning golden and crispy.
I was afraid that colouring the meat might make it too hard, but the thin strips are actually really nice crisped up.
You could make batons or cubes instead, but they harden much more easily so you should probably only cook them until they've rendered out without colouring.
Add a generous grinding of black pepper so it fizzes up, then remove the frying pan from the heat and scoop the meat out with a slotted spoon and set aside.Add the pasta to the water and cook for about 5 minutes less than the recommended time. Return the frying pan to a high heat and add about ¼ cup of the pasta water to the frying pan and swirl it around to emulsify with the fat. Drain the pasta, keeping the rest of the water, and add it to the frying pan. Swirl, stir or toss to coat the pasta until the sauce thickens and the pasta is cooked through to al dente. Add more reserved pasta water if required.
Now off the heat stir in half the pecorino. You want it to dissolve as much as possible, so it's best to clear a space in the pasta and stir it rapidly into the sauce, then mix the pasta through the emulsified cheese. Reheat, add the rest of the cheese and repeat.
If you let the sauce get too cold, or too hot, the cheese will separate out into chewing gum strands.
Which is not what you are aiming for.
Adjust the sauce consistency, season if necessary, mix in the guanciale and serve immediately.
Provide more grated cheese for people to add as desired.
Which is not what you are aiming for.
Really good.
The balance of the sharp pecorino, the crispy guanciale, the biting pepper and the smoothness of emulsified fat is perfect.
Though not so perfect as not to be improved by the addition of sliced mushrooms with the guanciale and chopped parsley to finish.
The balance of the sharp pecorino, the crispy guanciale, the biting pepper and the smoothness of emulsified fat is perfect.
Though not so perfect as not to be improved by the addition of sliced mushrooms with the guanciale and chopped parsley to finish.
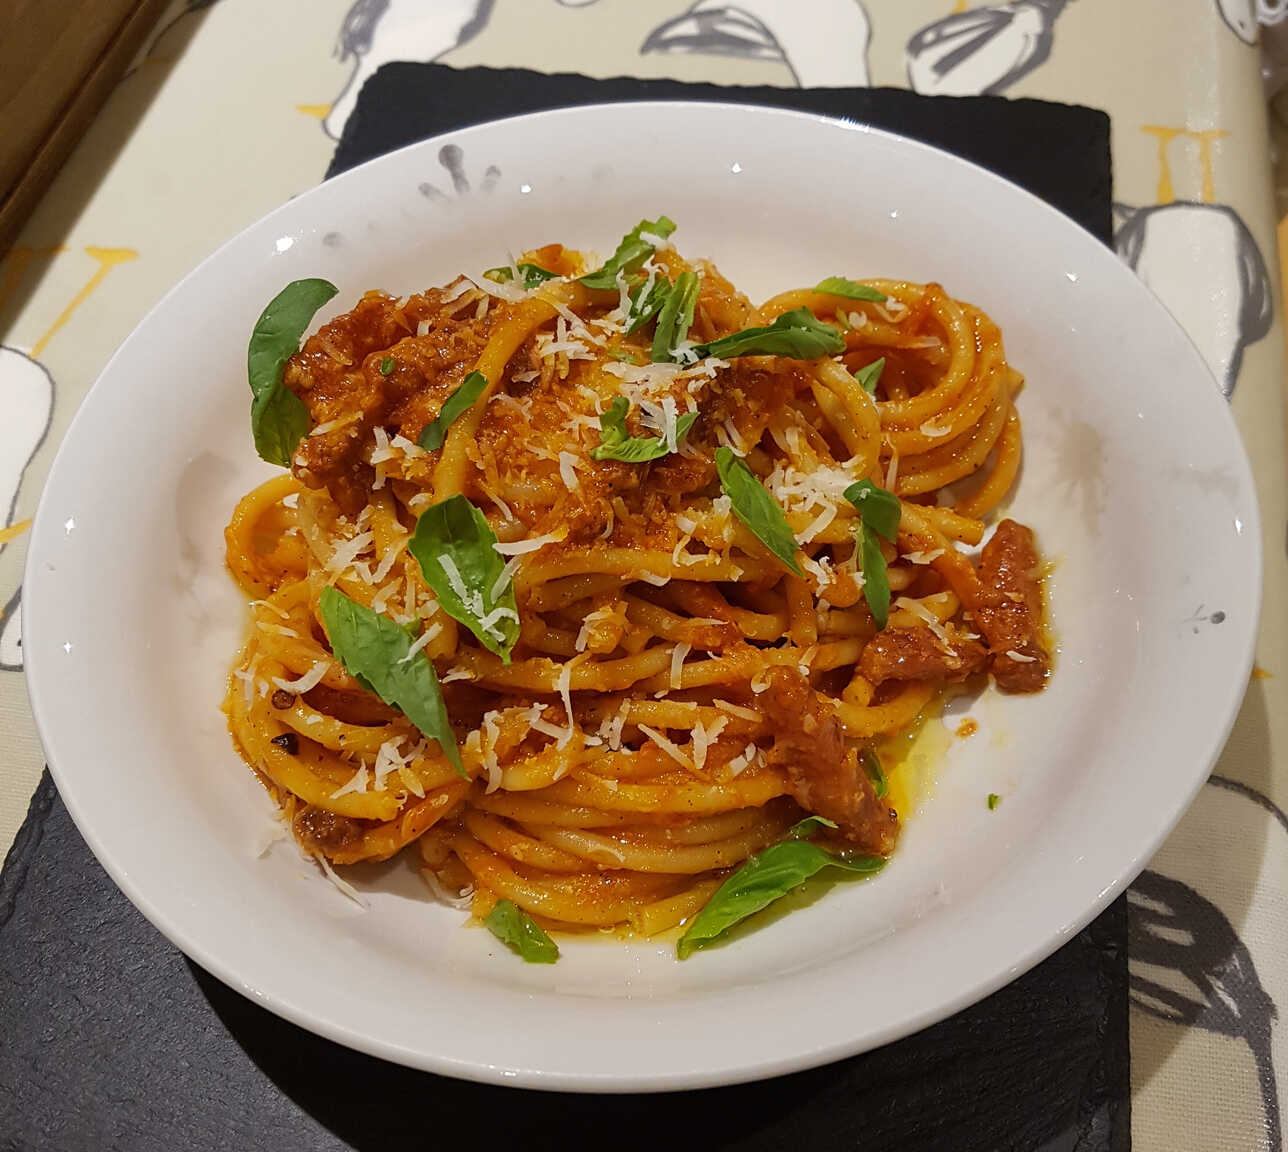
Bucatini all'Amatriciana
meat pasta cheese
Although there's some argument about the exact origin of this slightly spicy Roman sauce Amatriciana (or matriciana in the local Romanesco patois),
it can hardly be a coincidence that there's a (fairly) nearby town called Amatrice, so I'm going with that.
The eagle-eyed among you will have already intuited this from my clumsy attempt to retain consistent Capitalisation in deference to foods named after proper place nouns.
I like slicing the guanciale into thin strips for this sauce, as with pasta alla gricia.
You can purée the tomatoes if you like a particularly smooth sauce, but I rather like the rustic qualities of just mashing them up with a fork. But use San Marzano tinned tomatoes if you can find them. They are especially succulent.
Bucatini pasta, with it's hollow strands, is particularly nice, and the traditional Roman accompaniment, but you can use any shapes you like.
Spaghetti, particularly favoured in Amatrice itself, rigatoni or even penne wouldn't be a disgrace.
Serves One
Ingredients
- a splash of olive oil
- 50-60g guanciale, cut into thin slices about ¾"x¼"
- a pinch red pepper flakes
- 20ml dry white wine
- 200g tinned whole peeled tomatoes, hand-crushed
- freshly ground black pepper
- salt
- 120g bucatini pasta or other pasta
- 30-50g pecorino romano, grated
Crush the tomatoes with a fork or masher, or blend them up.
Heat a splash of olive oil in a large frying pan over medium heat until shimmering and add the guanciale and the pepper flakes. Cook, stirring, for about 5 minutes until golden and crisping at the edges then scoop it out and reserve it for later unless you prefer it doesn't retain its crispness. Return the frying pan to the heat, add a good grinding of pepper so it blooms, then add the wine. Evaporate the wine for a few minutes, scraping up all the browned goodness from the bottom of the pan, then add the crushed tomatoes and bring to a simmer.
Meanwhile, boil pasta in salted water until just shy of al dente, about 1 minute less than package recommends. Using tongs or a pasta spider, transfer the pasta to the sauce, along with a good splash of the cooking water. Cook over high heat, stirring and tossing rapidly, until the pasta is al dente and the sauce thickens and begins to coat the noodles. Add more pasta water if required.
Remove from the heat, add back the guanciale, add cheese, and stir rapidly to incorporate. Season to taste with more salt and pepper.
Serve immediately, with extra cheese at the table.
Pretty good - I like the bucatini pasta, which has more body than spaghetti.
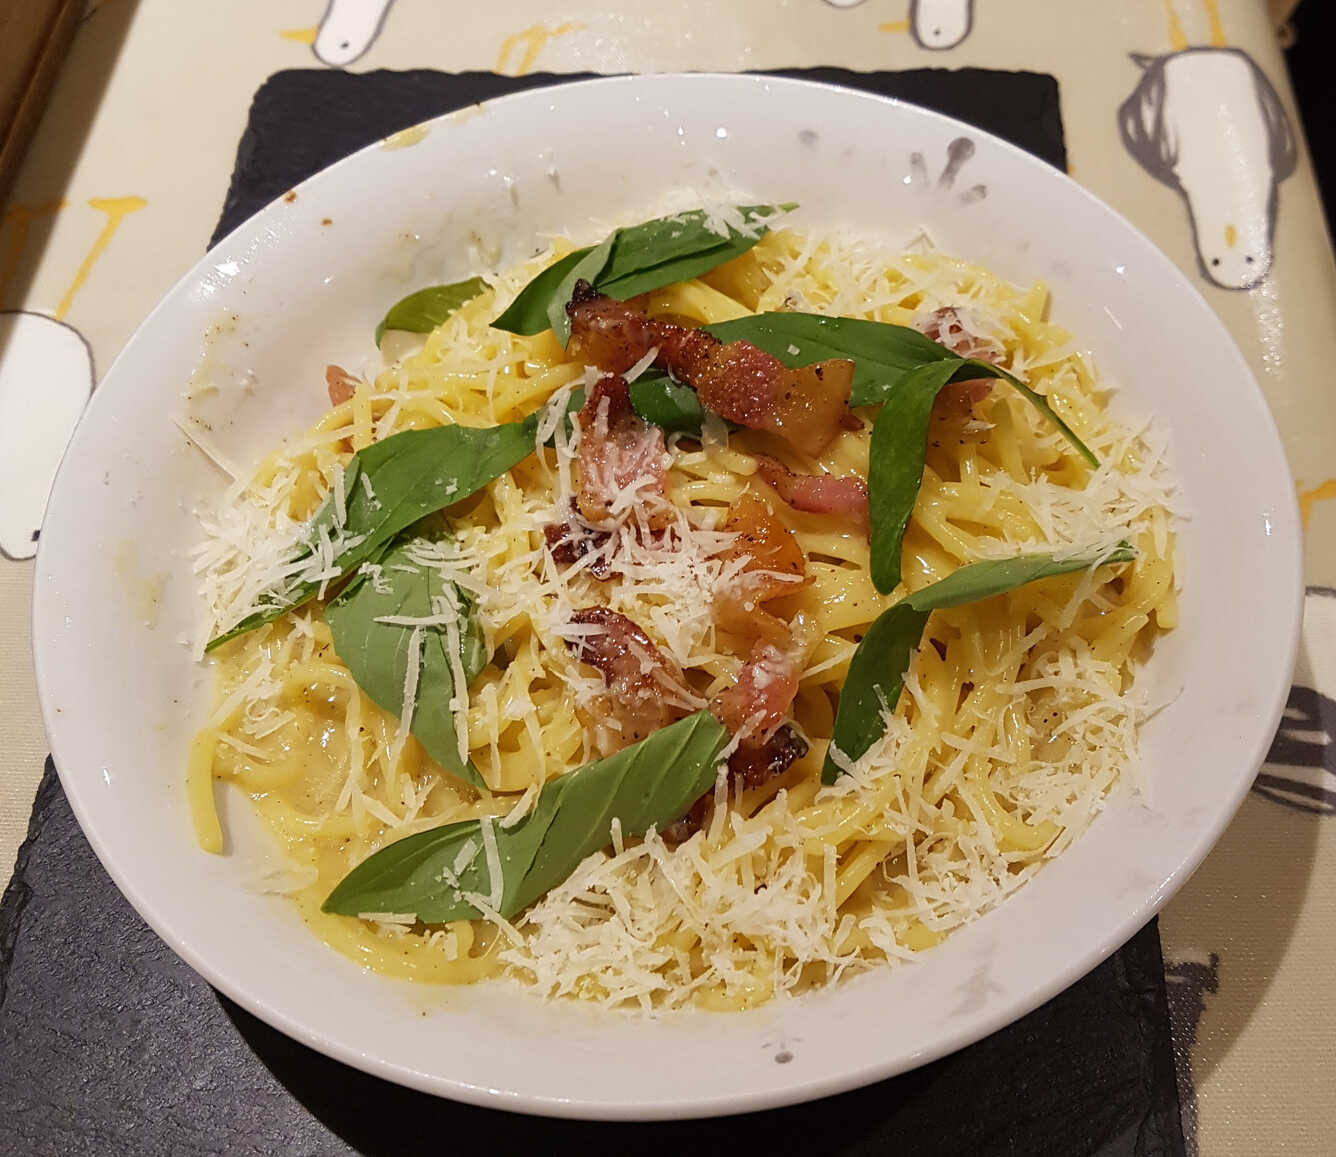
Spaghetti Carbonara
meat cheese pasta
Don't over-salt the pasta water since the cheese and cured meat will already be fairly salty.
You can, of course, use whatever pasta you like - spaghetti, linguine, rigatoni, penne. Bucatini is nice too.
I first made this following the traditional recipe using guanciale (extremely fatty, cured pig's cheek), only pecorino romano cheese, and one egg and one yolk.
And if I'm honest I didn't think too much of it.
Perhaps it's the slightly underwhelming cheesiness - I think adding some parmesan might be an improvement, perhaps it's the mildness of the guanciale which might be better replaced by pancetta, or even (gasp) bacon, or maybe it's the slight lack of unctuous richness that might be helped by a adding a little cream or only using egg yolks?
Of course, since there's little evidence that this dish existed before the Second World War, and may have been invented by American servicemen posted to Italy, traditional is a bit of a stretch.
You can, of course, use whatever pasta you like - spaghetti, linguine, rigatoni, penne. Bucatini is nice too.
I first made this following the traditional recipe using guanciale (extremely fatty, cured pig's cheek), only pecorino romano cheese, and one egg and one yolk.
And if I'm honest I didn't think too much of it.
Perhaps it's the slightly underwhelming cheesiness - I think adding some parmesan might be an improvement, perhaps it's the mildness of the guanciale which might be better replaced by pancetta, or even (gasp) bacon, or maybe it's the slight lack of unctuous richness that might be helped by a adding a little cream or only using egg yolks?
And how right I was!
I replaced the guanciale with a spicy Calabrian pancetta cut into thin batons, used 50/50 pecorino and parmesan cheese, two egg yolks, and cooled the dressed pasta at the end with a splash of double cream. And the dish was much improved!
Next to try it with bacon 😯
I replaced the guanciale with a spicy Calabrian pancetta cut into thin batons, used 50/50 pecorino and parmesan cheese, two egg yolks, and cooled the dressed pasta at the end with a splash of double cream. And the dish was much improved!
Next to try it with bacon 😯
Of course, since there's little evidence that this dish existed before the Second World War, and may have been invented by American servicemen posted to Italy, traditional is a bit of a stretch.
Serves One
Ingredients
- 120g spaghetti, linguine or bucatini
- 50g guanciale, pancetta or bacon
- 1 tblsp olive oil
- 2 egg yolks
- 20g pecorino romano
- 20g parmesan
- ground black pepper
- a splash of double cream optional
To Serve:- extra grated cheese
- torn basil leaves or chopped parsley
- a grating of nutmeg
Cut the meat into batons, cubes or slices. If you're using pancetta you probably don't want them too thick.
Grate the cheese, about half-and-half pecorino and parmesan works well.
In a large heatproof if you plan on double-boiling it bowl, mix together the eggs, a grinding of pepper and most of the cheese keep some for serving.
Heat a tablespoon of olive oil in a large skillet or frying pan, add in the guanciale and cook, stirring occasionally, over medium heat until the fat has rendered out and the guanciale gets crisp and golden, 5-10 minutes.
Add a good grinding of black pepper so it blooms in the oil.
Meanwhile bring a pot of salted water to a boil. Add the pasta and cook, stirring, until nearly al dente - a minute or two under the recommended time.
Using tongs or a pasta spider scoop the pasta into the frying pan, add a splash of pasta water and toss to coat nicely in the fat.
Dribble about 2 tablespoons of the pasta water to the egg mixture and stir it in.
You now have a choice of finishing cooking the eggs and pasta to perfection in the frying pan or in the heatproof bowl adapted as a double-boiler. Either:
Serve with extra grated cheese, more pepper, and a grating of nutmeg if you like.
Your choice.
Grate the cheese, about half-and-half pecorino and parmesan works well.
In a large heatproof if you plan on double-boiling it bowl, mix together the eggs, a grinding of pepper and most of the cheese keep some for serving.
Heat a tablespoon of olive oil in a large skillet or frying pan, add in the guanciale and cook, stirring occasionally, over medium heat until the fat has rendered out and the guanciale gets crisp and golden, 5-10 minutes.
Add a good grinding of black pepper so it blooms in the oil.
Meanwhile bring a pot of salted water to a boil. Add the pasta and cook, stirring, until nearly al dente - a minute or two under the recommended time.
Using tongs or a pasta spider scoop the pasta into the frying pan, add a splash of pasta water and toss to coat nicely in the fat.
Dribble about 2 tablespoons of the pasta water to the egg mixture and stir it in.
You now have a choice of finishing cooking the eggs and pasta to perfection in the frying pan or in the heatproof bowl adapted as a double-boiler. Either:
- Empty the egg mixture into the pasta in the frying pan and, tossing and stirring constantly over a fairly low heat, cook until the sauce thickens nicely and you begin to see trails as you stir.
Add extra pasta water if the sauce seems too thick. Don't over-cook and turn it into scrambled eggs. - Or:
- Scrape the pasta mixture into the bowl with the eggs and cheese, set it over simmering water in the pasta pan (without touching the water) and stir it in the bowl instead until the sauce thickens as above.
Serve with extra grated cheese, more pepper, and a grating of nutmeg if you like.
Some chefs like to first flavour their olive oil with slices of garlic, removing them once they turn golden, before continuing with the guanciale.
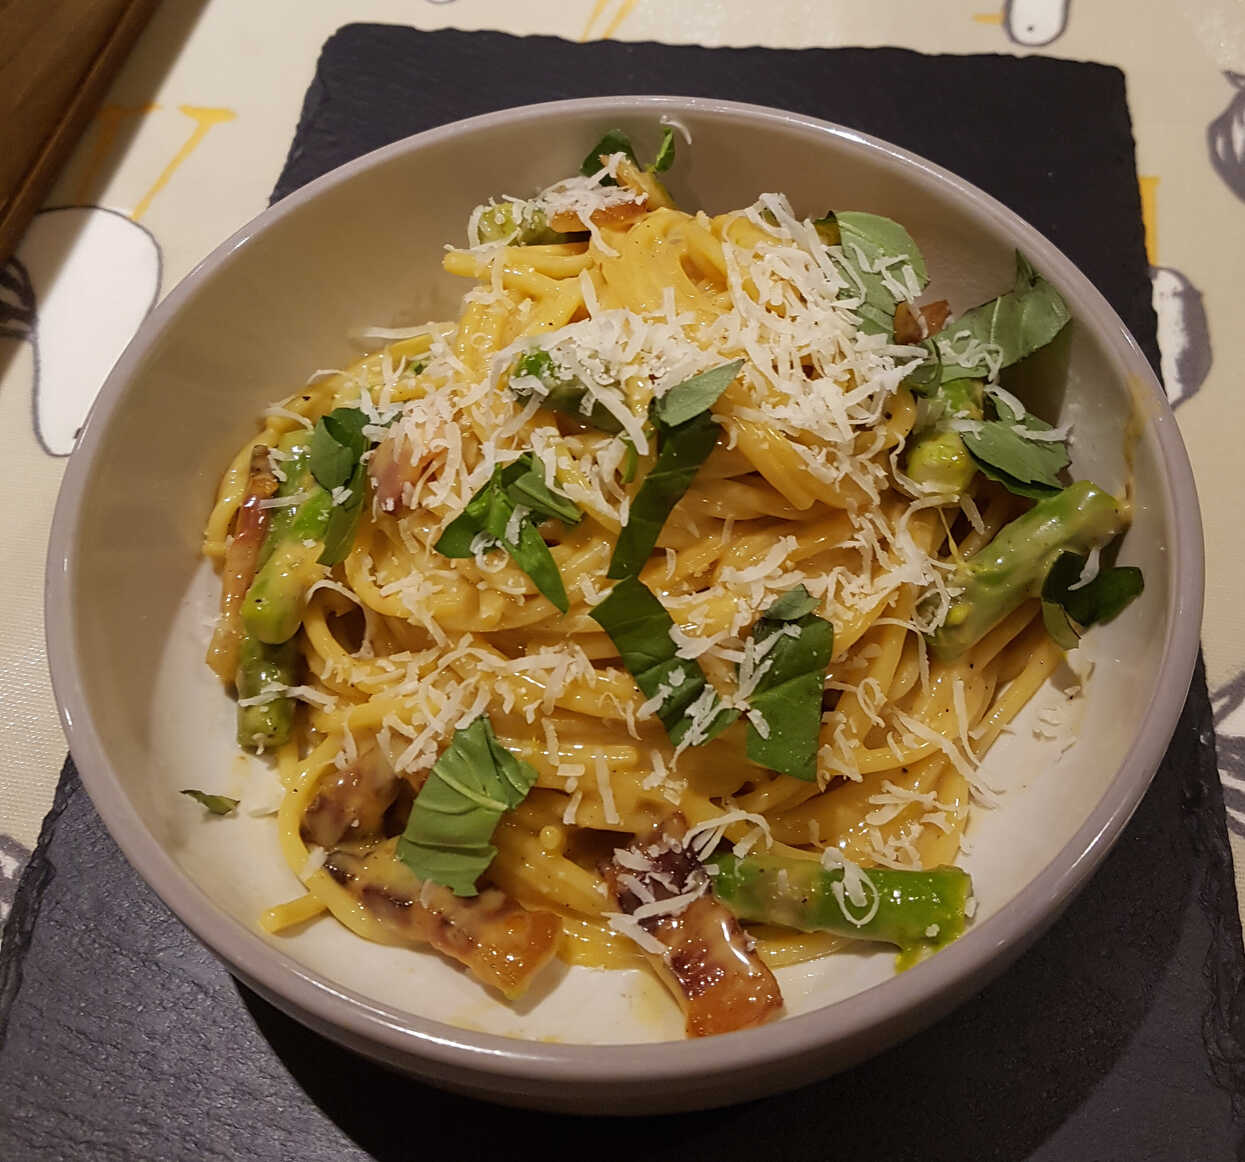
If you want to be completely inauthentic with this 20th Century G.I. recipe you can always add a few mushrooms and sliced garlic cloves to the frying guanciale,
or stir in some blanched peas or asparagus tips to the pasta at the end.
Or dress with roughly torn basil or chopped parsley to serve.
If you want to be hopelessly gauche you could even add some leeks or onions.
I've not had any particular difficulty just tossing off the pasta to a finish in the frying pan, but I suppose the double-boiler method would make it easier to get just the right custardy consistency to the sauce.If you want to be completely inauthentic with this 20th Century G.I. recipe you can always add a few mushrooms and sliced garlic cloves to the frying guanciale,
or stir in some blanched peas or asparagus tips to the pasta at the end.
Or dress with roughly torn basil or chopped parsley to serve.
If you want to be hopelessly gauche you could even add some leeks or onions.
Your choice.
Pasta Alla Zozzona
pasta meat cheese
The recipe calls for the meat of salsiccia - Italian sausage; it being an Italian recipe.
The notable features
of Italian sausages being their relatively coarse grind and their lack of non-meat filler.
Unfortunately I couldn't find any Italian sausage in my neighbourhood. Because my neighbourhood sucks.
But my Local Fucking Supermarket™ stocks both Harrogate Original sausages (97% pork!)
and raw chorizo cooking sausages. Which are at least spicy and almost entirely pork.
So I used those. I used both of those - one of each sausage, which was about double the recipe quantity. And it worked just fine.
Apparently the name derives from filthy, dirty or messy in Italian, though it has slightly lewd overtones: A slobby woman or possibly a dirty slut. Though, less salaciously, in the local Roman dialect Romanesco it might just mean luxurious. Or filthy rich.
Traditionally served over rigatoni, but ziti, penne, or mezze maniche would work.
I note that some people use fresh cherry tomatoes rather than passata, and some deglaze the fried sausage with red wine. Many omit the chilli.
1 Large Serving
Ingredients
- 1 egg yolk
- 20g pecorino romano, grated
- 40g guanciale or pancetta, cubed
- 60g sweet or hot Italian sausage or raw chorizo, or both
- 2 shallots or ¼ onion, finely chopped
- pinch red pepper flakes
- ⅔ cup/170g tomato passata or crushed tinned tomatoes
- 120g rigatoni
To Serve:- grated parmesan
- parsley
In a small bowl, beat egg yolks and Pecorino Romano together with a fork until they form a homogeneous thick paste, about 1 minute. Season with a few grindings of black pepper. Set aside.
Cut the guanciale into batons or small cubes (about ¼"/½cm).
Remove the sausage skin and add the meat to the skillet by pinching off ¾-1" pieces and arranging in a single layer in the pan. Cook over medium heat, undisturbed, until bottom side is light golden brown, about 1 minute.
Add pepper flakes (if using) and you didn't already add them and bloom in rendered fat until aromatic, about 30 seconds. Add tomato passata and bring to a simmer. Cook, stirring occasionally, until sauce has thickened slightly and fat has emulsified into sauce, about 10 minutes.
Meanwhile, in a pot of lightly salted boiling water, cook pasta until softened on the exterior, but well shy of al dente, and still uncooked in the center (about 3 minutes less than the package directs). Using a spider skimmer, transfer pasta to sauce, along with ½ cup (120ml) pasta cooking water.
Add an additional ¼ cup (60ml) of the pasta cooking water to the bowl with reserved egg yolk-Pecorino Romano paste, and stir with a rubber spatula until smooth and well-combined; set aside.
Alternatively, if you don't have a spider skimmer or a slotted spoon, drain the pasta using a strainer, making sure to reserve at least 1½ cups (355ml) pasta cooking water, before proceeding with above instructions.
Remove skillet from heat, add cooked guanciale and egg yolk mixture, and stir and toss rapidly until fully incorporated and pasta is glossy, 15 to 30 seconds. Season with salt and pepper to taste. Serve immediately, passing more grated cheese at the table.
Cut the guanciale into batons or small cubes (about ¼"/½cm).
If you're using pancetta this is probably too thick and the pieces will be hard when cooked.
In a large skillet, cook the guanciale over medium-low heat, stirring occasionally, until the fat has rendered and the guanciale is golden brown and crisp, about 15 minutes.
Unlike in Pasta alla Gricia I think the larger chunks of browned guanciale work best here.
Remove from heat. Using slotted spoon, transfer guanciale to a plate. Set aside.Remove the sausage skin and add the meat to the skillet by pinching off ¾-1" pieces and arranging in a single layer in the pan. Cook over medium heat, undisturbed, until bottom side is light golden brown, about 1 minute.
It's a good idea to throw in the pepper flakes and some extra black pepper grinds towards the end of frying here.
Add the minced shallot, season lightly with salt, and, using a thin metal spatula, turn sausage pieces onto uncooked side.
Continue to cook, stirring occasionally, until sausage is cooked through, onion is softened, and fat in the pan is clear and no longer cloudy, 5 to 7 minutes;
lower heat at any point if sausage or onion threaten to scorch.Add pepper flakes (if using) and you didn't already add them and bloom in rendered fat until aromatic, about 30 seconds. Add tomato passata and bring to a simmer. Cook, stirring occasionally, until sauce has thickened slightly and fat has emulsified into sauce, about 10 minutes.
Meanwhile, in a pot of lightly salted boiling water, cook pasta until softened on the exterior, but well shy of al dente, and still uncooked in the center (about 3 minutes less than the package directs). Using a spider skimmer, transfer pasta to sauce, along with ½ cup (120ml) pasta cooking water.
Add an additional ¼ cup (60ml) of the pasta cooking water to the bowl with reserved egg yolk-Pecorino Romano paste, and stir with a rubber spatula until smooth and well-combined; set aside.
Alternatively, if you don't have a spider skimmer or a slotted spoon, drain the pasta using a strainer, making sure to reserve at least 1½ cups (355ml) pasta cooking water, before proceeding with above instructions.
The instructions above are for 3 times the quantities, so adjust your pasta water measurements accordingly.
Just add the pasta water you need.
Increase heat to high and cook, stirring and tossing rapidly, until pasta is al dente and sauce is thickened and coats noodles, about 2 minutes,
adding more pasta cooking water in ¼ cup (60ml) or smaller increments as needed.Remove skillet from heat, add cooked guanciale and egg yolk mixture, and stir and toss rapidly until fully incorporated and pasta is glossy, 15 to 30 seconds. Season with salt and pepper to taste. Serve immediately, passing more grated cheese at the table.
Very nice. I think I like it the best of these, except maybe for a good carbonara - that's tough to beat.
I used parmesan for the additional grated cheese which adds a welcome rich nuttiness.
I also mixed through some roughly chopped parsley at the end, which I thought complemented the dish well, though I'm sure basil would also work.
I used parmesan for the additional grated cheese which adds a welcome rich nuttiness.
I also mixed through some roughly chopped parsley at the end, which I thought complemented the dish well, though I'm sure basil would also work.
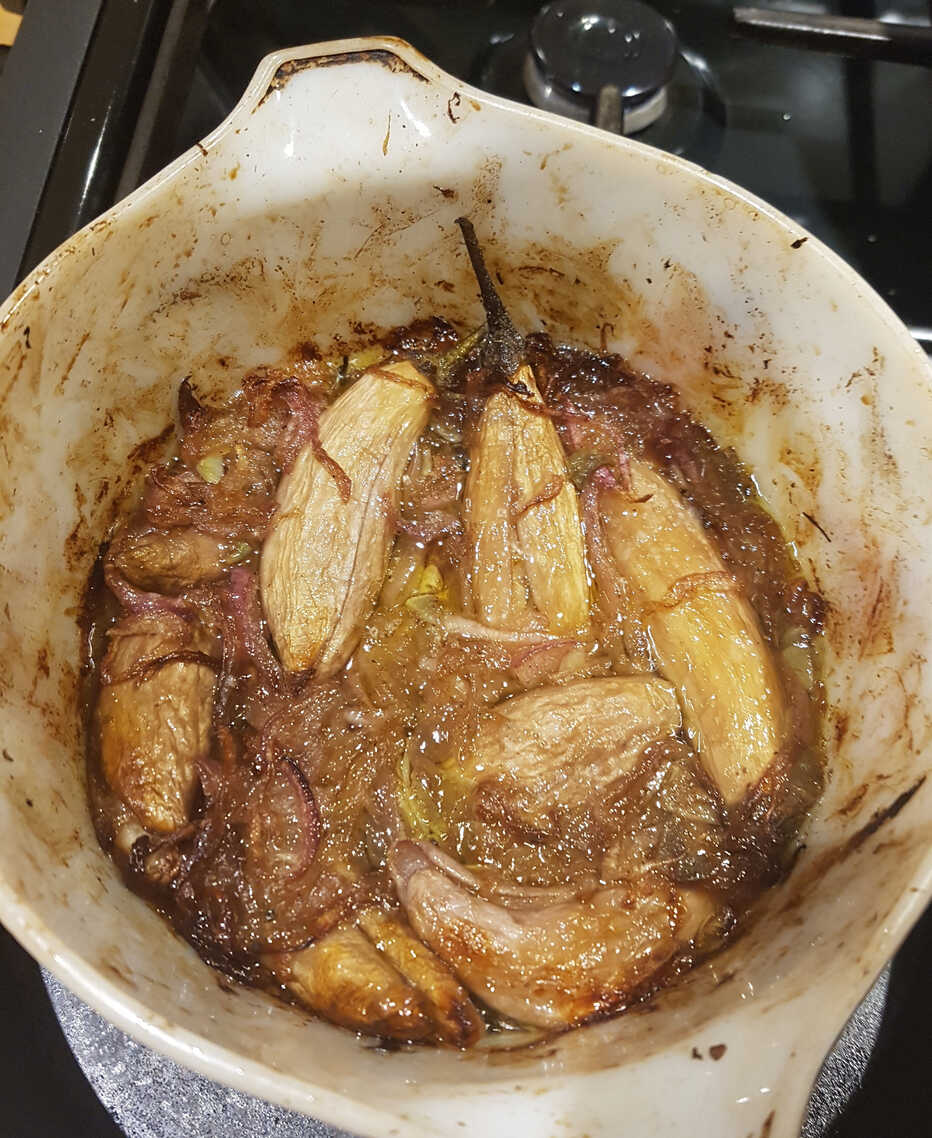
Roast Baby Aubergines with Red Onions
veg side cheese
My usual grocers had some little graffiti aubergines, which I'd never heard of.
So I bought them to try out.
I read about a southern Italy antipasto that roasted roughly chopped aubergines with copious quantities of red onions, so I thought I might give this method a try, but the result was oily, rather tasteless and overall disappointing.
I think aubergines, even small ones, might really need to be grilled, fried or roast hard to develop their flavour.
Also, with the vinegar and the onion, the garlic does turn a weird blue colour and I'm not sure contributes a great deal to the taste.
I'd probably skip either the vinegar or the garlic.
Having said all this, it did fry up very nicely afterwards - crisping up the onions and browning the split aubergines really helps, and makes a great filling for a sausage sandwich with mustard and crème fraîche.
It makes me wonder if the original dish might have worked if I'd just left it roasting long enough to really caramelize the ingredients.
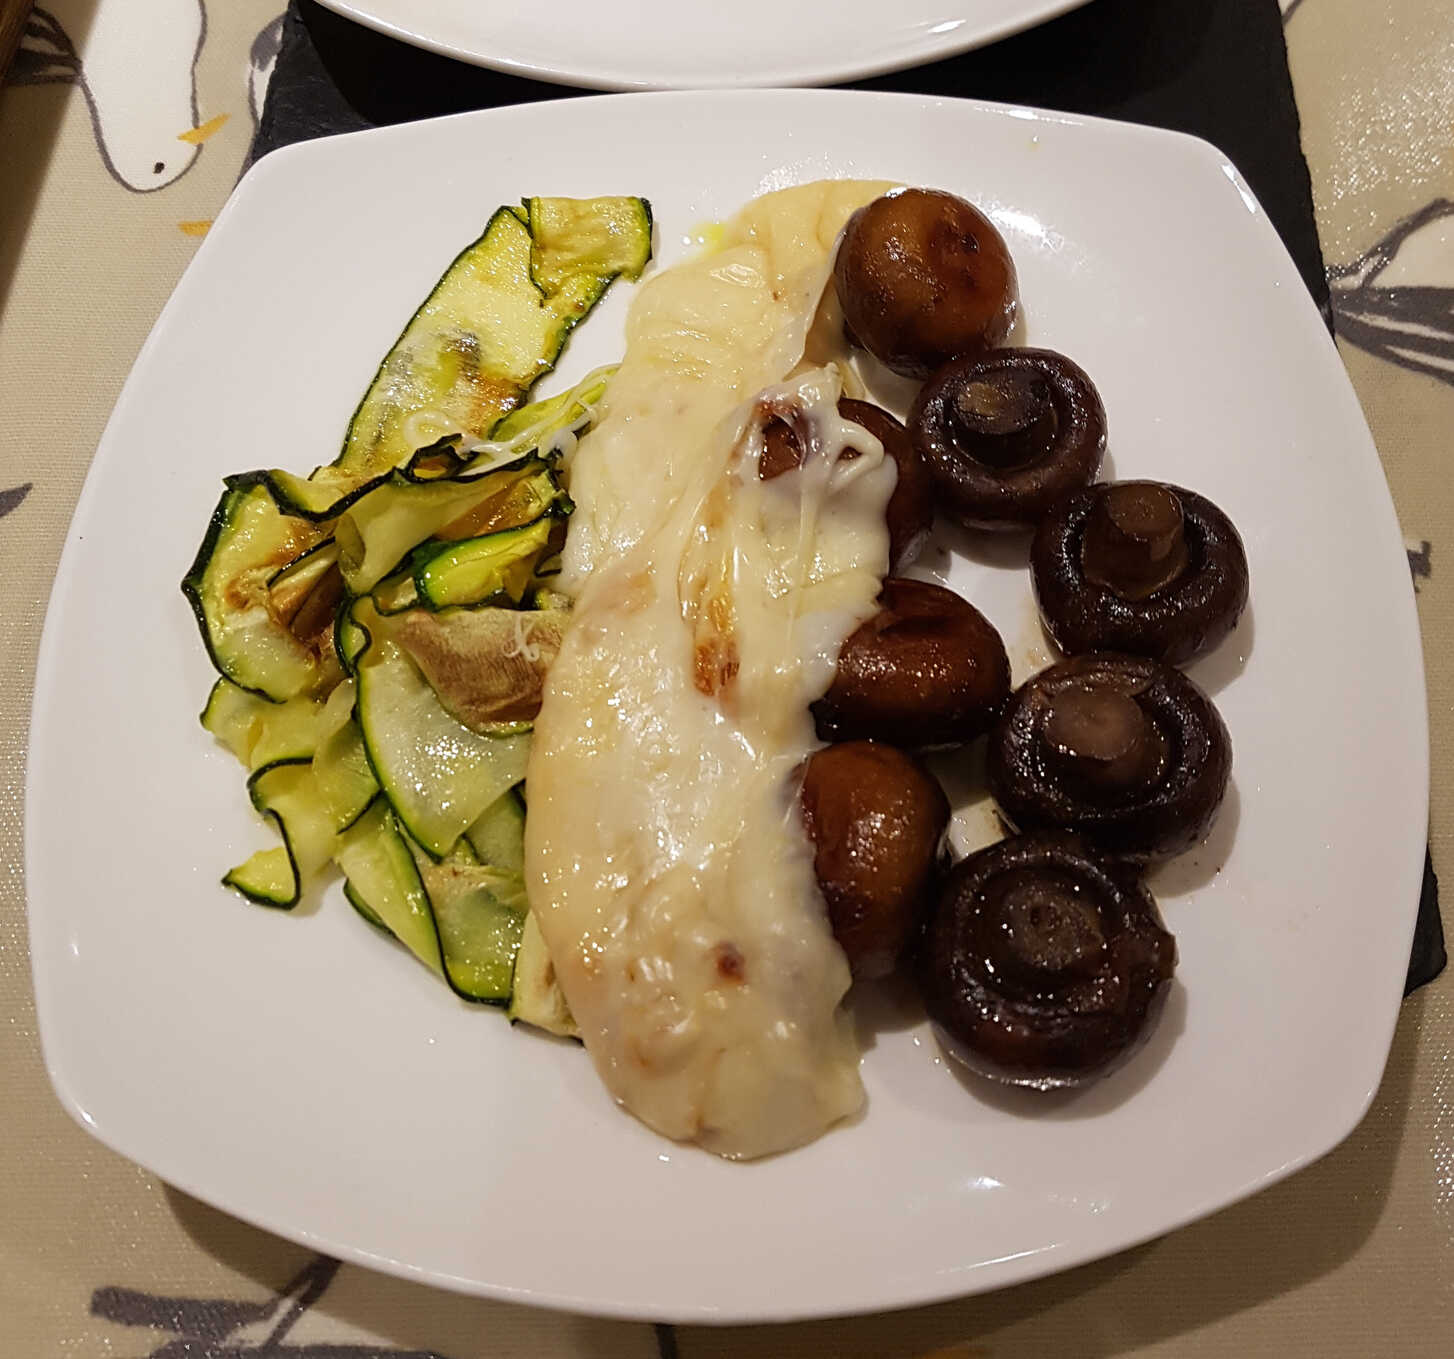
Nigella does mention optionally dressing the dish with ricotta salata (aged and salted ricotta), or feta cheese. And as I happened to have some scamorza I decided to try that.
I read about a southern Italy antipasto that roasted roughly chopped aubergines with copious quantities of red onions, so I thought I might give this method a try, but the result was oily, rather tasteless and overall disappointing.
I think aubergines, even small ones, might really need to be grilled, fried or roast hard to develop their flavour.
Also, with the vinegar and the onion, the garlic does turn a weird blue colour and I'm not sure contributes a great deal to the taste.
I'd probably skip either the vinegar or the garlic.
Having said all this, it did fry up very nicely afterwards - crisping up the onions and browning the split aubergines really helps, and makes a great filling for a sausage sandwich with mustard and crème fraîche.
It makes me wonder if the original dish might have worked if I'd just left it roasting long enough to really caramelize the ingredients.
Nigella does mention optionally dressing the dish with ricotta salata (aged and salted ricotta), or feta cheese. And as I happened to have some scamorza I decided to try that.
Ingredients
- baby aubergines
- red onions, sliced
- garlic, sliced
- dried oregano
- olive oil
- red wine vinegar
To Serve:- scamorza cheese, sliced thickly
Slit the small aubergines from tip to almost stem, leaving them still attached at the base.
Finely slice the onion and garlic.
Mix everything in an oven-proof dish, drizzle with a little red wine vinegar may not be a good idea?, a generous amount of olive oil and dried oregano, and season well.
Put in a Gas Mark 4 oven for 1½-2 hours until the onions are nicely caramelised and the aubergines shrivelled, turning occasionally.
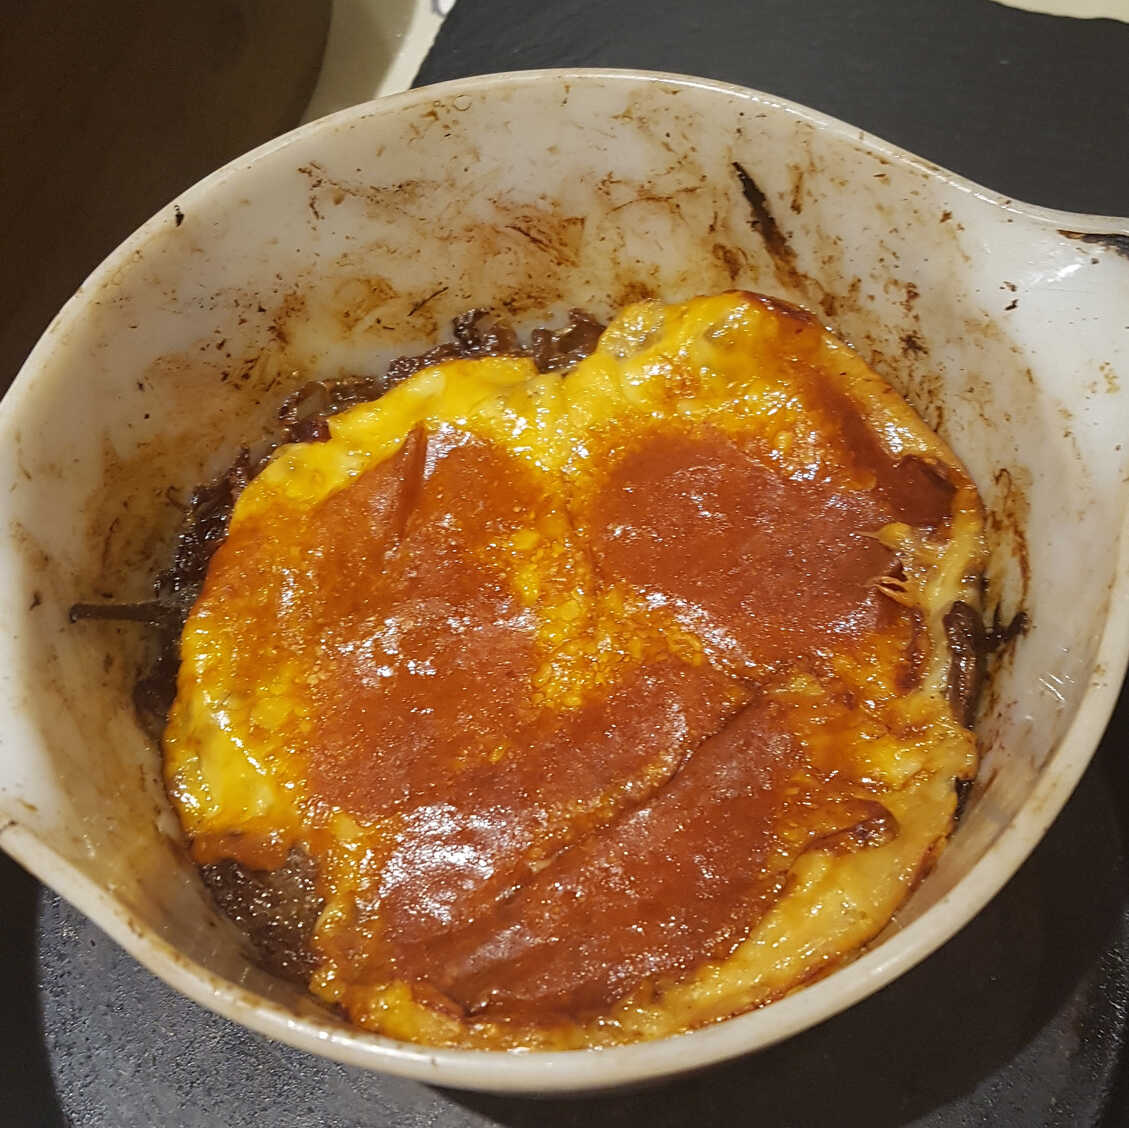
Slice the scamorza quite thickly. Heat a frying pan until very hot, drizzle in a tiny layer of olive oil, turn down the heat and lay in the scamorza slices. Let them bubble until they melt with hopefully a nice brown crust on the underside.
Finely slice the onion and garlic.
Mix everything in an oven-proof dish, drizzle with a little red wine vinegar may not be a good idea?, a generous amount of olive oil and dried oregano, and season well.
Put in a Gas Mark 4 oven for 1½-2 hours until the onions are nicely caramelised and the aubergines shrivelled, turning occasionally.
Slice the scamorza quite thickly. Heat a frying pan until very hot, drizzle in a tiny layer of olive oil, turn down the heat and lay in the scamorza slices. Let them bubble until they melt with hopefully a nice brown crust on the underside.
I'm not even sure the frying stage is necessary, since the resulting aubergine cheese topping turned too hard, but I do like those crusty bits.
Scrape the cheese over the aubergine dish, return to the oven for a few minutes, then serve.
Needs work. It's tasty enough when fried afterwards so the aubergine and onion go a bit crispy.
Either it needs frying first, after, or longer roasting. Not sure which will be best.
Either it needs frying first, after, or longer roasting. Not sure which will be best.
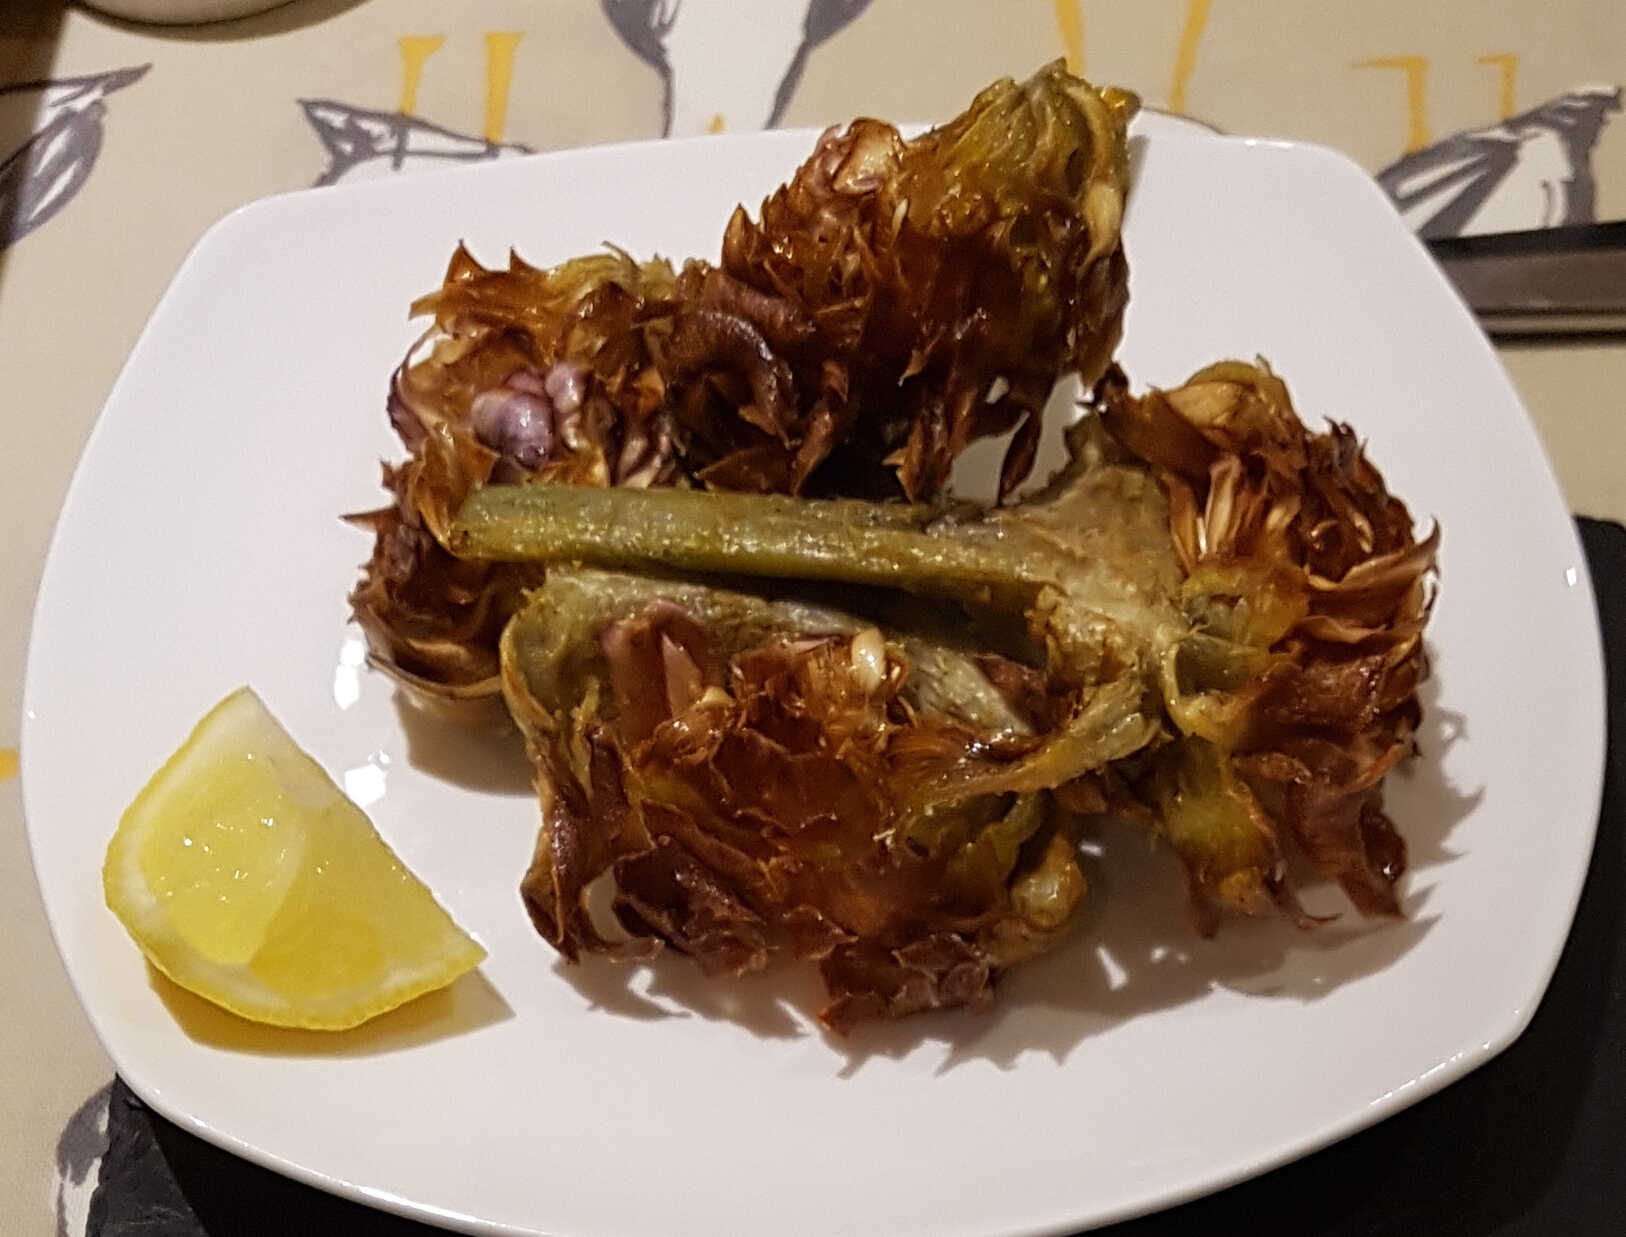
Carciofi alla Guidia
side snack veg vegan
Apparently the Jews my be responsible for spawning much of the world's deep-fried comestibles,
perhaps even including the venerated British Fish and Chips.
And in a plot twist may also be guilty of originating the seat of the Holy Roman Empire's fried artichokes. Called, appropriately (in Italian) the Artichokes made by those damn Jews.
In the 16th Jewish ghettoes around Rome they developed the now-famous dish of carciofi all guidia, or Jewish artichokes.
In Rome they typically use a choke-free variety of artichoke called cimaroli or mammole. Which means they can be fried whole, with little trimming.
You might be able to do the same with undeveloped baby artichokes, but if all you can get are big fat British artichokes you'll have to remove their hairy chokes before you cook them. It's easiest to do this if you first cut them in half. Use water acidified with lemon juice to prevent them from browning while you work.
You don't need to completely submerge the artichokes while you fry them, but otherwise you will have to keep turning them. However, this does mean you could use olive oil for a more authentic flavour without going bankrupt. Otherwise use a neutral oil like sunflower, and as much as you like.
Have 1 or 2 per Person
Ingredients
- globe artichokes
- olive or neutral oil for deep-frying
- salt
- lemon
Fill a large bowl with water and squeeze in the juice from two lemon halves then throw them all in too.
Remove the tough outer leaves of the artichokes (about half a dozen layers). Keep going until you reach the more soft and tender leaves.
Peel the tough outer layer of the stem with a vegetable peeler or a paring knife and trim the stalk to a reasonable length.
Immediately place the artichoke halves in the lemon water, submerging them on all sides to keep them from browning.
Heat your chosen oil to about 138°C (280°F). Pat the artichokes dry and lower them into the oil. Cook them fairly gently (they should stream out bubbles steadily) until they are easily pierced with a fork - 10 to 15 minutes.
Turn them every few minutes if they aren't fully submerged in the oil.
Remove to drain on kitchen towel. When cool enough you can pry the leaves open to give them their signature flower appearance.
Drain on paper towels and salt immediately while they are still hot.
Serve with lemon wedges.
Remove the tough outer leaves of the artichokes (about half a dozen layers). Keep going until you reach the more soft and tender leaves.
If the leaves are too tough, when fried they will turn hard and impossible to eat at their outer ends.
Crispy leaves are good. Rock hard ones, not so fine.
Use a sharp knife to cut an inch off the top of the bulb where the hard or thorned bits of leaf are.Crispy leaves are good. Rock hard ones, not so fine.
Peel the tough outer layer of the stem with a vegetable peeler or a paring knife and trim the stalk to a reasonable length.
You might need to peel the stalk (and the bottom of the bulb) quite aggressively since the outer layers can be quite fibrous.
Slice the artichoke in half lengthwise (if large). Use a small knife or spoon to scoop out the fuzzy center choke.Immediately place the artichoke halves in the lemon water, submerging them on all sides to keep them from browning.
Heat your chosen oil to about 138°C (280°F). Pat the artichokes dry and lower them into the oil. Cook them fairly gently (they should stream out bubbles steadily) until they are easily pierced with a fork - 10 to 15 minutes.
Turn them every few minutes if they aren't fully submerged in the oil.
Remove to drain on kitchen towel. When cool enough you can pry the leaves open to give them their signature flower appearance.
If they're small enough to cook whole, now might be the best time to scoop out their choke if they still have one.
Bring the oil up to 177°C (350°F) and return the bloomed artichokes to the fryer.
They will fry quickly now - remove them after only a minute or two when browned and crispy.Drain on paper towels and salt immediately while they are still hot.
Serve with lemon wedges.
Very tasty, though I'd need a bit more practice in completely removing all the tough or fibrous parts.
Wild Garlic Pesto
veg cheese pasta sauce
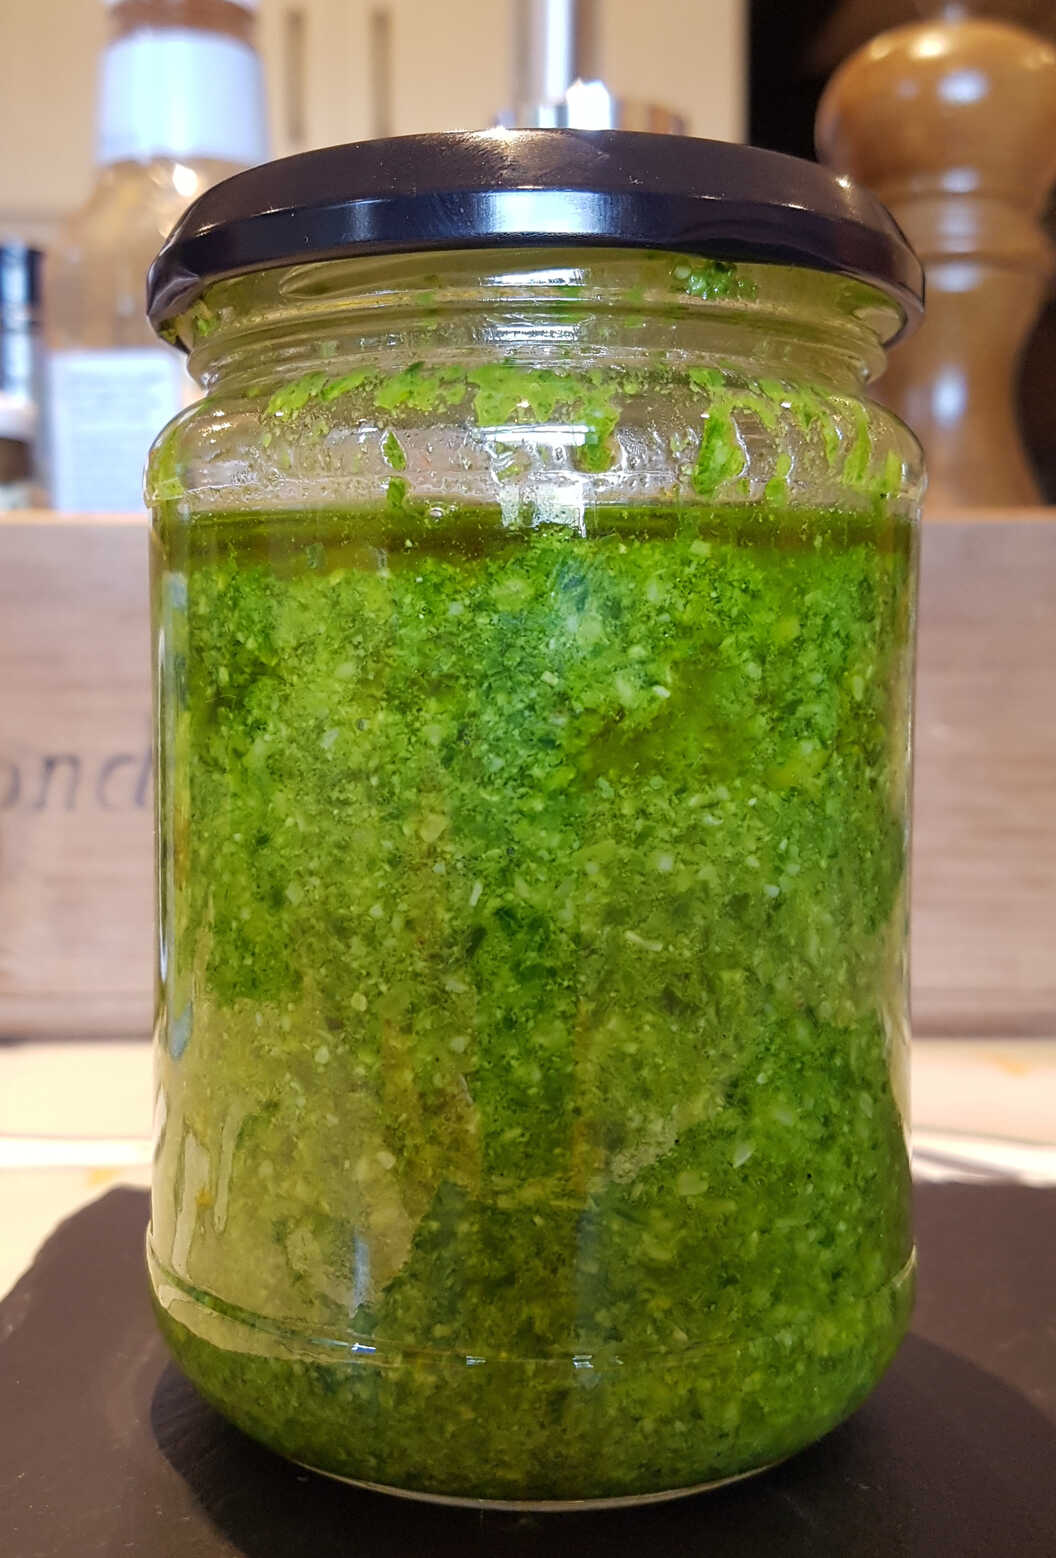
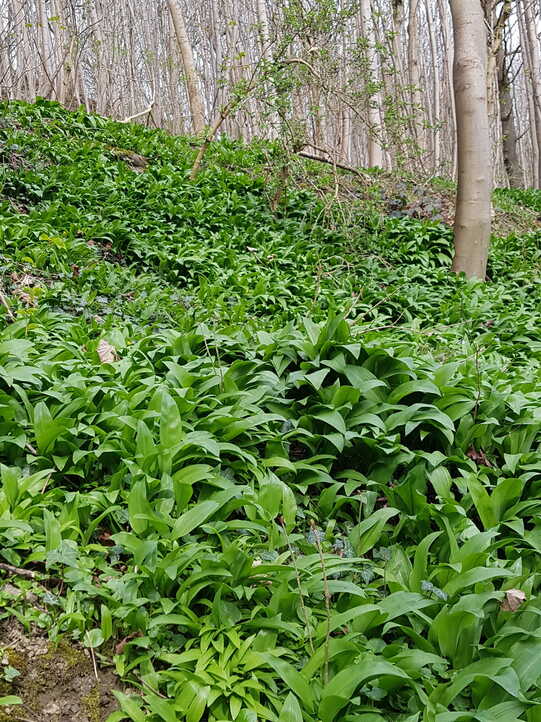
The local greengrocer had wild garlic for sale. And I thought But it's growing all along the canal, right there!
So I picked a bunch and made pesto.
Makes about 1 Cup
Ingredients
- 60g wild garlic leaves
- juice of ½ lemon
- 40g pine nuts
- 50g grated parmesan
- salt
- pepper
- about 100ml olive oil
The easiest way to make this pesto is to throw everything but the oil into a blender or food processor, and then drizzle the oil into the resulting paste.
But this can create more of a sludge than a rough paste and even generate bitterness from the violent mechanical dispersal of phenols from the olive oil. It may also be unkind to the parmesan.
The best way to make pesto is with a lot of chopping followed by a damn good pounding in a giant pestle and mortar. But not everyone has one of those.
So if you want to compromise on a textured pesto that isn't too smooth, or too much trouble, you can blend up the wild garlic leaves with only as much lemon juice and olive oil as necessary to get the paste moving. Then grind the pine nuts in a pestle and mortar (which is quite manageable), finely grate the parmesan, and beat these with the rest of the olive oil into the mixture by hand.
Adjust the quantities I like relatively generous quantities of cheese and lemon and season to taste.
Other nuts, such as hazelnuts (or cobnuts) are also recommended.
It should keep for weeks, in a jar in the fridge, covered with a layer of olive oil.
It should keep for weeks, in a jar in the fridge, covered with a layer of olive oil.
You can fry some tinned anchovies in olive oil, lubricate with pasta water, add cooked pasta, flavour with wild garlic pesto, and dress with more grated parmesan for a decent pasta dish.
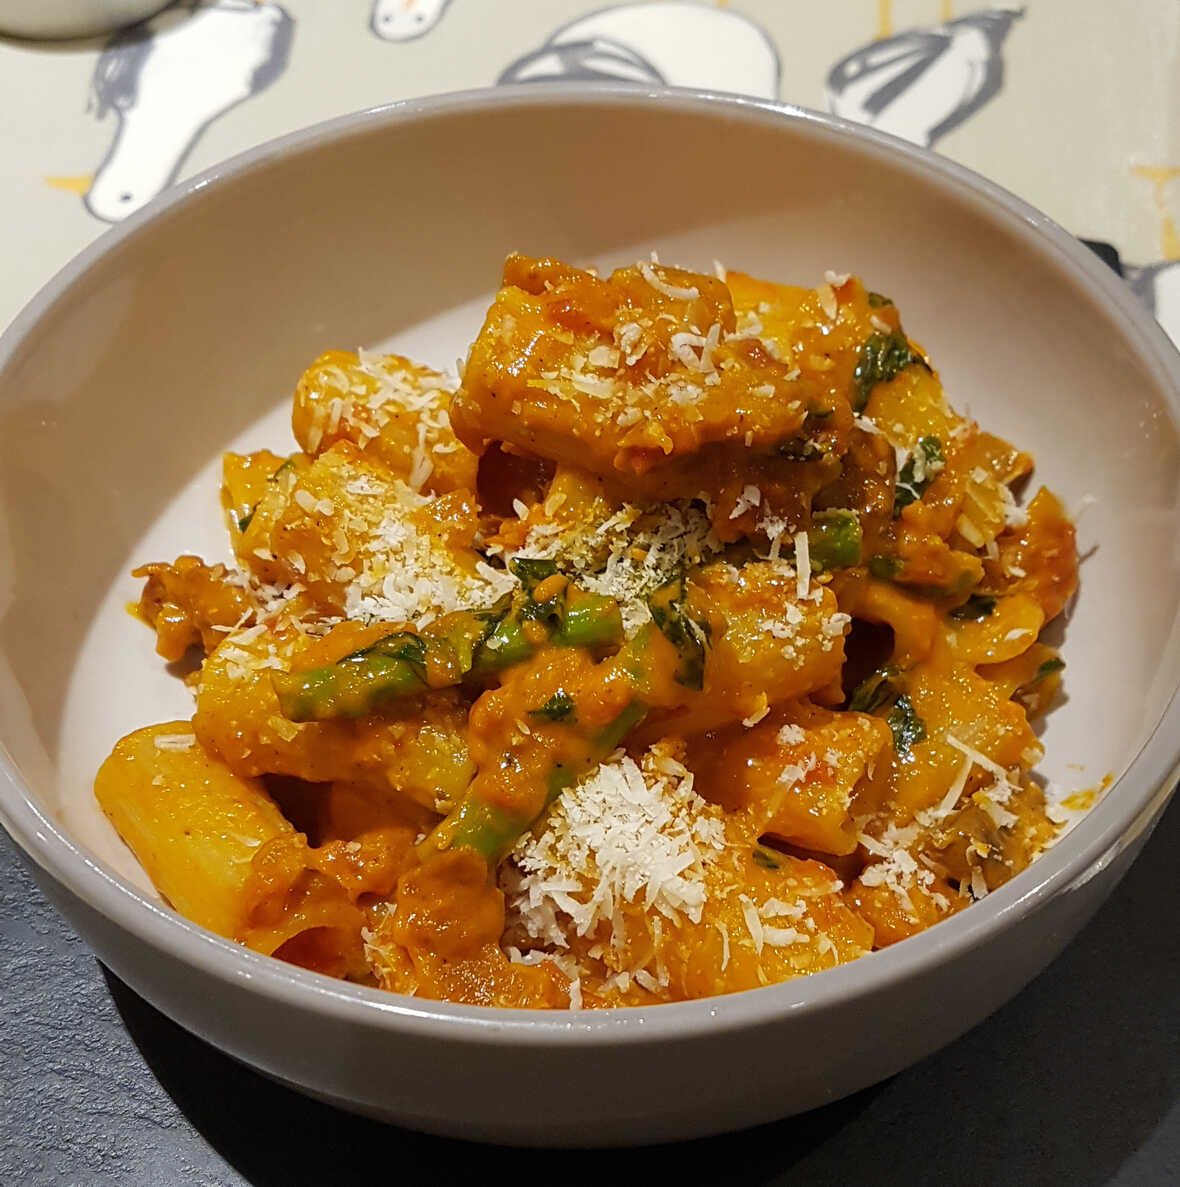
Roast Kohlrabi and Jerusalem Artichokes with Wild Garlic Pesto
veg starter side
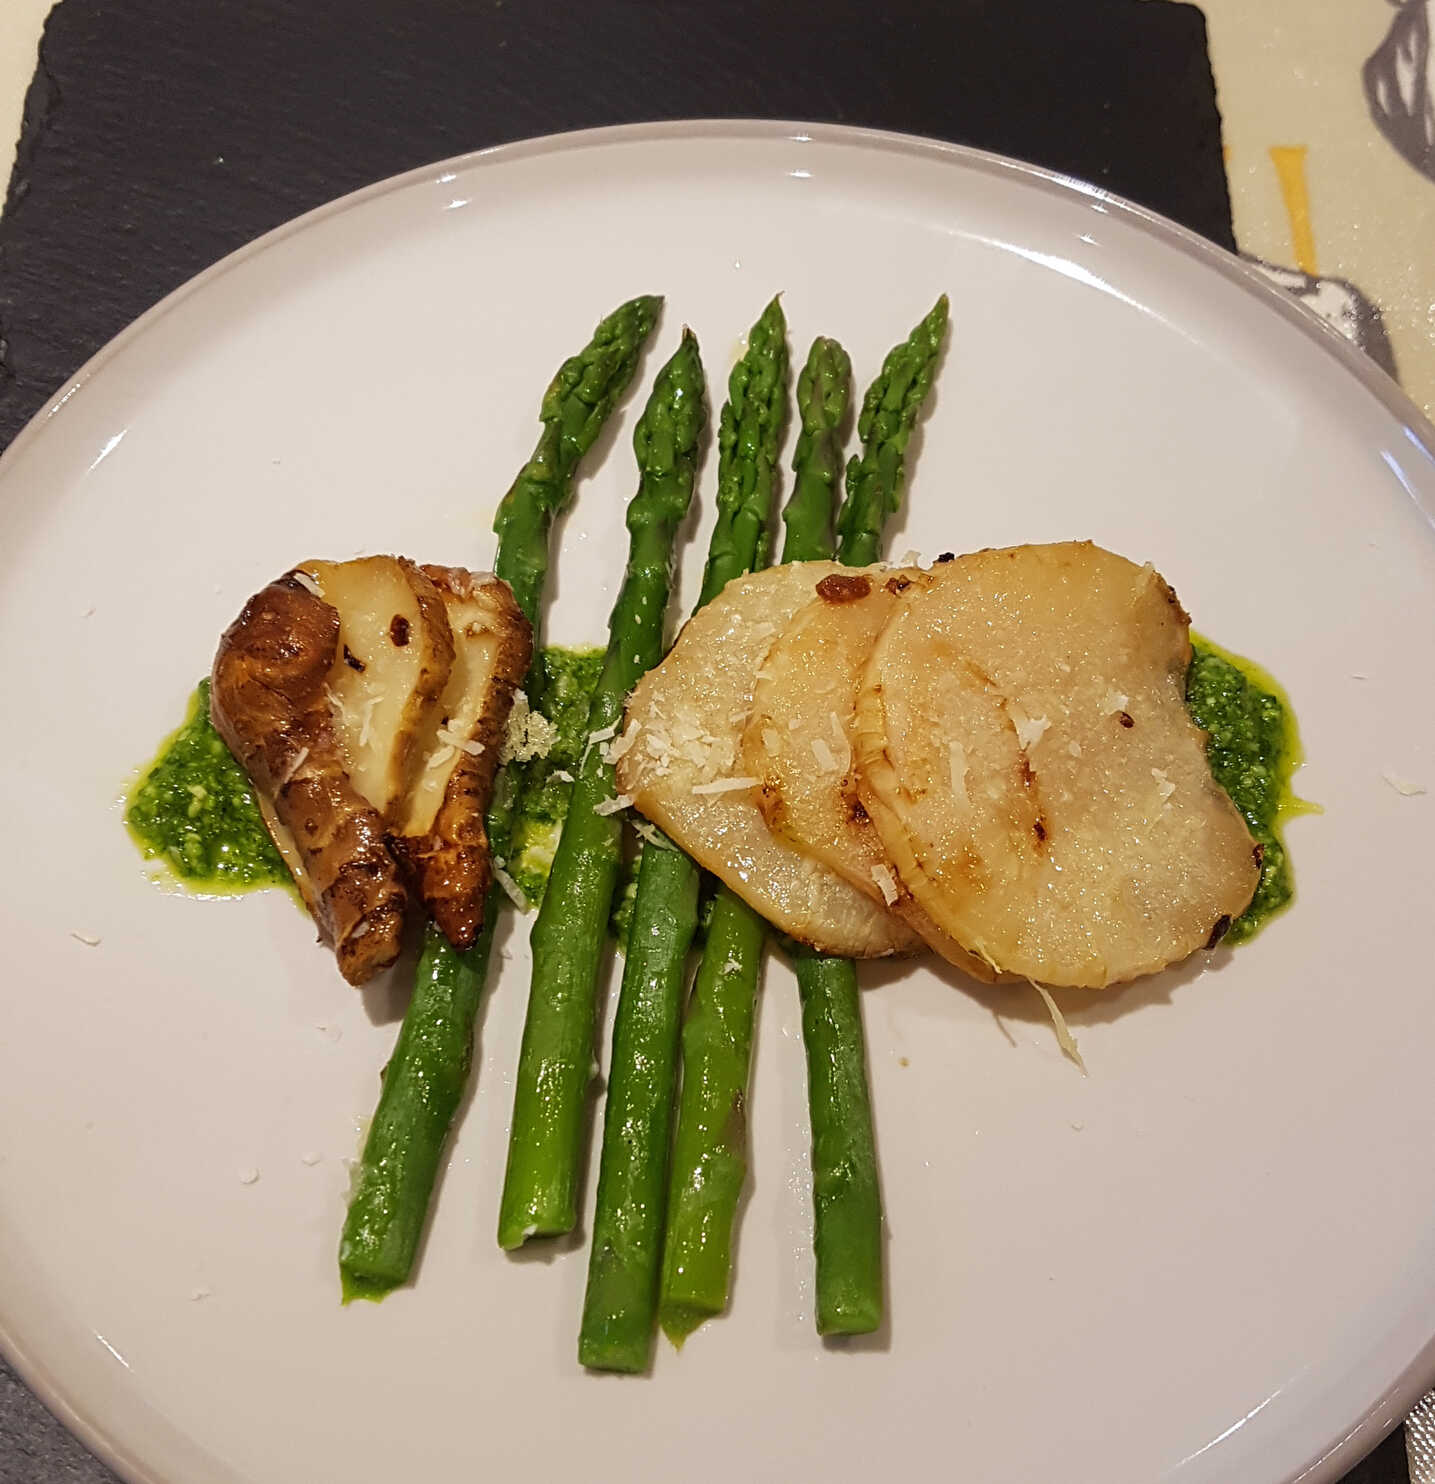
So I'd seen people claiming
that roasted kohlrabi was crispy and delicious. And they were right!
I'd actually only had it raw before (they eat a fair bit of it in Scandinavia).
I'd actually only had it raw before (they eat a fair bit of it in Scandinavia).
Serves 4
Ingredients
- 1 kohlrabi
- half a dozen jerusalem artichokes
- a squeeze of lemon juice?
- bunch asparagus spears
- 1-2 cloves garlic garlic, sliced or minced optional
- salt & pepper
- olive oil
- pecorino or parmesan cheese, grated
Dressing:- grated lemon zest
- wild garlic pesto
Preheat the oven to Gas Mark 7/230°C/450°F.
Mince or slice a little garlic if you like.
Peel the kohlrabi their skin can be thick and fibrous. Wash or peel the jerusalem artichokes. Cut them all into wedges, or slices about ¼" thick.
Season the slices with salt & pepper, add the garlic and generously coat them in olive oil.
Meanwhile blanch asparagus spears snap off any tough ends to their stems for a minute or two, then drain.
Add the asparagus to the dish, give everything a stir, grate over a light sprinkling of grated parmesan or pecorino, and return to the oven for 5-10 minutes until the cheese melts and coats the vegetables.
Serve with a dressing of wild garlic pesto. Add a scattering of lemon zest if you like.
Mince or slice a little garlic if you like.
Peel the kohlrabi their skin can be thick and fibrous. Wash or peel the jerusalem artichokes. Cut them all into wedges, or slices about ¼" thick.
Season the slices with salt & pepper, add the garlic and generously coat them in olive oil.
I think I skipped adding garlic being worried about it burning at the relatively high oven temperature, though I suppose you could substitute garlic powder of which I'm not sure I approve,
and I may have rubbed the artichokes with lemon juice, which stops them from browning, I really can't remember now!
Lay them out in more-or-less a single layer in an oven dish and roast them for about 30 minutes until they brown nicely.
Give them a prod and maybe a turn half way through.Meanwhile blanch asparagus spears snap off any tough ends to their stems for a minute or two, then drain.
Add the asparagus to the dish, give everything a stir, grate over a light sprinkling of grated parmesan or pecorino, and return to the oven for 5-10 minutes until the cheese melts and coats the vegetables.
Serve with a dressing of wild garlic pesto. Add a scattering of lemon zest if you like.
Very good. It turns out that roast kohlrabi are crunchy and delicious.
Though this has not yet translated to deep-frying.
Though this has not yet translated to deep-frying.
Wild Garlic Velouté with Marinated Feta
veg soup
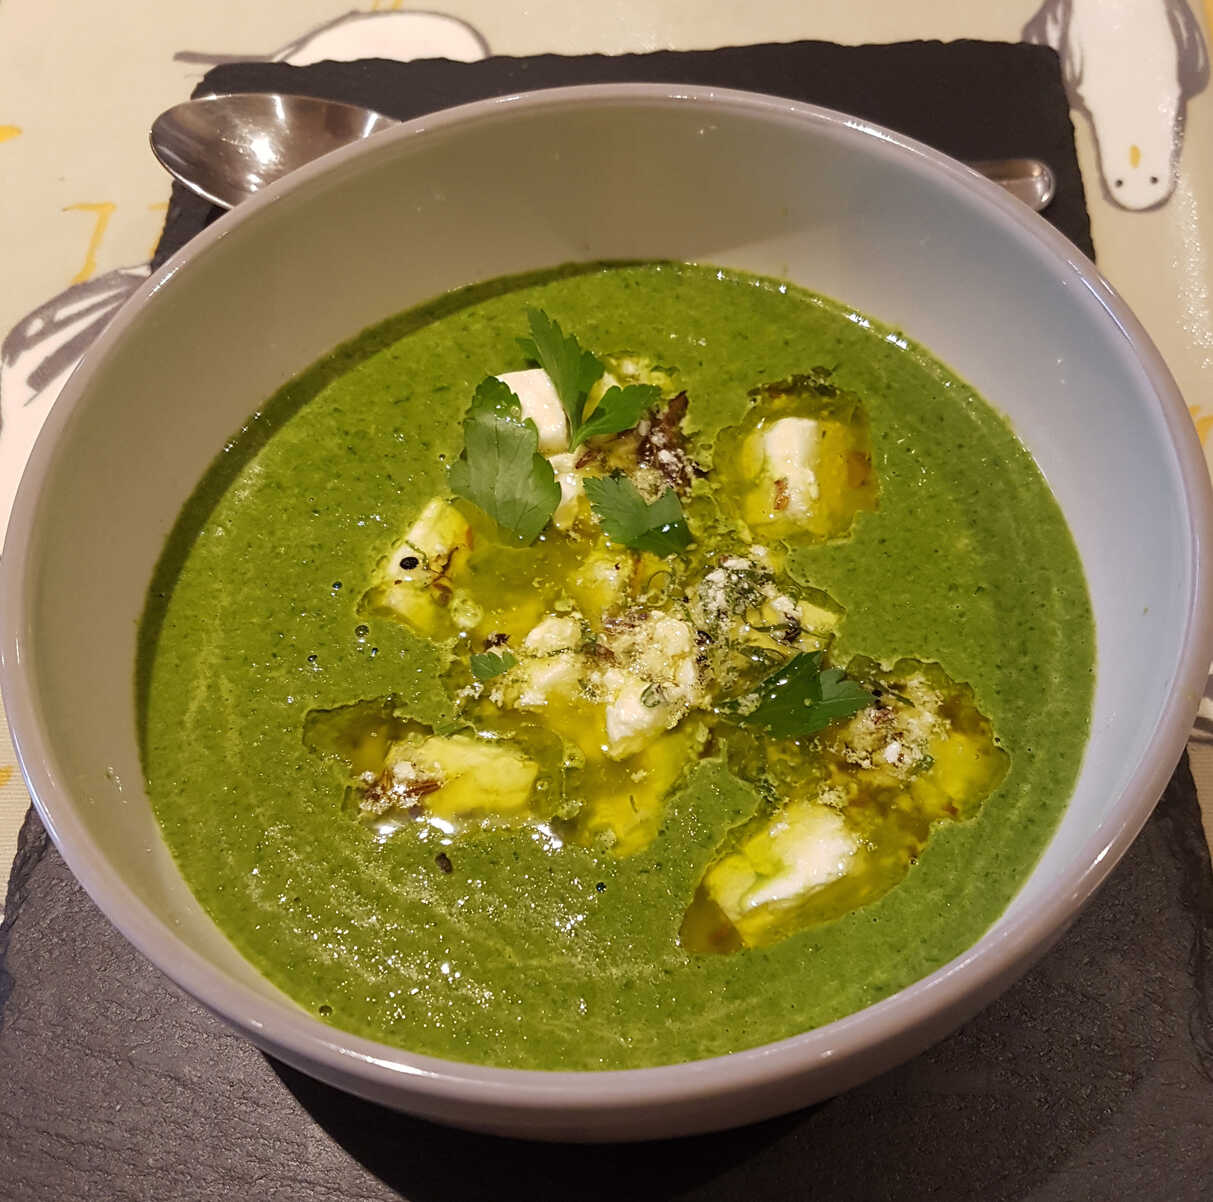
I was surprised how magnificently this soup turned out.
It's a combination of a Great British Chefs' Wild Garlic Velouté and Anna Hansen's Wild garlic, new potato and black onion seed soup with marinated feta with a few improvements of my own.
I happened to have some kohlrabi which I'd read was a common thickener for soups so I threw that in. And it really helped.
I didn't have any dried Urfa chilli (who does?) so I just used regular chilli pepper flakes.
I also only had old, dried, curry leaves so I also threw in a good pluck of dried fenugreek leaves. Which I think is definitely advised.
Serves 2-4
Ingredients
Soup:- 500ml of strong chicken stock
- ½ kohlrabi, peeled, chopped
- 150g of wild garlic
- 50g of spinach
- 50ml of double cream
- 20g of butter
- salt & pepper
- lemon juice
- extra olive oil, for drizzling (optional)
Marinated Feta:- 200g of feta, cut into 1cm cubes
- 150ml of extra virgin olive oil
- 10 curry leaves
- large pinch dried fenugreek leaves perhaps a teaspoon of crushed leaves
- ½ tsp fennel seeds
- ½ tsp caraway seeds
- ½ tsp black mustard seeds
- ½ tsp Urfa chilli flakes
- generous ½ tsp onion seeds
- 6 basil leaves, shredded
Marinate the Feta
Measure 100ml of olive oil into a small pan over a moderate heat and add the curry leaves, fenugreek leaves and dry spices.
Mix cooled spiced oil over the feta along with the remaining 50ml oil or just enough to cover and the minced basil leaves.
Gently toss the feta in the oil then refrigerate in an airtight container until ready to use.
Peel the kohlrabi, making sure to remove all the tough stringy outer layers, then roughly chop. Simmer the kohlrabi for 10-15 minutes in the stock in a large pan until it softens.
Stir in the double cream, cook for a minute more and then transfer to a blender. Blitz until very smooth.
Return the blend to the pan, reheat, and enrich it by whisking in the cold butter.
Season with salt and pepper and a squeeze of lemon juice.
Ladle into bowls and dress with a pile of the marinated feta cheese and a further drizzle of oil if necessary.
Measure 100ml of olive oil into a small pan over a moderate heat and add the curry leaves, fenugreek leaves and dry spices.
You can lightly crush them, especially the leaves, with a pestle and mortar first.
Fry for a minute or 2 until the spices become aromatic and begin to pop watch out - they're pretty lively!, then remove from the heat and leave to cool.Mix cooled spiced oil over the feta along with the remaining 50ml oil or just enough to cover and the minced basil leaves.
Gently toss the feta in the oil then refrigerate in an airtight container until ready to use.
It's a good idea to bring it out of the fridge a couple of hours before using so it has time to come up to room temperature before dressing the soup.
Peel the kohlrabi, making sure to remove all the tough stringy outer layers, then roughly chop. Simmer the kohlrabi for 10-15 minutes in the stock in a large pan until it softens.
You could skip the kohlrabi, but it does add a sweet, nutty texture to the soup.
Allow the stock to reduce down to about 400ml as it simmers, particularly if it's a bit on the feeble side. Or vegetable.
Add the wild garlic and spinach, wilt, and cook for a few minutes. You want to cook the garlic through to eliminate the raw punchy flavour but not so much that it loses its bright green colour.Allow the stock to reduce down to about 400ml as it simmers, particularly if it's a bit on the feeble side. Or vegetable.
Stir in the double cream, cook for a minute more and then transfer to a blender. Blitz until very smooth.
Return the blend to the pan, reheat, and enrich it by whisking in the cold butter.
Season with salt and pepper and a squeeze of lemon juice.
Ladle into bowls and dress with a pile of the marinated feta cheese and a further drizzle of oil if necessary.
OMG Fantastic!
Reheat gently without boiling.
Reheat gently without boiling.
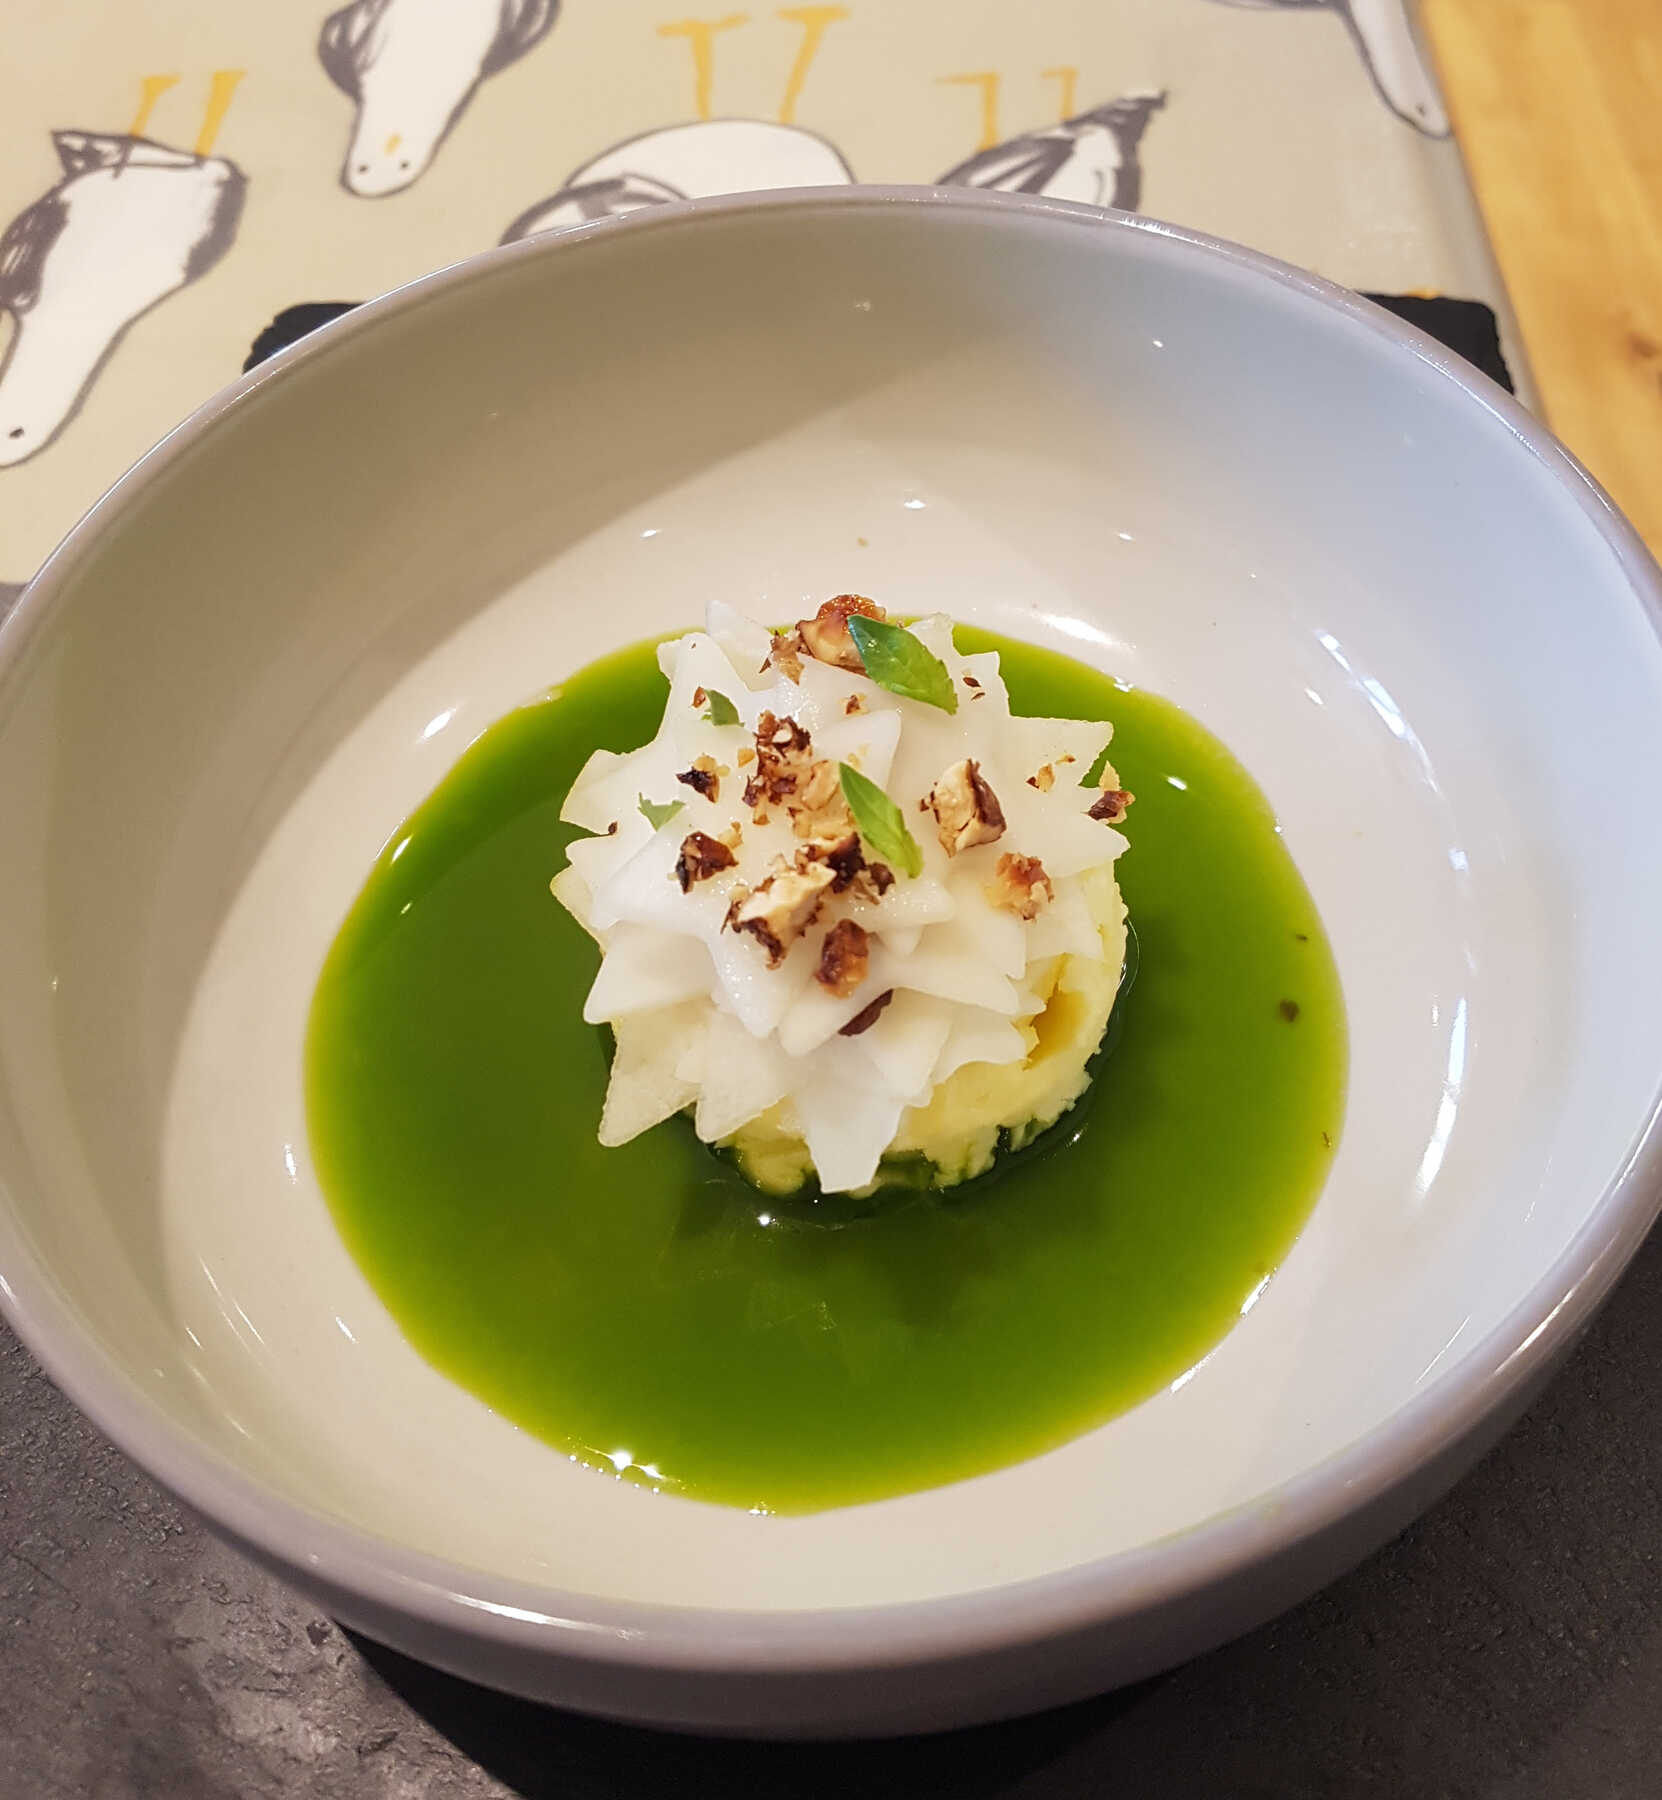
Abondance Mousse with Kohlrabi, Walnut Pesto and Pear Salad, Dill Dressing
starter cheese
A recipe from Adam Smith, if that's even a real name,
who apparently serves it with a Comté biscuit on the side.
As if the dish wasn't already complicated enough!
Anyway, he makes his mousse with Aged Comté, but I used Abondance, a rather nice, nutty, fruity French cheese from the Alps, because it was on offer at my Local Fucking Supermarket™. And because it's quite like Comté.
Now, I completely miscalculated how much time would be involved in creating this marvel when I originally planned it as a Saturday dinner starter. It's not just the vacuum-packing-pickling, or the mousse-chilling. Or the walnut roasting. Or the pear-juicing. (Actually I might have made that rod for my own back - I could always have bought pear juice. I should think.) It's also quite fiddly to prepare, using the star-shaped cookie cutter you bought especially from that pound shop that stocks everything in plastic or tin tat.
I found the proportions in Adam's recipe to be completely out-of-wack. His ingredients are supposed to serve 6 people, but there's no way you could use up 3 kohlrabis and 6 pears as a garnish. I mean, you've only got 450g of mousse. And that's a WHOLE PEAR EACH! Madness.
I think you'd struggle to stretch the mousse out to 6 people, and there'd be too much pickled kohlrabi, and too many candied walnuts.
So feel free to adjust the measures below accordingly.
As if the dish wasn't already complicated enough!
Anyway, he makes his mousse with Aged Comté, but I used Abondance, a rather nice, nutty, fruity French cheese from the Alps, because it was on offer at my Local Fucking Supermarket™. And because it's quite like Comté.
Now, I completely miscalculated how much time would be involved in creating this marvel when I originally planned it as a Saturday dinner starter. It's not just the vacuum-packing-pickling, or the mousse-chilling. Or the walnut roasting. Or the pear-juicing. (Actually I might have made that rod for my own back - I could always have bought pear juice. I should think.) It's also quite fiddly to prepare, using the star-shaped cookie cutter you bought especially from that pound shop that stocks everything in plastic or tin tat.
Although now I come to look - it seems quite hard to buy pear juice. So there.
I found the proportions in Adam's recipe to be completely out-of-wack. His ingredients are supposed to serve 6 people, but there's no way you could use up 3 kohlrabis and 6 pears as a garnish. I mean, you've only got 450g of mousse. And that's a WHOLE PEAR EACH! Madness.
I think you'd struggle to stretch the mousse out to 6 people, and there'd be too much pickled kohlrabi, and too many candied walnuts.
So feel free to adjust the measures below accordingly.
Ingredients
Dill Oil- 130g of dill or wild garlic!
- 200g of vegetable oil
- 2g of salt
Candied Walnuts- 150g of walnuts
- 200g of caster sugar
- 500ml of water
- 4 star anise
Pickled Kohlrabi- 200g of kohlrabi, thinly sliced
- 36g of rapeseed oil
- 18g of Chardonnay vinegar
- 5g of flaky sea salt
- 2g of cane sugar
Cheese Mousse- 150g of aged Comté other cheeses are available
- 300g of whipping cream
- 2 bronze gelatine leaves
- 1g of flaky sea salt
Walnut Pesto- 100g of walnuts
- 3g of flaky sea salt try it with less
- 20ml of walnut oil
Pear and Walnut Dressing- 50ml of pear juice
- 20ml of sherry vinegar
- 100ml of walnut oil
- salt and pepper
Garnish- 3 about 1 kohlrabi
- 6 about 2 pears
- 400g about 100g of Comté cheese other cheeses are available, thinly sliced and cut into rounds
- mixed salad leaves, such as nasturtium, watercress or chicory
Dill Oil
For the dill oil, blend the dill with the vegetable oil and salt in a Thermomix at 62°C, or else in a regular blender until thoroughly blended.
Strain through a triple later of muslin, hanging in the fridge overnight.
Candied Walnuts
Begin by making the candied walnuts. Place the walnuts into a heatproof bowl.
Bring the sugar, water and star anise to the boil in a heavy saucepan. Simmer for 3–4 minutes then pour the syrup over the walnuts.
Let cool at room temperature until lukewarm then chill in the fridge overnight.
The next day, preheat the oven to 170°C fan.
Drain the walnuts from the syrup and place them onto a lined baking tray. Cook for 8–12 minutes until deep golden brown.
Set aside to cool at room temperature while you prepare the other components.
Pickled Kohlrabi
Whisk together the rapeseed oil, vinegar, salt and sugar until emulsified.
Pour the vinaigrette over the kohlrabi and compress in a vac pac machine or simply cover tightly. Chill in the fridge for 2 hours.
Cheese Mousse
Finely grate the cheese, then place it into a pan with the whipping cream.
Bring the cream up to 85°C, stirring to melt the cheese.
Bloom your gelatine in water. Once it's soft, remove it and squeeze out any excess water.
Add the gelatine to the cheese and cream mixture and whisk until smooth. Season with salt.
Pass the cream through a fine sieve and set in the fridge for at least 2 hours.
Once set, beat the mix with a spatula until light and creamy. Transfer to a piping bag and set aside until needed.
Walnut Pesto
While the cream cools, preheat the oven to 170°C fan.
Place the walnuts for the pesto onto a baking tray. Season with the sea salt and mix with half (10ml) the walnut oil.
Coarsely chop a quarter of the walnuts by hand. Set aside.
Pulse the remaining walnuts in a food processor while slowing adding the second half (10ml) of the walnut oil.
Combine the hand-chopped walnuts and walnut oil mixture together and set aside until needed.
Pear and Walnut Dressing
Whisk together all the dressing ingredients together with 100ml dill oil and season well with salt and freshly ground black pepper.
To Serve
Use a mandolin to thinly slice the pear and raw kohlrabi. Adam chooses to then cut the slices out into little stars as seen in the image above, but you can cut them into rounds if it's easier.
Cut the pickled kohlrabi into rounds or stars.
Pipe the cheese mousse onto a plate and create a well on top. Fill the well with the walnut pesto and top with the rounds of cheese.
Arrange the raw kohlrabi, pickled kohlrabi and pear over the mousse. It should be completely covered.
Finish with the dressing and serve with some crusty bread.
For the dill oil, blend the dill with the vegetable oil and salt in a Thermomix at 62°C, or else in a regular blender until thoroughly blended.
Strain through a triple later of muslin, hanging in the fridge overnight.
I used the same weight of wild garlic to make Wild Garlic Oil instead.
I don't think it quite matched the pear and walnut flavours as much as I imagine the dill would have. But it wasn't too bad.
It certainly looked the part.
I don't think it quite matched the pear and walnut flavours as much as I imagine the dill would have. But it wasn't too bad.
It certainly looked the part.
Candied Walnuts
Begin by making the candied walnuts. Place the walnuts into a heatproof bowl.
Bring the sugar, water and star anise to the boil in a heavy saucepan. Simmer for 3–4 minutes then pour the syrup over the walnuts.
Let cool at room temperature until lukewarm then chill in the fridge overnight.
The next day, preheat the oven to 170°C fan.
Drain the walnuts from the syrup and place them onto a lined baking tray. Cook for 8–12 minutes until deep golden brown.
Set aside to cool at room temperature while you prepare the other components.
These are really nice!
Pickled Kohlrabi
Whisk together the rapeseed oil, vinegar, salt and sugar until emulsified.
Pour the vinaigrette over the kohlrabi and compress in a vac pac machine or simply cover tightly. Chill in the fridge for 2 hours.
Days longer seems to be fine.
Cheese Mousse
Finely grate the cheese, then place it into a pan with the whipping cream.
Bring the cream up to 85°C, stirring to melt the cheese.
Bloom your gelatine in water. Once it's soft, remove it and squeeze out any excess water.
Add the gelatine to the cheese and cream mixture and whisk until smooth. Season with salt.
Pass the cream through a fine sieve and set in the fridge for at least 2 hours.
Once set, beat the mix with a spatula until light and creamy. Transfer to a piping bag and set aside until needed.
This didn't work well at all for me.
It all went fine, except for struggling to get the gelatin to dissolve, up until the chilling stage. At which point the mousse set like rubber. I used a fork and a palette knife to shred it up, then cream it as best I could, but it was a long way from being airy.
And piping was completely out of the question.
Perhaps I used too much gelatine? He doesn't specify the size or weight of his bronze leaves. Is that a standard measure?
Or perhaps the mousse isn't meant to be chilled for 2 days like mine, and is best whipped almost immediately?
I might try warming it up to serve.
You can't warm it up with directed heat without it separating into oil and cheese it seems,
but if you just leave it out to naturally come up to room temperature you can then beat it into something resembling a mousse.
I still wouldn't call it airy though.
Walnut Pesto
While the cream cools, preheat the oven to 170°C fan.
Place the walnuts for the pesto onto a baking tray. Season with the sea salt and mix with half (10ml) the walnut oil.
I'd suggest going a bit lighter on the salt.
Bake at 170°C for 10–12 minutes until deep golden brown, then remove from the oven.Coarsely chop a quarter of the walnuts by hand. Set aside.
Pulse the remaining walnuts in a food processor while slowing adding the second half (10ml) of the walnut oil.
Combine the hand-chopped walnuts and walnut oil mixture together and set aside until needed.
You can combine this walnut baking with the candied walnuts to save on oven-time. Don't get them mixed up though!
Pear and Walnut Dressing
Whisk together all the dressing ingredients together with 100ml dill oil and season well with salt and freshly ground black pepper.
To Serve
Use a mandolin to thinly slice the pear and raw kohlrabi. Adam chooses to then cut the slices out into little stars as seen in the image above, but you can cut them into rounds if it's easier.
Cut the pickled kohlrabi into rounds or stars.
Pipe the cheese mousse onto a plate and create a well on top. Fill the well with the walnut pesto and top with the rounds of cheese.
Arrange the raw kohlrabi, pickled kohlrabi and pear over the mousse. It should be completely covered.
I tried to reproduce Adam's star-cut arrangement and it works really well, though you have to fold some of the stars or use the pesto to build some mounds to get a proper 3-dimensional hedgehog appearance.
Place some nuggets of candied walnuts over the top and garnish with leaves and herbs of your choice.Finish with the dressing and serve with some crusty bread.
The candied walnuts are lovely! I think it might take a couple more goes to get the mousse and the balance of flavours exactly right, but it shows promise.
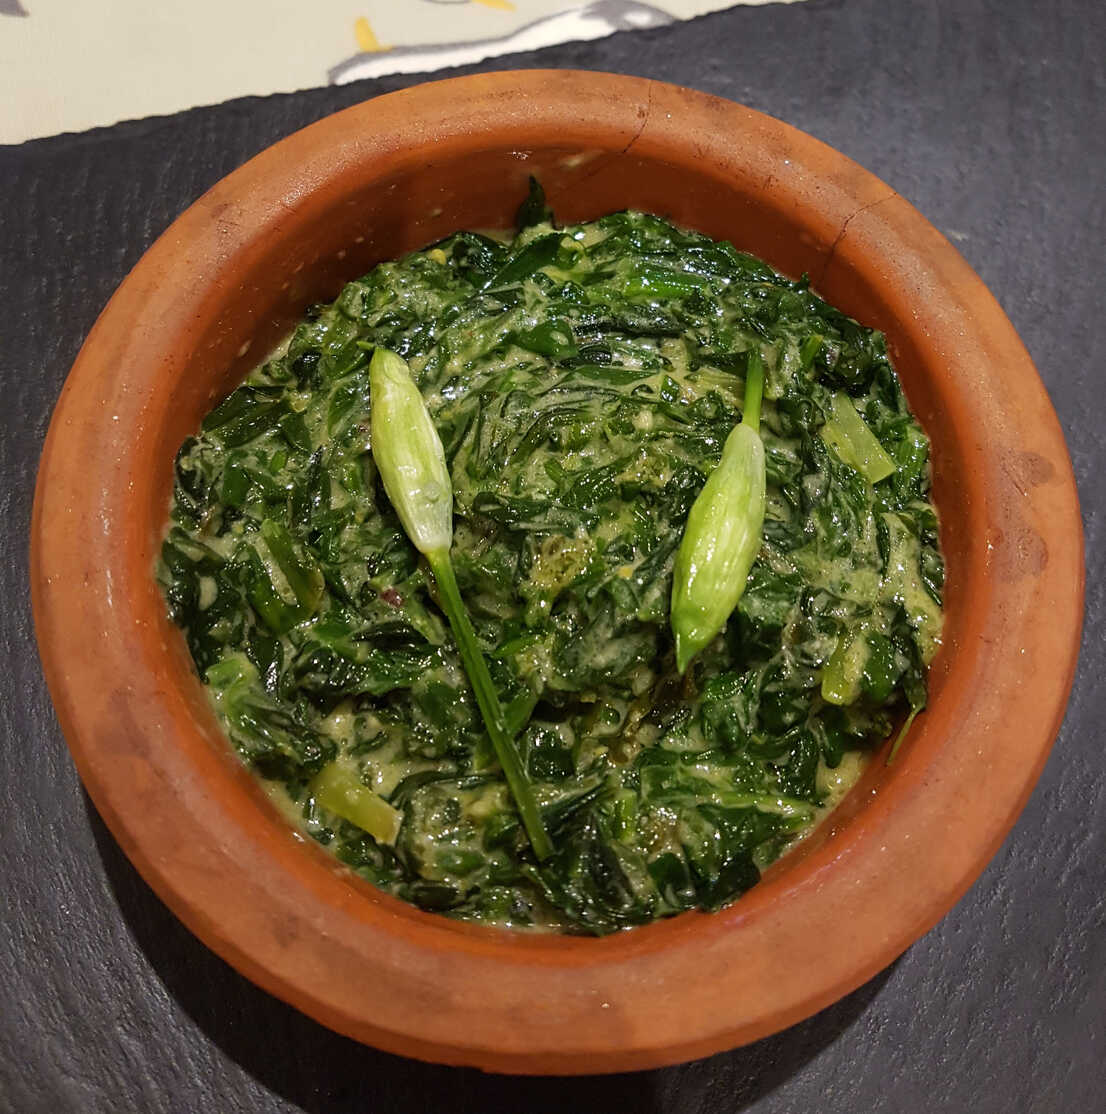
Wilted Spinach and Wild Garlic
veg side
A wonderful addition to my collection of wilted spinaches.
You could probably skip any of the flavourings if you prefer it without the cream, or the parmesan.
You could even miss out the wild garlic, but then it would be just another wilted spinach after all.
You could probably skip any of the flavourings if you prefer it without the cream, or the parmesan.
You could even miss out the wild garlic, but then it would be just another wilted spinach after all.
Serves 4
Ingredients
- 200g spinach
- 200g wild garlic leaves
- handful parsley leaves
- zest of 1 lemon
- juice of ½ lemon
- about 30g of butter
- ½-1 tsp ground nutmeg
- splash of double cream
- grated parmesan
- salt & pepper
Roughly chop the spinach and the wild garlic. Finely slice the parsley. Remove any massive stalks from all of these.
Melt a generous amount of butter in a large saucepan over a low heat, then throw in the chopped leaves and cover.
Stir occasionally until they have collapsed down, then uncover and turn up the heat a little.
When the excess liquid has cooked off, throw in the lemon zest and the nutmeg. Stir them through, then loosen with a splash of double cream and mix in the grated parmesan until it melts into a nice thick coating.
Season with salt & pepper, if required mine did not, drizzle with a squeeze of lemon juice, and serve.
Absolutely delicious.
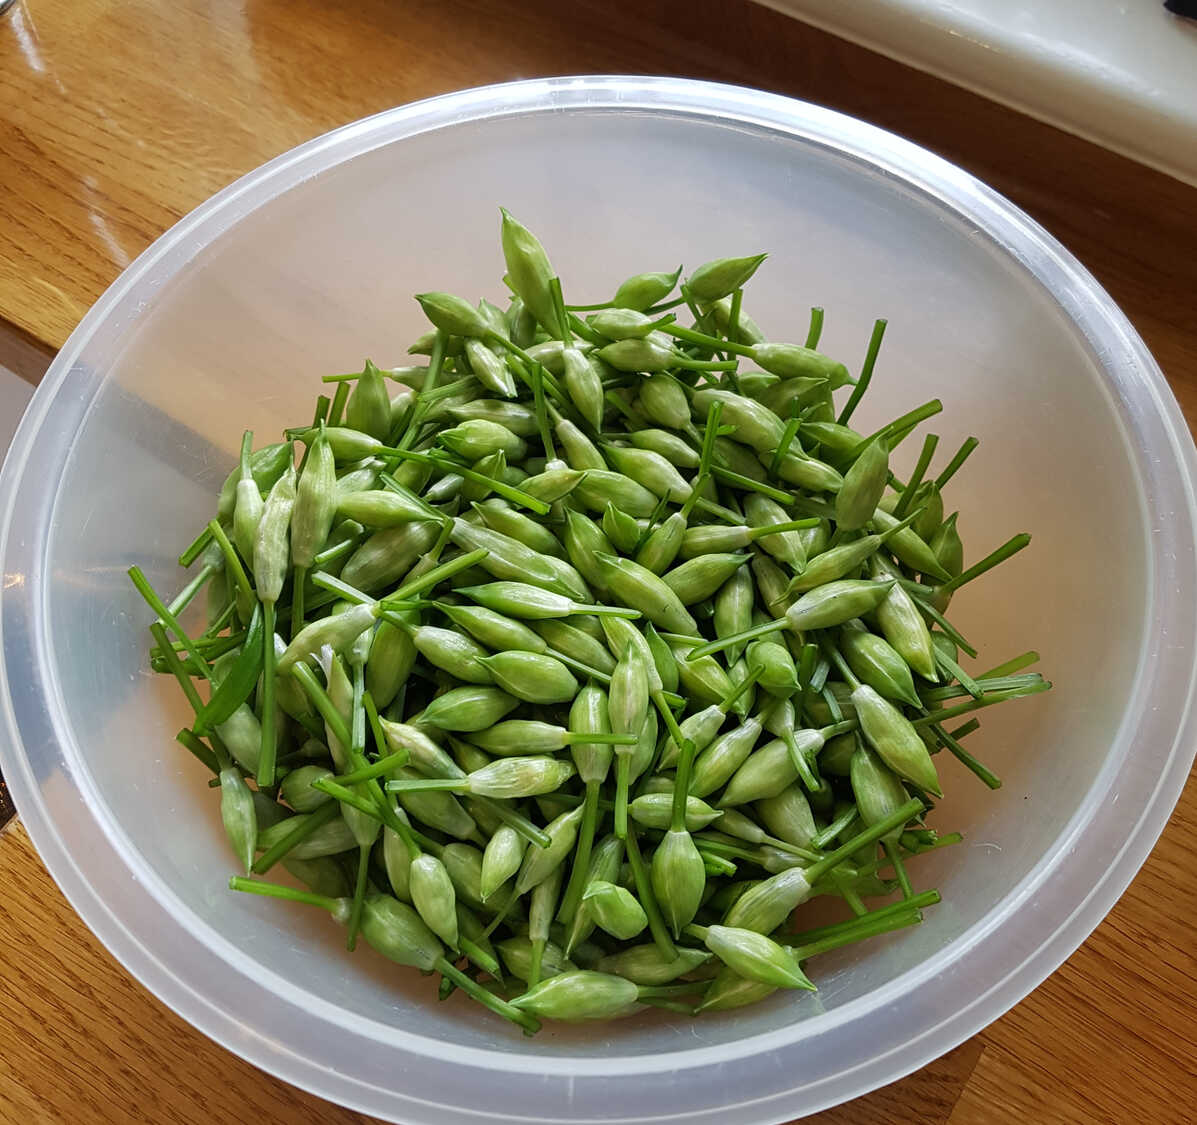
Pickled Wild Garlic Buds
veg vegan ingredient
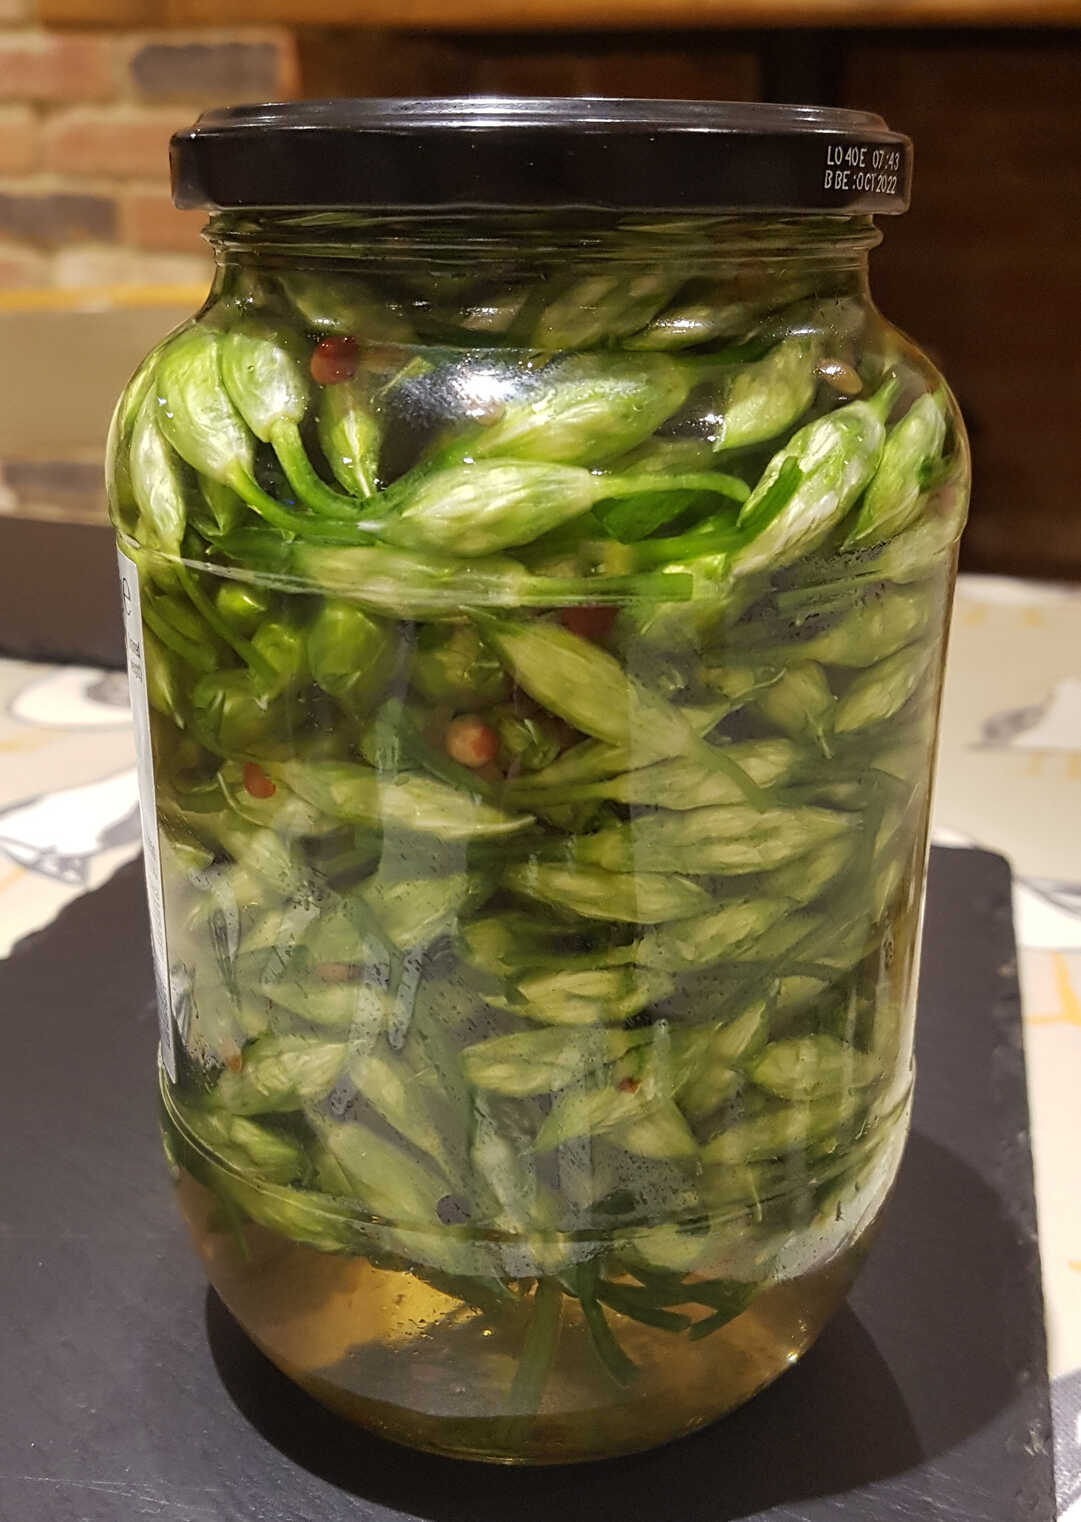
I pickled my buds using white wine vinegar in a ratio of 3:2:1 vinegar:water:sugar following a suggestion by Galloway Wild Foods.
They also recommend salting the buds first, which I did for a day or so, before pickling. It's supposed to intensify their flavour and contribute to softening them up, but most other sites skip it, so we'll just have to see I guess!
Flavour with whatever you like - I used mixed peppercorns and coriander seeds.
Makes a Big-Jar-Load
Ingredients
- 500g wild garlic buds
- 300g cider or wine vinegar
- 200g water
- 100g sugar
- red peppercorns, black peppercorns, coriander seeds, allspice
First pick your garlic buds.
Just before they all start to flower is the best time so they're plump and ripe. At this stage they should have started visibly pushing themselves out of the mass of garlic leaves. Don't wait too long though, I don't think it hurts to pick the buds a little early (they'll be there hiding under the leaves for weeks before they flower) and they do flower in only a day or two.
Put them in a bowl and scatter 2-3 teaspoons of salt flakes over them. Leave them for anything from a day to a week, turning them occasionally, and draining and re-salting if required. Wash the salt off and dry them before pickling.
Loosely pack the garlic buds into a jar and cover them with the vinegar mixture.
Just before they all start to flower is the best time so they're plump and ripe. At this stage they should have started visibly pushing themselves out of the mass of garlic leaves. Don't wait too long though, I don't think it hurts to pick the buds a little early (they'll be there hiding under the leaves for weeks before they flower) and they do flower in only a day or two.
Put them in a bowl and scatter 2-3 teaspoons of salt flakes over them. Leave them for anything from a day to a week, turning them occasionally, and draining and re-salting if required. Wash the salt off and dry them before pickling.
This step seems optional.
Make the vinegar mixture by mixing vinegar:water:sugar in the weight ratio 3:2:1 and heating until the sugar dissolves.
I used white wine vinegar. Cider vinegar would also be fine. Probably not malt vinegar.
Allow the mixture to cool.Loosely pack the garlic buds into a jar and cover them with the vinegar mixture.
They float enthusiastically, so you might need an insert of some kind to weight them down so they're all fully submerged.
Keep them in the fridge for a few days or a week before eating, for best results.
They may safely keep for 6 months.
I've yet to try my own ones, but other people's were delicious!
If you want to keep them for a long time it might be advisable to sterilise the jars, and even to pour boiling vinegar solution over the buds in the jars. We'll just have to see I guess 😉
If you want to keep them for a long time it might be advisable to sterilise the jars, and even to pour boiling vinegar solution over the buds in the jars. We'll just have to see I guess 😉
Chorizo Carbonara
meat pasta cheese
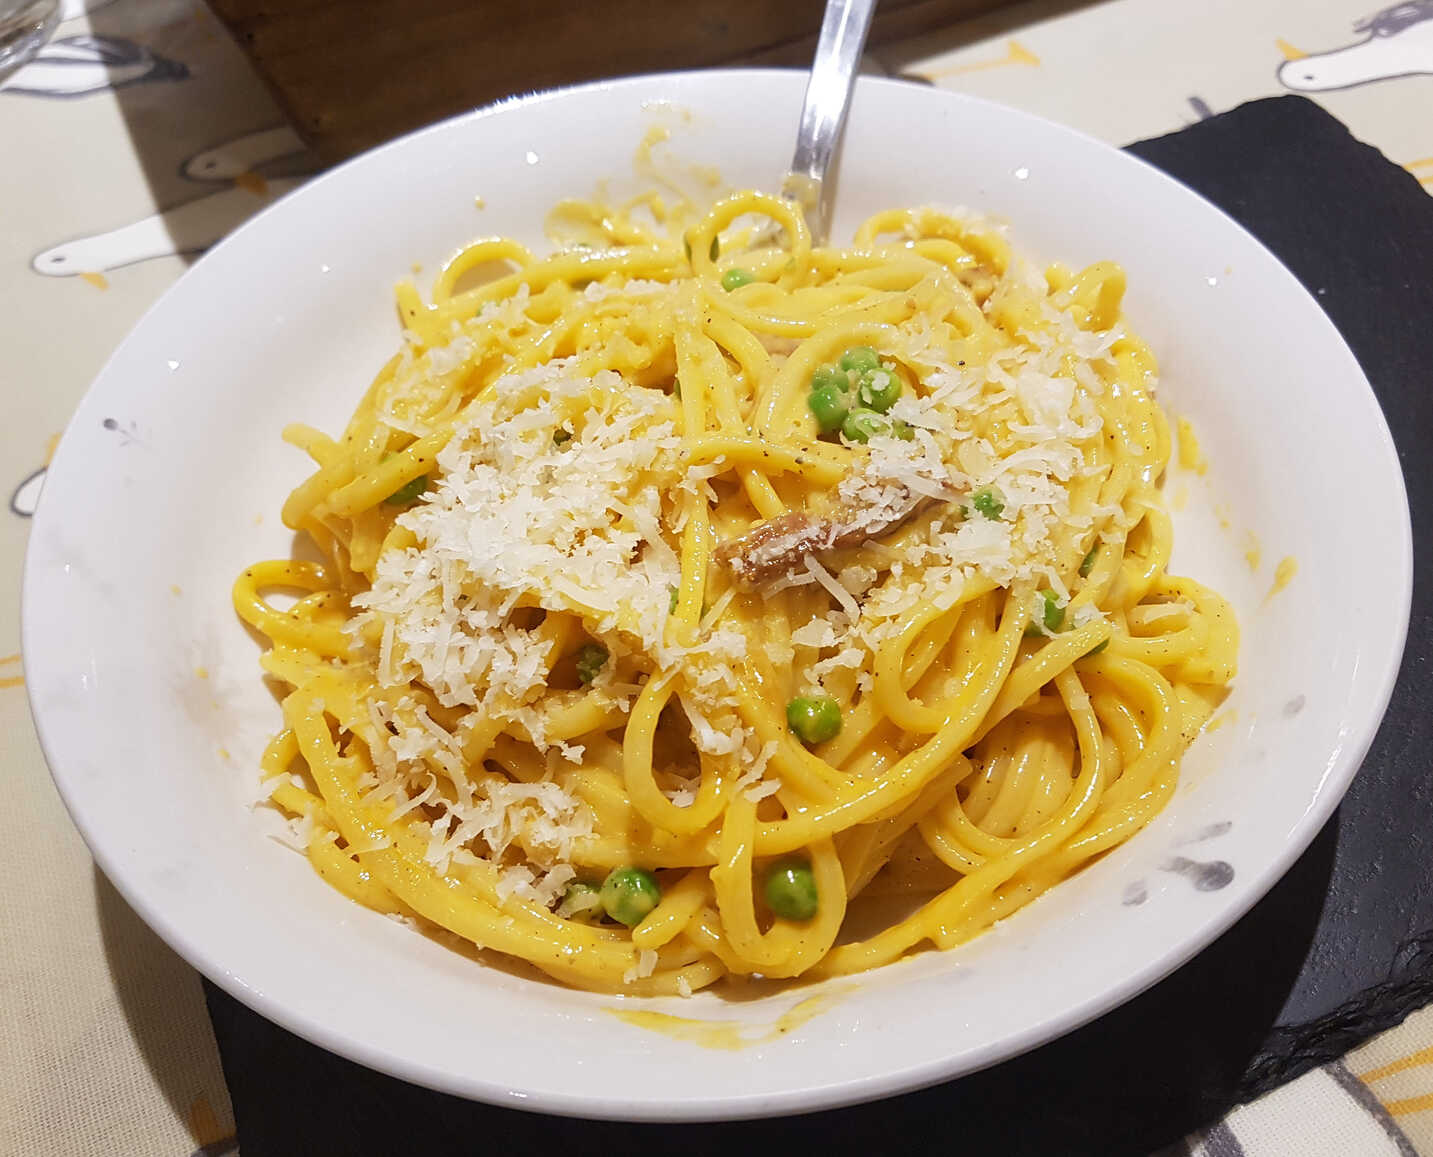
Hardlly authentic. But then neither is carbonara, arguably, and this does seem like a natural union.
I've seen a few online recipes for chorizo carbonara, but they mostly use fresh, mexican cooking chorizo which can just be crumbled in, rather than the cured spanish kind which must be sliced fairly thinly. They might work better I suppose.
You could also use some whole egg in with your yolks, but I think it's better with pure yolk.
Ingredients
- olive oil
- cured chorizo, chopped or julienned
- garlic, crushed
- smoked paprika
- black pepper
- parmesan, grated
- egg yolks
- frozen peas or possibly chopped spring onions
- pasta spaghetti, linguine, bucatini are good
Flavour Options:- couple tablespoons double cream
- lemon juice or sherry vinegar or balsamic vinegar
- splash of double cream
Mix the egg yolks and the grated parmesan.
Peel and chop or julienne the cured chorizo and sweat gently in olive oil in a large frying pan until it renders beautiful red fat and crisps just a little at the edges.
Add a generous amount of crushed garlic and a sprinkle of ground black pepper and smoked paprika and sweat the garlic until soft.
Meanwhile boil the pasta in a small quantity of salted water according to the packet instructions.
If the garlic is ready early, halt the cooking process with a ladleful of the pasta water. When the pasta is ready throw in handful of frozen peas or chopped spring onion if you remember, return to a boil, then scoop everything out or drain it, and add to the frying pan along with a ladle of cooking water and over a low heat toss to coat.
Add a couple of tablespoons of the pasta water to the eggs and cheese and mix through, then mix this through the pasta off the heat.
Return to a very low heat and toss or stir continuously until the sauce thickens and coats the pasta nicely, bearing in mind that the sauce will thicken further as it cools.
Season to taste.
Now you can finish the pasta with a splash of double cream, a sprinkle of sherry or balsamic vinegar, or a squeeze of lemon juice.
Whichever floats your boat.
Mama Mia that's a spicy carbonara!
Seriously though, it's a marked improvement on the regular carbonara which I still find dull and stodgy.
I went with both cream and sherry vinegar. The sour vinegar is quite a contrast and definitely adds to the character of the dish, even if I may have added a bit too much.
Wish I'd remembered to add the frozen peas though.
Pasta with Creamy Prawns and Chorizo
pasta fish meat
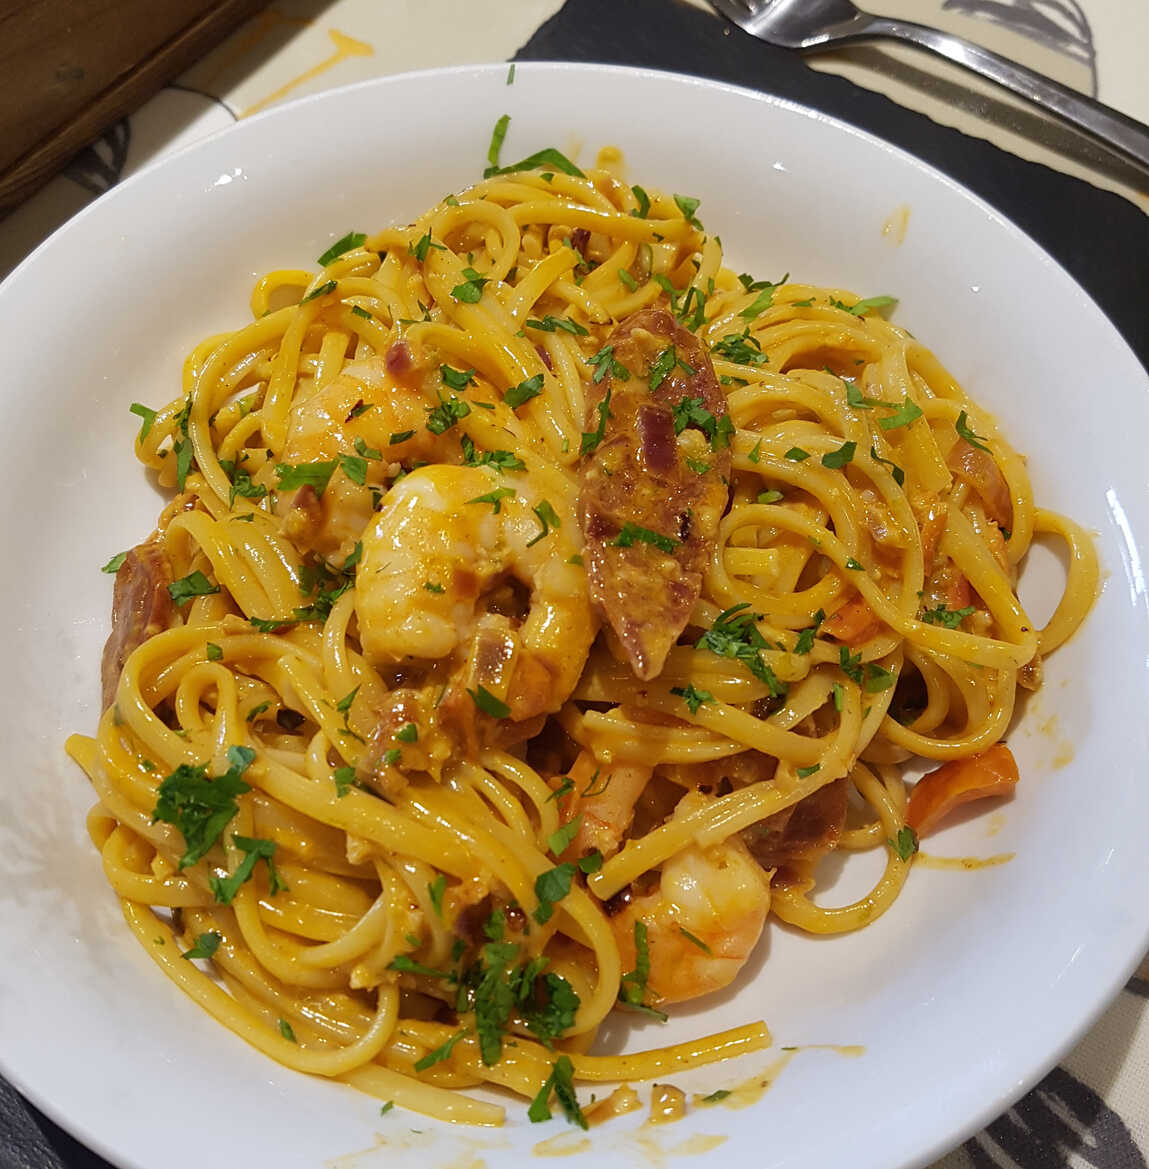
I took inspiration from Sarah Tuck, but drastically reduced the amount of chorizo she used.
You could substitute two or three tablespoons of mascarpone or sour cream for the double cream.
Or you could skip the dairy completely and replace it with a tablespoon of red wine vinegar.
Feel free to include some grated lime zest.
You could substitute two or three tablespoons of mascarpone or sour cream for the double cream.
Or you could skip the dairy completely and replace it with a tablespoon of red wine vinegar.
Feel free to include some grated lime zest.
Serves 2
Ingredients
- 250g pasta
- olive oil
- 16 king prawns, peeled, de-veined
- 90g chorizo, sliced
- 1 small red onion, or shallots, minced
- ¼-½ tsp chilli flakes
- ½ tsp paprika
- 4-6 cloves garlic
- 2 tomatoes or half a dozen cherry tomatoes, roughly chopped
- 100ml white wine
- 50ml double cream
- salt & pepper
Toppings:- squeeze of lime juice
- parsley, or basil, chopped
Peel the chorizo and slice it into prawn-sized rounds about the thickness of a pound coin.
Chop the onion or shallot quite finely.
Crush or mince the garlic.
Roughly chop the tomatoes: cut cherry tomatoes into eighths.
Heat olive oil until shimmering in a large frying pan and add the chilli flakes, and the prawns. Toss to fry them quickly, until red and opaque, but not overcooked, then scoop them in to a bowl.
Add the chorizo and the onion to the pan and stir fry over medium heat until they begin to colour, then add the garlic. Turn down the heat and sweat the garlic for a few minutes, then add the paprika and stir it through.
Meanwhile, start cooking the pasta according to the packet instructions until al dente.
Toss in the chopped tomatoes, then de-glaze the pan with the white wine, and bubble it off until reduced to a third.
Add the cream and stir through.
Scoop out the cooked pasta with tongs or a pasta spider and dump it into the frying pan, along with a splash or two of pasta water. Swirl and toss everything together until the pasta is well coated and finishes cooking. Add the prawns towards the end so they heat through. Season with salt and pepper. Finish with a squeeze of lime juice and half the chopped parsley or basil.
Serve immediately dressed with chopped herbs.
Pleasant.
Well. Were you busy making all those dishes. Whilst waiting for you delivery!
I was hungry just looking at those pasta dishes. Feed. Me. Pasta. Now!!!!!!
I have similar delivery woes. Waiting on my 2026 diary. I ordered it in June. So. I guess so long as it arrives before next year. But I have things to put in it!
#1 – 10 July, 2025 at 11:27 pm